http://www.weldingtipsandtricks.com/mig-like-tig.html
this weekly video is about trying to get that stacked dimes look on mig welds like ZTfab over at weldingweb.
Yes, its true that a stacked dime look means absolutely nothing when it comes to quality. But, I still want to learn how to do it.
Ever see that long thread called "mig like tig" ?
I tig like mig sometimes, and I can also mig like stick..ha ha. But have not quite mastered the Mig like Tig technique.
I am interested in photos and techniques , tips, settings, etc.
Lets figure this thing out together.
peace out,
Jody
Comments & questions on new & past videos

- admin
- Site Admin
-
Posts:
-
Joined:Mon Jun 01, 2009 8:54 am
-
Location:Atlanta, GA
-
Contact:

- Otto Nobedder
-
Weldmonger

-
Posts:
-
Joined:Thu Jan 06, 2011 11:40 pm
-
Location:Near New Orleans
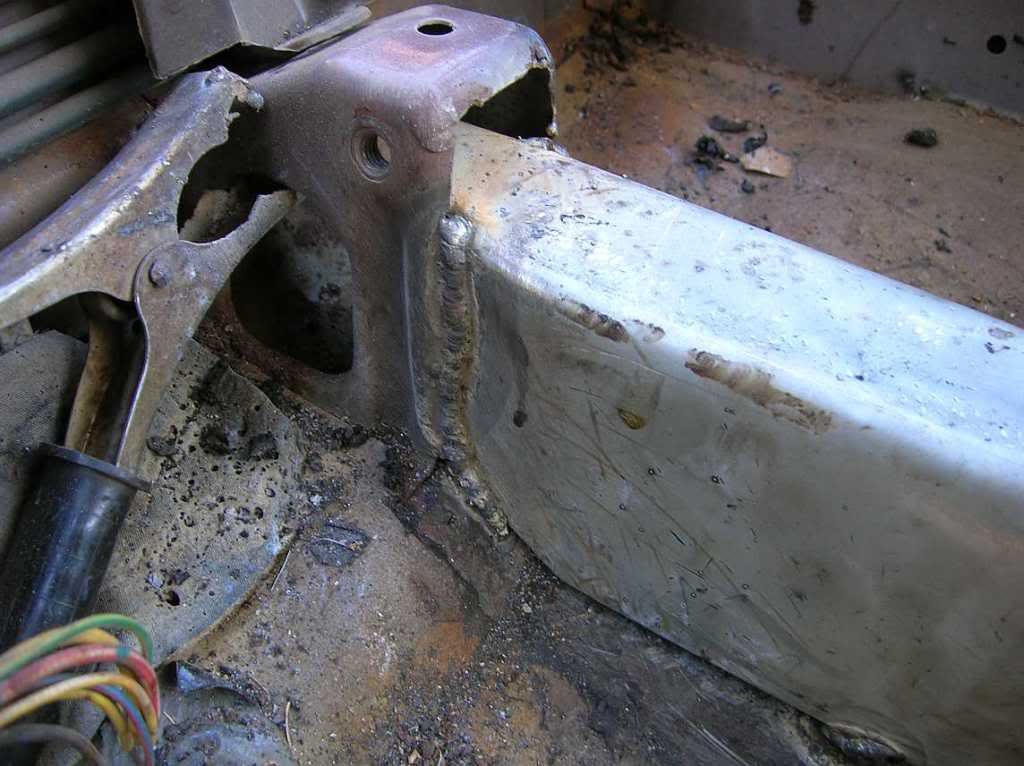
Like the outside corner in the foreground?
Is that the appearance you're referring to?
I realize it's not perfect... the parts were torch-cut freehand. I'm just referring to the "stacked' look.
Steve S
- GEDC0496.JPG (186.02 KiB) Viewed 6093 times
I realize it's not perfect... the parts were torch-cut freehand. I'm just referring to the "stacked' look.
Steve S
- Otto Nobedder
-
Weldmonger
-
Posts:
-
Joined:Thu Jan 06, 2011 11:40 pm
-
Location:Near New Orleans
The curved weld in the background is done uphill.
The foreground weld is downhand, done full open-corner. (1/4" material.) There's a decent horizontal, too, but the camera angle doesn't show much but the toes.
The foreground weld is downhand, done full open-corner. (1/4" material.) There's a decent horizontal, too, but the camera angle doesn't show much but the toes.
- admin
- Site Admin
-
Posts:
-
Joined:Mon Jun 01, 2009 8:54 am
-
Location:Atlanta, GA
-
Contact:
good work Steve. thats exactly what I am talking about.
Got any tips to share on how to make it happen?
jody
Got any tips to share on how to make it happen?
jody
- Otto Nobedder
-
Weldmonger
-
Posts:
-
Joined:Thu Jan 06, 2011 11:40 pm
-
Location:Near New Orleans
Thanks, Jody,
It's really the same advance-pause as in TIG, but the feed is automatic. The motion isn't as smooth as in TIG; It's a rapid move forward, about half the distance as the finished weld is wide, and pause while the puddle fills. On a downhand, I'll move slightly back into the puddle during the fill (dragging about 15*, so the arc-force is "up") until the edges/corners fill out. Propping is critical, but with the mass of a MIG gun to resist shaking and the ability to put both hands on the gun, an elbow is an adequate prop.
I've just been doing it reflexively, so it's hard to explain, if that makes sense. I have some coming up, and I'll pay attention. Maybe I can explain better.
Due to the nature of that project, it never occurred to me to take more pictures of the MIG... It seemed like an afterthought at that point.
Steve
- Otto Nobedder
-
Weldmonger
-
Posts:
-
Joined:Thu Jan 06, 2011 11:40 pm
-
Location:Near New Orleans
Yep
Like that!
Nicely done!
Can you describe your methods?
Like that!
Nicely done!
Can you describe your methods?
Agent Orange
- Agent Orange
-
New Member

-
Posts:
-
Joined:Thu Feb 14, 2013 12:58 am
Hey guys, I had a job for 2 years doing mig all day long and everyone loved the tig look. Ironically I quit that job to be a tig welder, so I don't have any pictures at the moment as I'm in aerospace now. But a few things were thicker wire, lower heat, and 70s-6 wire seemed to be more important because of the silicon that would freeze over the ripples and look sweet when you cleaned it off. As far as motion, there were 2 ways I came up with, one being sharper circles with a slight pause at the top and spacing them slightly further apart than normal. The second was a slight whip motion, like a 6010 rod, but much less drastic. If you "whip" it forward and then bring it back and pause, it will create "coins". The key is you have to space it just enough so the previous dime has time to partially solidify

Yup I am agreeing with all the above. I can get mig to look somewhat like the stack of coins look by doing a whip forward and come back to the edge of the previous puddle and pause. Not as good as tig but it usually looks perdy. Works best on a downhill joint or a flat tee or lap but I've been able to accomplish it in other positions as well.
Be the monkey....
echosixmike
- echosixmike
-
Workhorse

-
Posts:
-
Joined:Wed Feb 13, 2013 8:03 am
If you watch chuckE2009's HTP 2400 MIG video from a week or two ago, he seems to be getting a TIG like appearance using the "pulse" settings. Which seems to be for setting up consistant stitch welding but it looks pretty. S/F....Ken M
Red: PowerMIG 300, Square Wave 175
Blue: DEL200, Syncro250, XMT300
Green: STH160
Black: Tweco 181i Fabricator
Oddball: Craftsman HF unit
Blue: DEL200, Syncro250, XMT300
Green: STH160
Black: Tweco 181i Fabricator
Oddball: Craftsman HF unit
BDoubleU
- BDoubleU
-
Workhorse
-
Posts:
-
Joined:Thu Jan 03, 2013 10:23 am
-
Contact:
Good discussion and tips ...
Here's a pic of welds on a cup-car frame that were made by "pumping the trigger." They look nice, but I typically run hotter than this on my MIG welds - on the hairy edge of a spray transfer I still get a ripple pattern that looks nice, but what I'm really looking for is penetration - especially with a structural MIG weld. But hey, some things just have to be "good enough" and making it look "pretty" shows talent and craftsmanship.
Here's a pic of welds on a cup-car frame that were made by "pumping the trigger." They look nice, but I typically run hotter than this on my MIG welds - on the hairy edge of a spray transfer
- Brent Williams Nascar Frame MIG like TIG.jpg (26.51 KiB) Viewed 4028 times
weldfusion.com
watched your vid, good stuff.
my you tube comment:
There is no evidence a pretty weld makes the weld. I go ape with mig for that reason. there are soft metals and things to make beautiful..tig is the champ there. There are even places to keep ugly without beads..like an o2 sensor bung hole. that is a reading you want to hammer a frequency out of the hole not spinning in beautiful circles.
I'll attempt to post more than once every 3 years
Hmmmm, how do we know folks are really using a mig process and not actually tig? I think it's a conspiracy and until I actually witness someone doing "mig like tig" live or on video, I'll believe that it's really tig and one is claiming to be using mig. 
"Let's light the fire an' brief on guard.". RIP Lt. Col Stan "Red Dog" Nichols. USMC. Fighter Pilot. Korea, Vietnam. MCAS El Toro.
xd40packer
- xd40packer
-
New Member
-
Posts:
-
Joined:Thu Feb 14, 2013 2:33 pm
It is unfortunate that the average client is more concerned with the appearance of the weld than it's integrity. It's a damn shame when they ask you to grind a perfectly laid "work of art" because they want the piece to look finished. Only lousy welders grind their crap to hide their incompetence. After viewing today's video I just had to run out to the shop and play around myself. This is somewhat akin to painting with a brush and making it look like powder coating, I don't think it is possible.
Good thing most customers don't know the difference.
Happy Valentine's Day
Good thing most customers don't know the difference.
Happy Valentine's Day

- frederick flintstone
-
Active Member

-
Posts:
-
Joined:Thu Feb 14, 2013 3:25 pm
-
Location:mid michigan
For aluminum my MIG welder (Lincoln power MIG 350) has pulse on pulse mode that varies the cleaning action and makes TIG like welds easy, but only on aluminum.
http://www.lincolnelectric.com/assets/U ... /NX210.pdf
http://www.lincolnelectric.com/assets/U ... /NX210.pdf
one of my toys:
http://www.jeepforum.com/forum/f22/my-d ... tj-616304/
http://www.jeepforum.com/forum/f22/my-d ... tj-616304/
OMG Jody!!!! ZT has some great looking stuff and so does Zap, but if the integrity of the weld is good and it is functional it should also have a decent appearance too. The well manicured stack o dimes is a waste of time, is your paying customer willing to pay for art or do they want it welded so it won't brak again? I'm willing to bet that a well constructed and properly penetrated weldment can be done faster than all that pretty and time consuming art. At the end of the day how much more money are you going to pocket for art when you could have produced more and used less gas and wire possibly just doing good solid welds. I'm not taking anything away from ZT or Zap, but I need cash to pay bills and buy new toys. Those two have probably burned several thousand miles of wire in their lives and it just comes natural now, I believe it is a function of pure practice and proper technique. Ok, let the flaming begin...
Bob
Bob
flyingnunrt
- flyingnunrt
-
New Member
-
Posts:
-
Joined:Tue Oct 06, 2009 4:22 am
I'm not a pro welder nor much of a mig operator but I do do TIG
I noticed that you weld left to right in the video, would it work better if you welded right to left?
Which is the way I was taught to MIG weld.
ie the ripples forming on the cold side not the front side where it would be recieving the full force/heat of the arc.
Just my thoughts.
cheers
Tony
I noticed that you weld left to right in the video, would it work better if you welded right to left?
Which is the way I was taught to MIG weld.
ie the ripples forming on the cold side not the front side where it would be recieving the full force/heat of the arc.
Just my thoughts.
cheers
Tony

- weldin mike 27
-
Weldmonger
-
Posts:
-
Joined:Fri Apr 01, 2011 10:59 pm
-
Location:Australia; Victoria
Hey,
I agree with bob. Why take twice as long to acheive a certain "look" the may not add anything to the functionality of the job. Flicks and weaves have their place, as does stop start, but to weld a whole job that way to.make it look pretty? Seems a little silly to me. Sorry, Just
Mick my opinion.
I agree with bob. Why take twice as long to acheive a certain "look" the may not add anything to the functionality of the job. Flicks and weaves have their place, as does stop start, but to weld a whole job that way to.make it look pretty? Seems a little silly to me. Sorry, Just
Mick my opinion.
- Otto Nobedder
-
Weldmonger
-
Posts:
-
Joined:Thu Jan 06, 2011 11:40 pm
-
Location:Near New Orleans
I don't run any cooler, or take one second more, to leave an even ripple pattern, and properly done, it enhances penetration. When you advance to bare metal quickly with an established arc, you get the root penetration you need, and when you slowly bactrack toward the last "dime", you build "fill" on a barely solidified puddle, so scavenging is excellent. It's a sound practice for more than cosmetics, especially downhand where penetration can be questionable when the arc is always on the puddle.
My primary client insists that any repair weld be left "as is", except for spatter/slag, and the rounding of sharp edges on outside corners for paint adhesion. They can then see immediately where any repair is, and can roughly judge the quality of the weld by appearance.
Steve S
My primary client insists that any repair weld be left "as is", except for spatter/slag, and the rounding of sharp edges on outside corners for paint adhesion. They can then see immediately where any repair is, and can roughly judge the quality of the weld by appearance.
Steve S
- Otto Nobedder
-
Weldmonger
-
Posts:
-
Joined:Thu Jan 06, 2011 11:40 pm
-
Location:Near New Orleans
Actually, since I'm never challenged on my process choices at work, I prefer to weld mild steel with the same tri-mix I use for stainless...
Hotter arc, more penetration, far less spatter.
Doesn't seem to affect the "stacks", but increases my confidence in the quality of a weld I can't examine the back side of.
Steve S
Hotter arc, more penetration, far less spatter.
Doesn't seem to affect the "stacks", but increases my confidence in the quality of a weld I can't examine the back side of.
Steve S
Hello everyone .
Im also new here, just watched jodys video this morning and had a little go at work today . Tried to take pics but the batteries are dead in the camera , so I will try to post them tomorrow . Looking forward to chattin on the forum.
Billy.
Im also new here, just watched jodys video this morning and had a little go at work today . Tried to take pics but the batteries are dead in the camera , so I will try to post them tomorrow . Looking forward to chattin on the forum.
Billy.
- Otto Nobedder
-
Weldmonger
-
Posts:
-
Joined:Thu Jan 06, 2011 11:40 pm
-
Location:Near New Orleans
Billy and James,
Welcome, both!
I wish my work would put out for "pulse" features, on our TIG machines, in particular. I might sell that, eventually. They'll never buy pulsed-MIG.
Remember, pics can be uploaded directy with your post, but must be under 256K each (E-mail size on your camera).
Steve S
Welcome, both!
I wish my work would put out for "pulse" features, on our TIG machines, in particular. I might sell that, eventually. They'll never buy pulsed-MIG.
Remember, pics can be uploaded directy with your post, but must be under 256K each (E-mail size on your camera).
Steve S
Thanks Steve for the heads up on the pics , like you I wish my work would buy a pulsed mig but I know they wont, but unlike you I don't even have a tig at work though its not like I don't try . but I suppose we don't really need it for what we do .
Billy
Billy
Jump to
- Introductions & How to Use the Forum
- ↳ Welcome!
- ↳ Member Introductions
- ↳ How to Use the Forum
- ↳ Moderator Applications
- Welding Discussion
- ↳ Metal Cutting
- ↳ Tig Welding - Tig Welding Aluminum - Tig Welding Techniques - Aluminum Tig Welding
- ↳ Mig and Flux Core - gas metal arc welding & flux cored arc welding
- ↳ Stick Welding/Arc Welding - Shielded Metal Arc Welding
- ↳ Welding Forum General Shop Talk
- ↳ Welding Certification - Stick/Arc Welding, Tig Welding, Mig Welding Certification tests - Welding Tests of all kinds
- ↳ Welding Projects - Welding project Ideas - Welding project plans
- ↳ Product Reviews
- ↳ Fuel Gas Heating
- Welding Tips & Tricks
- ↳ Video Discussion
- ↳ Wish List
- Announcements & Feedback
- ↳ Forum News
- ↳ Suggestions, Feedback and Support
- Welding Marketplace
- ↳ Welding Jobs - Industrial Welding Jobs - Pipe Welding Jobs - Tig Welding Jobs
- ↳ Classifieds - Buy, Sell, Trade Used Welding Equipment
- Welding Resources
- ↳ Tradeshows, Seminars and Events
- ↳ The Welding Library
- ↳ Education Opportunities