Hey guys I got that mig like tig down
Machine is a Lincoln power mig 255 using .035 wire. C-25 and machine set at 18.4 and 214 like z says its a slower movement.
Comments & questions on new & past videos
Jrsmotorsports
- Jrsmotorsports
-
New Member

-
Posts:
-
Joined:Sat Feb 16, 2013 9:52 am
- Attachments
-
- image.jpg (204.55 KiB) Viewed 3097 times
-
- image.jpg (213.97 KiB) Viewed 3097 times
Jrsmotorsports
- Jrsmotorsports
-
New Member
-
Posts:
-
Joined:Sat Feb 16, 2013 9:52 am
I found moving torch further forward like say twice as far as you would usually move it,then let it puddle then move.
I will try a video.
I will try a video.
Ed Joskow
- Ed Joskow
-
New Member
-
Posts:
-
Joined:Fri Feb 15, 2013 1:37 pm
-
Location:New York City, NY
Jody,
I think I have an answer for you. Until two years ago, I thought welding skills at Nassau County BOCES. one of the techniques I would teach the more advanced students was a "manually controlled stitch weld" welding steel using .035 wire with 25/75 Argon/C02 as a shielding gas. The model or manufacturer of the welding equipment is irrelevant.
First form a starting puddle as you would performing any Mig operation. Once a puddle/bead is formed release the trigger. Reposition the gun at the trailing edge of the previous puddle/bead. (The size of the first puddle/bead will set the pattern for the entire weld, keep the following beads the same size). Again press the trigger forming the next puddle/bead and continue this process the entire length of the weld.
*IMPORTANT* don't let the previous puddle cool before starting on the next one... Solidify yes, cool NO. It should still be
glowing red when starting the next bead...
*As a starting point, three beads every two seconds.... As you practice this technique you will developer your own rhythm.
The same goes for the spacing or length of the beads. This is all a matter of esthetics.
*i do not recommend this technique where critical weld strength or integrity is needed. Although I have never had one of these welds fail. I have never used this technique ON ANY JOINT that was exposed to great stresses. There, D1.1 takes center stage.


- Otto Nobedder
-
Weldmonger

-
Posts:
-
Joined:Thu Jan 06, 2011 11:40 pm
-
Location:Near New Orleans
But...
I'm not certified in the J-B process... And it doesn't meet the WPS!

Steve S
I'm not certified in the J-B process... And it doesn't meet the WPS!
Steve S

- weldin mike 27
-
Weldmonger
-
Posts:
-
Joined:Fri Apr 01, 2011 10:59 pm
-
Location:Australia; Victoria
Ba dum tish.... Champagne Comedy. lol
Mick
Mick
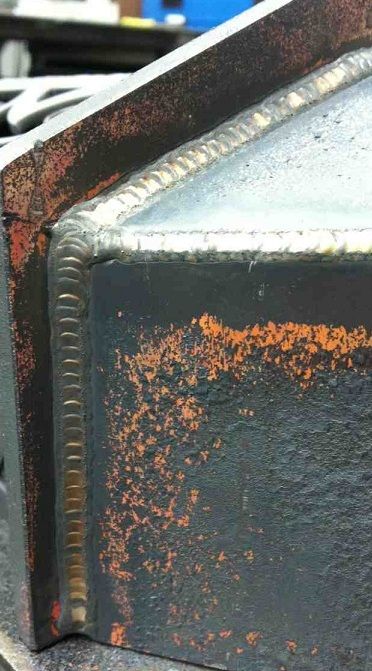
This is a section for a weight lifting plate holder I am making using my Lincoln Electric 180 MIG welder. Still learning how to weld, not sure if this is the best or not. If Jody is correct in his assumptions, its possible this was done too cold. What you see is a T-joint, using .035 with 25/75 gas. Settings were on the "letter/number" the MIG welder called for for welding 1/8" steel. I used a series of cursive "E."
- Attachments
-
- MIGlikeTIG.JPG (195.69 KiB) Viewed 2697 times
- Otto Nobedder
-
Weldmonger
-
Posts:
-
Joined:Thu Jan 06, 2011 11:40 pm
-
Location:Near New Orleans
I agree you were a little cold.
Looks good, but the shadow at the bottom of the bead in the pic gives away that you could have used more heat.
Technique is solid. Just get a bit hotter.
Steve S
Looks good, but the shadow at the bottom of the bead in the pic gives away that you could have used more heat.
Technique is solid. Just get a bit hotter.
Steve S
dieselfitter
- dieselfitter
-
New Member
-
Posts:
-
Joined:Mon Feb 18, 2013 12:18 pm
just a thought but maybe he is using a stitch attachment to give a brief pause and then weld another puddle. I used this doing welds on thin material to avoid warping and keep the heat transfer low. The other possibility is to pulse the trigger and lay one bead on top of the other . just my 2 cents worth.
This is a very interesting and informative site and your videos are very good. I also like your casual approach to the welding processes shown, makes us all feel were welcome to contribute.
This is a very interesting and informative site and your videos are very good. I also like your casual approach to the welding processes shown, makes us all feel were welcome to contribute.
dieselfitter wrote:just a thought but maybe he is using a stitch attachment to give a brief pause and then weld another puddle. I used this doing welds on thin material to avoid warping and keep the heat transfer low. The other possibility is to pulse the trigger and lay one bead on top of the other . just my 2 cents worth.
This is a very interesting and informative site and your videos are very good. I also like your casual approach to the welding processes shown, makes us all feel were welcome to contribute.
Have you read ANY of this thread?
Particularly the parts where I explain how I do this technique and point out that I do NOT use any pulsing, triggering, spot/stitch timers, or special machines?
This is where I get frustrated...what good does it do to provide the information if people are going to continue to gloss over it and just guess at how it's done?
Oh well...break time is over. Back to welding my 1/4" copper parts...BTW, if anyone feels the earth shift off it's axis today it's probably just the gyroscopic influence from my electrical meter while I'm welding. I've got my syncrowave turned up to "11".
- weldin mike 27
-
Weldmonger
-
Posts:
-
Joined:Fri Apr 01, 2011 10:59 pm
-
Location:Australia; Victoria
Hey,
Dont stress too much, People will always say what they think rather than thinking what they say. Oh and lol, id say that copper would take some juice.
Mick
Dont stress too much, People will always say what they think rather than thinking what they say. Oh and lol, id say that copper would take some juice.
Mick
Not really stressing over it, Mick.
I just find it difficult to have a discussion when the facts are ignored.
It's like everyone is raising their hand to be the kid in the classroom with the best answer but they're all failing to see the answer has already been written on the chalkboard.
...and yes, the copper parts put my Syncrowave 250 to the test but she always performs.
I can't show the whole part due to my non-disclosure contract but here is a small shot. This is 11ga (.125") to 1/4" copper. Welded with silicon-bronze..machine set to 310A on DCEN, pedal at full tilt.
The parts look really rough right after welding but are scotch-brited back to bare copper then a custom patina is applied.

- admin
- Site Admin
-
Posts:
-
Joined:Mon Jun 01, 2009 8:54 am
-
Location:Atlanta, GA
-
Contact:
Hey Paul,
Thanks for jumping in and posting some pics as well as good info. I will just go ahead and say that I am in awe of your work.
I know what it takes as far as prep, planning, sequencing, visualizing where stops and starts will be, executing, etc . to get a finished product to look like yours does. I know it aint easy.
I tip my hat.
thanks for posting and engaging the members here.
Jody Collier - weldingtipsandtricks.com
- weldin mike 27
-
Weldmonger
-
Posts:
-
Joined:Fri Apr 01, 2011 10:59 pm
-
Location:Australia; Victoria
Hey,
Its all good. I like to explain things in detail as well as the way I do it, but people will always do it their own way. Its just the ones who cant figure out why their way didnt work are the prob.
Mick
Its all good. I like to explain things in detail as well as the way I do it, but people will always do it their own way. Its just the ones who cant figure out why their way didnt work are the prob.
Mick
admin wrote:Hey Paul,
Thanks for jumping in and posting some pics as well as good info. I will just go ahead and say that I am in awe of your work.
I know what it takes as far as prep, planning, sequencing, visualizing where stops and starts will be, executing, etc . to get a finished product to look like yours does. I know it aint easy.
I tip my hat.
thanks for posting and engaging the members here.
Jody Collier - weldingtipsandtricks.com
Thanks Jody.
The feeling is definitely mutual and I appreciate the time you spend making these videos so that we can all learn. I enjoy watching them.
- Paul Brinegar
Hey Jody, this is Sam from Australia, i have been receiving your weekly videos for a while and love them. Very informative, thank you. I would like to share my experience with trying to get that stack of dimes look with mig. Recently i had been practicing for my mig certification test, but was having trouble with my vertical up weld. The weld was a fillet on 12mm plate, with a 6mm root pass and a capping pass over it to a total of 10mm. The root pass was a christmas tree weave technique, but could not get good penetration. If i turned the heat up, i would get the penetration, but also got a very lumpy weld, turning the heat down got me a nice looking flat beaded weld (root pass), but very little penetration. It was suggested to me to manually pulse the root pass. Firstly i would need to increase the heat (amps and volts) to nearly double than that i was using with my weave pass. Next i experimented with pulse time. (the length of time squeezing the trigger), once i had found a happy medium with heat and time, i just proceeded laying a series of pulses (or tacks) overlapping each tack with the next by half. Even though i was travelling uphill, i got a flat stack of dimes looking weld, with extremely good penetration. (checked by doing a destructive fillet break test). My only concern with turning the amps and volts down, and weaving to achieve that look, is that the weld may suffer from lack of fusion, which is a common problem with mig. I'm sorry i don't have photos at this stage, but ill try to get some.
Cheers mate,
Sam.
Cheers mate,
Sam.
- weldin mike 27
-
Weldmonger
-
Posts:
-
Joined:Fri Apr 01, 2011 10:59 pm
-
Location:Australia; Victoria
Hey Mate,
Welcome to the forum. Im from Aus too.
A trick they taught us at tafe for Vert up mig fillet was to turn the wire speed.down , untill the arc gets a little more 'hissy' than 'bacony' (sorry) This lets the volts do the work of burning in without the worry of lack of fusion from too much wire. You need to be a little more carefull of undercut, but thats a technique thing. I used a straight up and down and pause for the root and a straight side to side weave on the cap. Go alittle up in the middle of the cap to.compensate for the sag. Imagine a stack of frowny mouths. ((((((((((((( Like that but vertical of course.
Mick
- Otto Nobedder
-
Weldmonger
-
Posts:
-
Joined:Thu Jan 06, 2011 11:40 pm
-
Location:Near New Orleans
All right, this didn't work quite as intended... I hadn't considered that I'd be welding 5/16 stainless in place, so it's not a stack of dimes at the heat I was running, and the TIG was done on the bench, walking the cup...
I'll have to put up a side-by-side bench comparison of something with similar heats and NOT walk the cup...
Steve S
- GEDC0617.JPG (172.08 KiB) Viewed 3394 times
Steve S
I personally put larger pearls in a weld using technique, and less about wire speed or amps/volts.
I've done it on heavy work wayyyy up in the amperage with spray transfer. Sometimes it's just not possible to to a real heavy stacked look because everything is so hot.
The 'secret' is allowing the previous puddle to solidify enough that you can wash part of the new one over it. This also helps tie in the toes and makes everything fuse nicely.
I'm sure the stacked technique can be achieved using any letter of the alphabet, but I personally use a step and back then 'C' motion.
Something like:
C←•--C←•--C←•--C←•--C←•--
Where the bullet point denotes a pause in the root (slightly ahead of the puddle), with a rapid washing movement with the arc for the 'C', and quickly forward again deep into the root for the new deposition and cooling of the previous puddle.
In "shop talk": "It's a step and pause technique with a fancy C shaped back wash to plant a pearl stacked on the previous pearl."
Hope this helps some newbs and maybe some non-newbs.
Now for the REAL challenge! A stacked look using a Lincoln AC tombstone with 7018 (not 7018AC).
- Otto Nobedder
-
Weldmonger
-
Posts:
-
Joined:Thu Jan 06, 2011 11:40 pm
-
Location:Near New Orleans
Welding porn? That would be something! (Not sure what, but certainly "something".) The lead character in "Flashdance" was a welder, after all.ZTFab wrote:Well, I hope Jody doesn't try to make a video of that!!weldin mike 27 wrote:hey,
...and F#%^ like a P#$n Star.....No offense intended.
Mick
I forgot to take a picture of a weld today I was going to call "TIG like Stick". It was a back-weld on a mig-welded joint that didn't have complete penetration (damn fitter... oh, wait, that was me). Couldn't get the mig gun in there, so TIGged it in tight quarters in a real awkward position and bad visibility. I saw it out in the sun today, and it looked for all the world like 7018. Even had little silicon islands drawn from the -s6 on the front side, and borderline undercut on the high side of the toes.
Steve S
- weldin mike 27
-
Weldmonger
-
Posts:
-
Joined:Fri Apr 01, 2011 10:59 pm
-
Location:Australia; Victoria
Hey,
I removed my post about doing you know what. It belonged in a bar not here. Sorry.
Mick
I removed my post about doing you know what. It belonged in a bar not here. Sorry.
Mick
BDoubleU
- BDoubleU
-
Workhorse

-
Posts:
-
Joined:Thu Jan 03, 2013 10:23 am
-
Contact:
GREAT discussion everyone! All the posts, pics and ideas are awesome ... and we were fortunate enough to have ZT provide input on his technique for producing welds with that appearance.
This thread was becoming very long ... so we have closed it from further posts. Remember, there are many creative techniques that will "get the job done." The trick is, to know them all
Thanks to everyone who posted on this thread!!!
This thread was becoming very long ... so we have closed it from further posts. Remember, there are many creative techniques that will "get the job done." The trick is, to know them all
Thanks to everyone who posted on this thread!!!
weldfusion.com
Jump to
- Introductions & How to Use the Forum
- ↳ Welcome!
- ↳ Member Introductions
- ↳ How to Use the Forum
- ↳ Moderator Applications
- Welding Discussion
- ↳ Metal Cutting
- ↳ Tig Welding - Tig Welding Aluminum - Tig Welding Techniques - Aluminum Tig Welding
- ↳ Mig and Flux Core - gas metal arc welding & flux cored arc welding
- ↳ Stick Welding/Arc Welding - Shielded Metal Arc Welding
- ↳ Welding Forum General Shop Talk
- ↳ Welding Certification - Stick/Arc Welding, Tig Welding, Mig Welding Certification tests - Welding Tests of all kinds
- ↳ Welding Projects - Welding project Ideas - Welding project plans
- ↳ Product Reviews
- ↳ Fuel Gas Heating
- Welding Tips & Tricks
- ↳ Video Discussion
- ↳ Wish List
- Announcements & Feedback
- ↳ Forum News
- ↳ Suggestions, Feedback and Support
- Welding Marketplace
- ↳ Welding Jobs - Industrial Welding Jobs - Pipe Welding Jobs - Tig Welding Jobs
- ↳ Classifieds - Buy, Sell, Trade Used Welding Equipment
- Welding Resources
- ↳ Tradeshows, Seminars and Events
- ↳ The Welding Library
- ↳ Education Opportunities