
Kent
Tig welding tips, questions, equipment, applications, instructions, techniques, tig welding machines, troubleshooting tig welding process


Mikechallgren
- Mikechallgren
-
Active Member

-
Posts:
-
Joined:Thu Jul 17, 2014 10:25 pm
-
Location:Van Nuys, California
Here is one of my airplanes made from welding wire.
- Attachments
-
- F4U Corsair
- image.jpg (61.13 KiB) Viewed 2099 times
Mike the wire airplane guy http://www.wiresculptor.net
Mikechallgren
- Mikechallgren
-
Active Member
-
Posts:
-
Joined:Thu Jul 17, 2014 10:25 pm
-
Location:Van Nuys, California
- image.jpg (65.34 KiB) Viewed 2101 times
- Attachments
-
- I love aviation...
- image.jpg (76.13 KiB) Viewed 2101 times
-
- image.jpg (66.5 KiB) Viewed 2101 times
Mike the wire airplane guy http://www.wiresculptor.net


newschoppafowah
- newschoppafowah
-
Workhorse

-
Posts:
-
Joined:Wed Feb 19, 2014 11:54 pm
Mikechallgren,
That is very neat stuff. Time consuming, precise and an excellent finished product. Hats off.
Run down a bit about how you do it, if you would. Forming the wire, size of the O/A tip, anything you want to share.
WW2 aircraft is a big interest of mine, got me through 3 years of history without having to write about anything that bored me.
Post up more of your work, I'd love to see an F6 Hellcat or a Dauntless. The Shiden Kai was an interesting plane too, but that's obviously on the other team
Sent from an earthen ditch outside Needles, CA using an awful lot of low voltage single strand wire.
It's a matter of flour and water and then there's the seasonings, which is a matter of salt and so forth and then you h-we interrupt this for the announc
It's a matter of flour and water and then there's the seasonings, which is a matter of salt and so forth and then you h-we interrupt this for the announc

That is nice
the gallery shows your ability
Like to see more
the gallery shows your ability
Like to see more
Everlast 250EX
Miller 250 syncrowave
Sharp LMV Vertical Mill
Takisawa TSL-800-D Lathe
Coupla Bandsaws,Grinders,surface grinder,tool/cutter grinder
and more stuff than I deserve(Thanks Significant Other)
Miller 250 syncrowave
Sharp LMV Vertical Mill
Takisawa TSL-800-D Lathe
Coupla Bandsaws,Grinders,surface grinder,tool/cutter grinder
and more stuff than I deserve(Thanks Significant Other)
Ditto. More info, please! I'm very interested to hear how you form the parts, and your technique for welding them.newschoppafowah wrote:Mikechallgren,
That is very neat stuff. Time consuming, precise and an excellent finished product. Hats off.
Run down a bit about how you do it, if you would. Forming the wire, size of the O/A tip, anything you want to share.
I've done two wireframe projects, and had good success with fusion welds down to 1/16" with ER70S2 rod, but 0.045" had a high failure rate (it's got a very narrow range between plastic and liquid, and getting a joint without it balling up is tough). I had better luck at that gauge with a springy piano wire alloy; however, it became very brittle after welding. When I got into TIG, I never expected to be pulse welding at 6-7 amps to control the heat!
Cheers,
Richard
Grinding discs... still my #1 consumable!

Awesome as usual!!!zank wrote:
Matt S by Zanconato Custom Cycles, on Flickr
Matt S by Zanconato Custom Cycles, on Flickr
Sick of working while sick this week. Got off work today and wanted to practice on something other than tube. Remembered pics of metal dice and decided to try it. After dinner after a couple hours of cutting, grinding and welding. Not perfect, too tired to be perfect.
3" +/- cube with 1/8" CRS plate
1/16" 2% lanth
1/16 filler rod
75 amps with foot pedal

Last edited by jcw on Sun Aug 10, 2014 12:28 am, edited 1 time in total.

- Superiorwelding
-
Weldmonger

-
Posts:
-
Joined:Thu Jan 24, 2013 10:13 pm
-
Location:Eddy, TX
Jcw,
Looks fine for what it is. Are you going to smooth the welds out? I have seen some that way and they were nice. Of course so do the ones with the welds. I have always wanted to do a set out of SS and alum but never have....yet.
-Jonathan
Looks fine for what it is. Are you going to smooth the welds out? I have seen some that way and they were nice. Of course so do the ones with the welds. I have always wanted to do a set out of SS and alum but never have....yet.
-Jonathan
Instagram- @superiorwelding/@learntotig
Twitter- @_JonathanLewis
https://www.learntotig.com
https://www.superiorweldandfab.com
https://www.youtube.com/+SuperiorWeldin ... ATHANLEWIS
Twitter- @_JonathanLewis
https://www.learntotig.com
https://www.superiorweldandfab.com
https://www.youtube.com/+SuperiorWeldin ... ATHANLEWIS
- IMG_20140812_152443.jpg (48.45 KiB) Viewed 2104 times
- IMG_20140812_152443.jpg (48.45 KiB) Viewed 2104 times
- IMG_20140812_152443.jpg (48.45 KiB) Viewed 2104 times
- Attachments
-
- IMG_20140812_152746.jpg (76.81 KiB) Viewed 2104 times
-
- IMG_20140812_152819.jpg (51.17 KiB) Viewed 2104 times

- Otto Nobedder
-
Weldmonger
-
Posts:
-
Joined:Thu Jan 06, 2011 11:40 pm
-
Location:Near New Orleans
Okay, no welds to present in this picture, but I wasn't able to include all the equipment in one shot, and I'm the only one working on this particular job...
Too much going on...
Steve S
- GEDC1480.JPG (226.49 KiB) Viewed 2071 times
Steve S
Some 316L Sanitary Pipe... This run is only around 80ft total
- Attachments
-
- Maxstar 150sth with stubby gas lens
- IMG_20140813_145229932.jpg (36.55 KiB) Viewed 2048 times
-
- Purged Inside
- IMG_20140813_195049169.jpg (37.7 KiB) Viewed 2048 times
I weld stainless, stainless and more stainless...Food Industry, sanitary process piping, vessels, whatever is needed, I like to make stuff.
ASME IX, AWS 17.1, D1.1
Instagram #RNHFAB
ASME IX, AWS 17.1, D1.1
Instagram #RNHFAB
Another weird leaning post/seat. It flips, it folds, it stores stuff. Tedious bits of engineering/fitting, at any rate. The back rest is removable and the seat itself will flip all the way onto the steering wheel so that they can take a nap on the 'bunk' cushion. They are out gator hunting on this boat all night sometimes so they take turns snoozing.

Poling platform for the same boat. Gee, can you fit anything else on the back there, buddy?

Poling platform for the same boat. Gee, can you fit anything else on the back there, buddy?
Miller ABP 330, Syncrowave 250, Dynasty 300 DX.
Honorary member of the Fraternity of Faded Tee Shirts.
Honorary member of the Fraternity of Faded Tee Shirts.
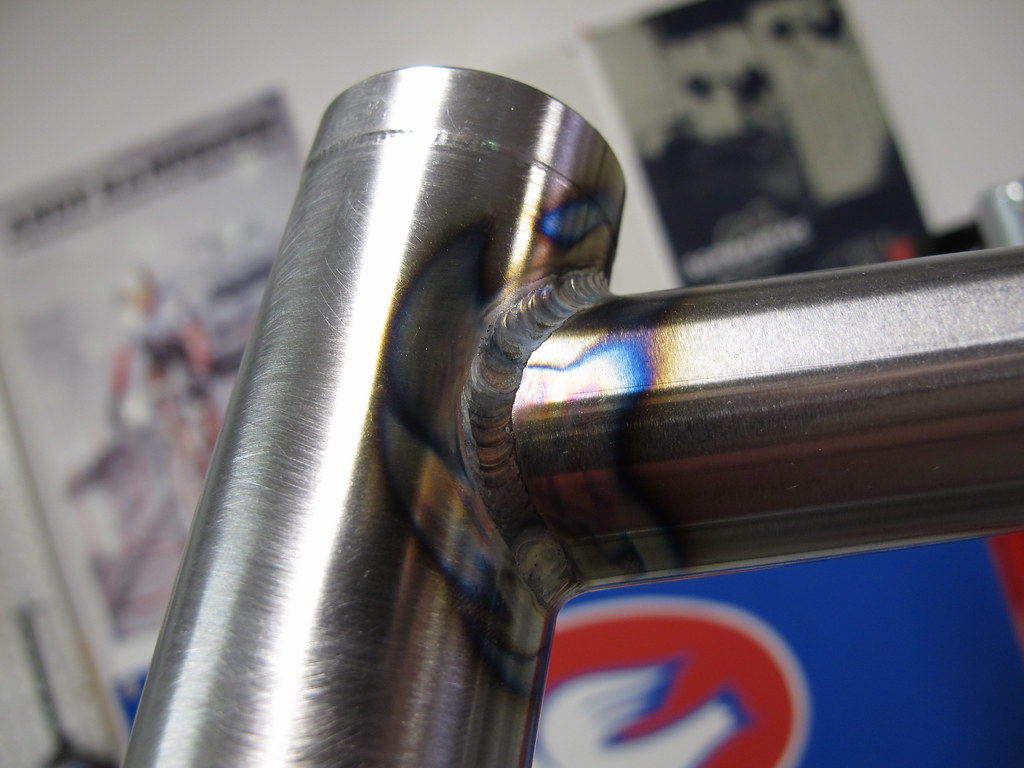
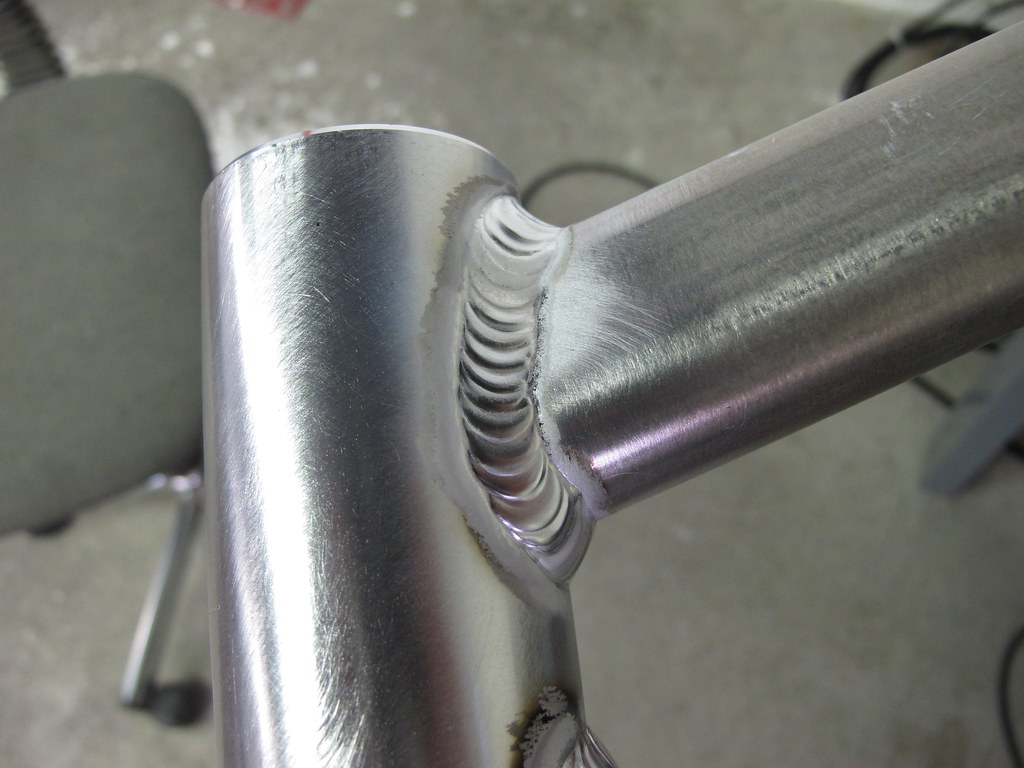
Finally welded my first aluminum frame today.
 A hot knife thru buttah. by Zanconato Custom Cycles, on Flickr
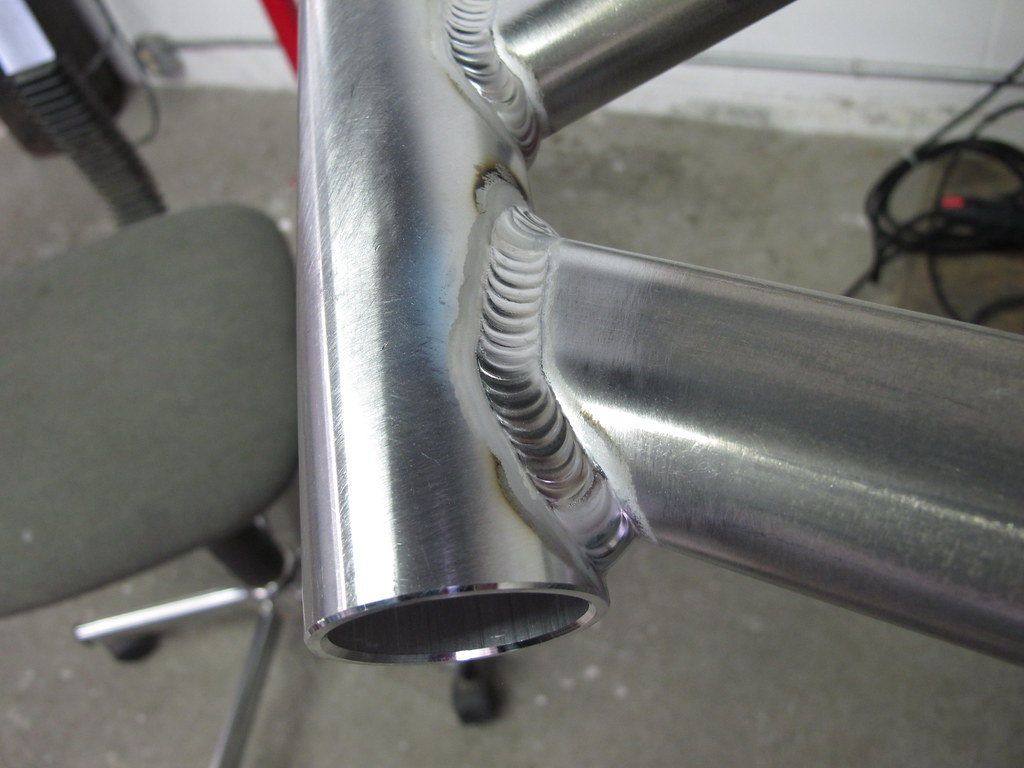 AL001 by Zanconato Custom Cycles, on Flickr
 AL001 by Zanconato Custom Cycles, on Flickr
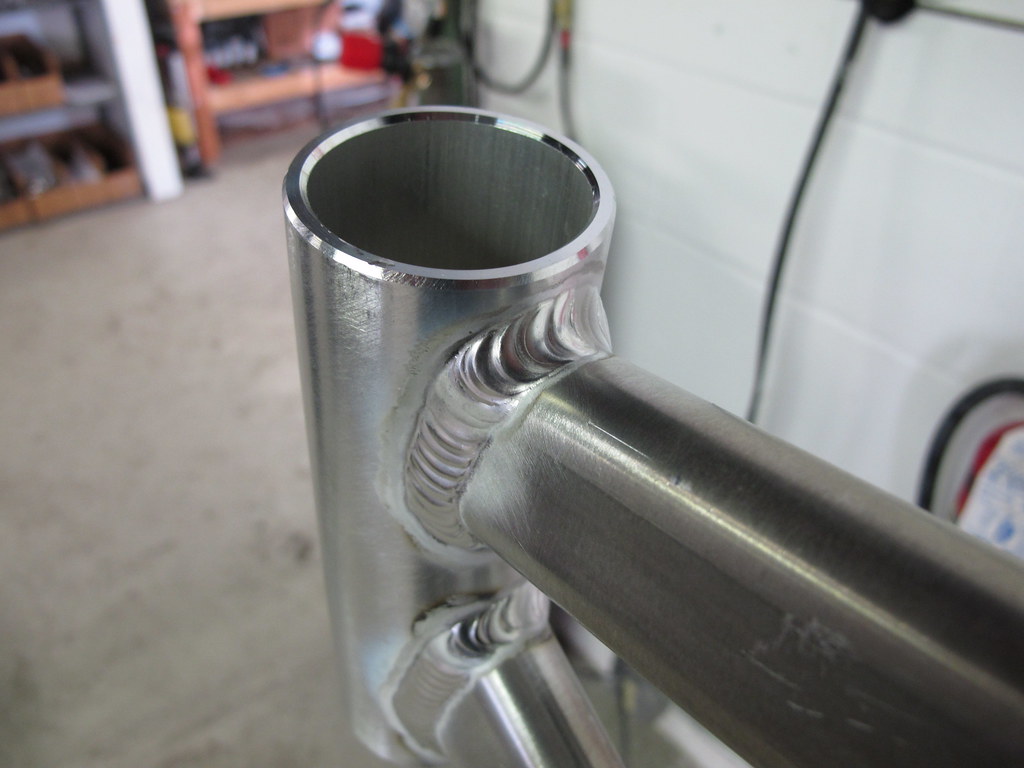 AL001 by Zanconato Custom Cycles, on Flickr
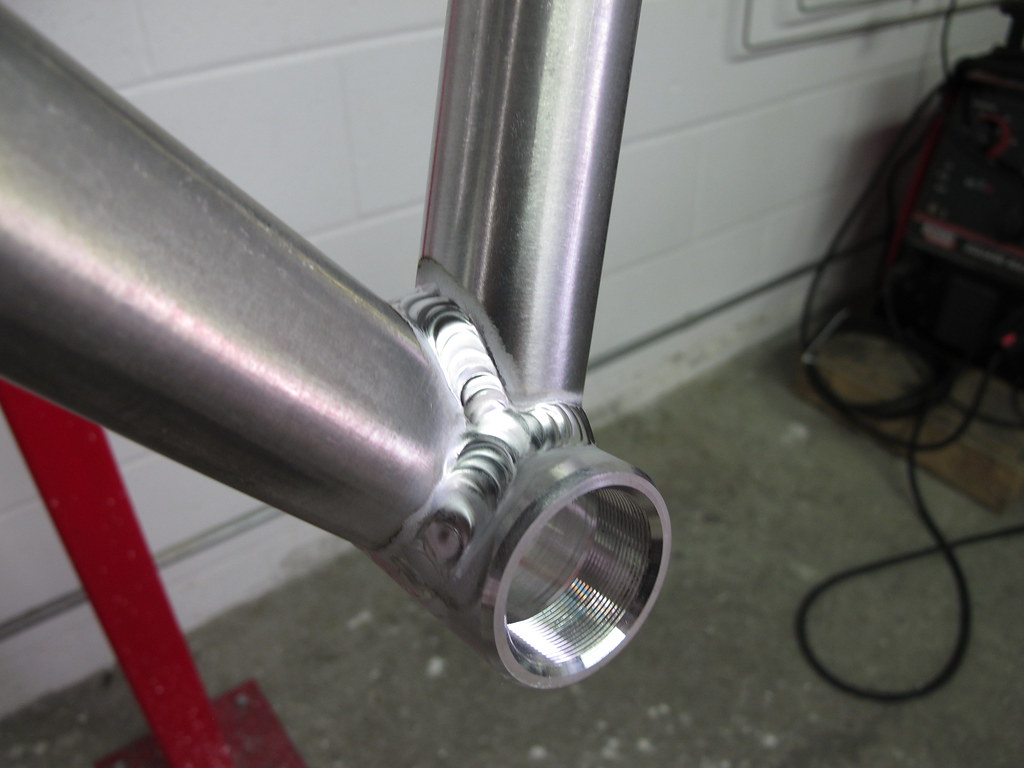 AL001 by Zanconato Custom Cycles, on Flickr
A hot knife thru buttah. by Zanconato Custom Cycles, on FlickrAL001 by Zanconato Custom Cycles, on FlickrAL001 by Zanconato Custom Cycles, on FlickrAL001 by Zanconato Custom Cycles, on FlickrAL001 by Zanconato Custom Cycles, on Flickr
- Otto Nobedder
-
Weldmonger
-
Posts:
-
Joined:Thu Jan 06, 2011 11:40 pm
-
Location:Near New Orleans
Nicely done, Zank!
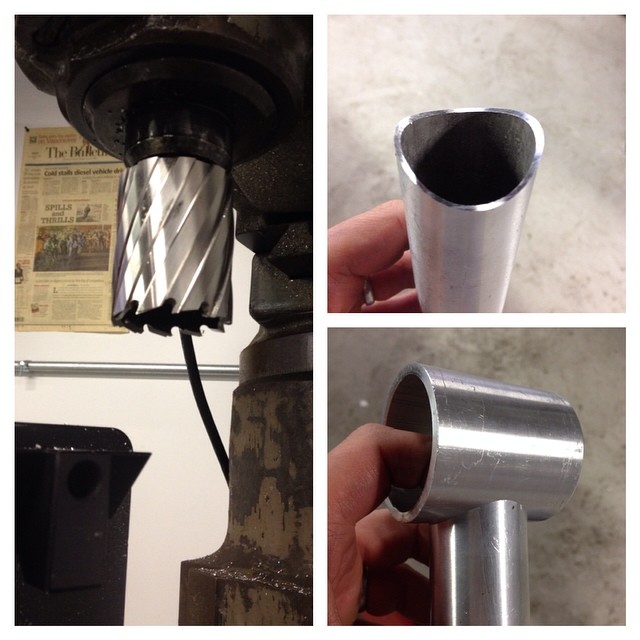
Nice, having a rotabroach to fit it...
I think I saw two spots where the "swell" of the puddle made you "just" brush your tungsten... A hint of "smoke" outside the weld zone.
And a tiny "crater" in a close-out.
If this is your first aluminum frame, I think it's more than outstanding!
Steve S
Nice, having a rotabroach to fit it...
I think I saw two spots where the "swell" of the puddle made you "just" brush your tungsten... A hint of "smoke" outside the weld zone.
And a tiny "crater" in a close-out.
If this is your first aluminum frame, I think it's more than outstanding!
Steve S

- TRACKRANGER
-
Weldmonger
-
Posts:
-
Joined:Wed Aug 06, 2014 12:48 am
-
Location:Melbourne, Australia
Nice job Zank, I wonder would you care to share your machine settings, tungsten and filler rod size?
EWM Phonenix 355 Pulse MIG set mainly for Aluminum, CIGWeld 300Amp AC/DC TIG, TRANSMIG S3C 300 Amp MIG, etc, etc
Thanks, fellas!
Steve, yeah, I'm still too close with the tungsten. I am so used to keeping such a tight arc with steel and titanium. And I still need a lot of practice on my stops.
Ranger, I am using a Lincoln Square Wave TIG 175. I have it set on 175
I used 3/32" 2% lanthanated tungsten ground to a point. It makes a nice rounded tip the first time I light up. I use a gas lens and #8 cup running at 15 CFH.
This material is 7005 series aluminum and I use 3/32" 5183 filler rod (5356 would be fine too). The head tube is 0.150" (3.8 mm) wall. The threaded shell is 0.160" (4 mm) wall. The three main tubes are between 0.052" and 0.080" (1.3 mm - 2 mm) wall depending on the tube and location.
I did a little pre heat. But the heavy wall parts are small enough that they heat up fast.
Probably shouldn't post this here because it's not likely an acceptable way to do it. I don't have a lot of time to be cutting bevels, or running multiple buildup passes, or straightening out cupped or gull winged plates after the fact. This was 1/2"x12" aluminum plate. It needed to finish out at 15.25"x17". It's backer plates for cracked transom bracket for two 300hp outboard motors. They really didn't even need to be welded IMO but that's what they asked for. Welds need to be flush at any rate.
Started off with a 3/8" gap, no bevel. Cut edge to cut edge, leaving the factory edges exposed for obvious reasons. 3/8" because I want to fit an 1/8" balled pure tungsten well down in it with wiggle room to wiggle-weave the heat around onto each side. And welded on both sides of the plate instead of blind root. This helps counter distortion, with minimal bracing, or heat loss from clamping it down to steel or aluminum. On this thickness material, I will make it 3/32" oversize to allow for shrinkage. To keep that minimum predictable and effective, I will use 3/8" aluminum rod as chocks. Notice that they get more of, and closer together as it gets towards the end. They should have to be 'tapped' in with a hammer.

They came out square/flat and on the money measurement wise. Time was 1hr and 15 mins start to finish. All the stops/starts are from letting the cables cool while welding a full 250 amps on a 250 amp machine. I just pause momentarily to allow the water in the cables exchange with cooler water.
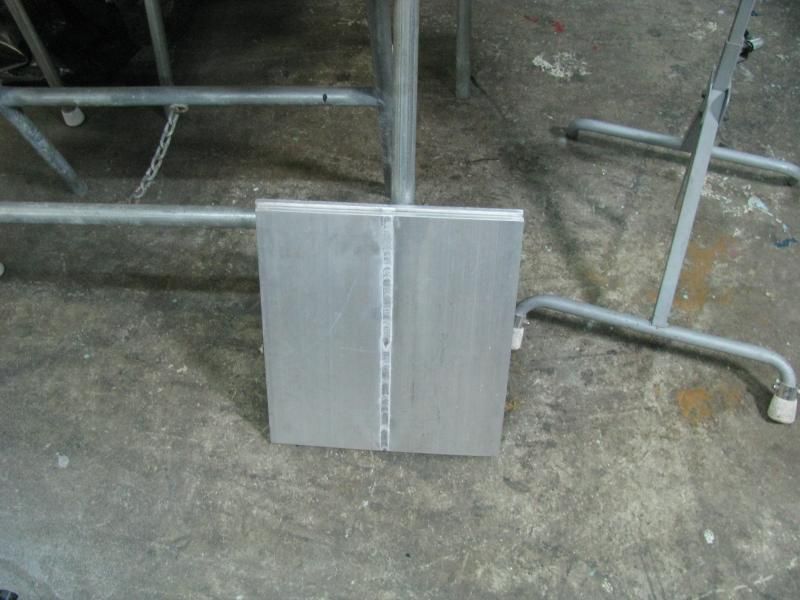
The hot side, doesn't need as many stop/starts.

Started off with a 3/8" gap, no bevel. Cut edge to cut edge, leaving the factory edges exposed for obvious reasons. 3/8" because I want to fit an 1/8" balled pure tungsten well down in it with wiggle room to wiggle-weave the heat around onto each side. And welded on both sides of the plate instead of blind root. This helps counter distortion, with minimal bracing, or heat loss from clamping it down to steel or aluminum. On this thickness material, I will make it 3/32" oversize to allow for shrinkage. To keep that minimum predictable and effective, I will use 3/8" aluminum rod as chocks. Notice that they get more of, and closer together as it gets towards the end. They should have to be 'tapped' in with a hammer.
They came out square/flat and on the money measurement wise. Time was 1hr and 15 mins start to finish. All the stops/starts are from letting the cables cool while welding a full 250 amps on a 250 amp machine. I just pause momentarily to allow the water in the cables exchange with cooler water.
The hot side, doesn't need as many stop/starts.
Miller ABP 330, Syncrowave 250, Dynasty 300 DX.
Honorary member of the Fraternity of Faded Tee Shirts.
Honorary member of the Fraternity of Faded Tee Shirts.
Good example of more planning, less work, nice results
Could some experience be showing in final picture?
Could some experience be showing in final picture?
Everlast 250EX
Miller 250 syncrowave
Sharp LMV Vertical Mill
Takisawa TSL-800-D Lathe
Coupla Bandsaws,Grinders,surface grinder,tool/cutter grinder
and more stuff than I deserve(Thanks Significant Other)
Miller 250 syncrowave
Sharp LMV Vertical Mill
Takisawa TSL-800-D Lathe
Coupla Bandsaws,Grinders,surface grinder,tool/cutter grinder
and more stuff than I deserve(Thanks Significant Other)


No foot pedal. Snap switch on the torch only. I was just glad they were done. I didn't get ahold of the project until right before it was time for me to leave. I am glad I don't have to do it today, though.rick9345 wrote:Good example of more planning, less work, nice results
Could some experience be showing in final picture?
Miller ABP 330, Syncrowave 250, Dynasty 300 DX.
Honorary member of the Fraternity of Faded Tee Shirts.
Honorary member of the Fraternity of Faded Tee Shirts.
Return to “Tig Welding - Tig Welding Aluminum - Tig Welding Techniques - Aluminum Tig Welding”
Jump to
- Introductions & How to Use the Forum
- ↳ Welcome!
- ↳ Member Introductions
- ↳ How to Use the Forum
- ↳ Moderator Applications
- Welding Discussion
- ↳ Metal Cutting
- ↳ Tig Welding - Tig Welding Aluminum - Tig Welding Techniques - Aluminum Tig Welding
- ↳ Mig and Flux Core - gas metal arc welding & flux cored arc welding
- ↳ Stick Welding/Arc Welding - Shielded Metal Arc Welding
- ↳ Welding Forum General Shop Talk
- ↳ Welding Certification - Stick/Arc Welding, Tig Welding, Mig Welding Certification tests - Welding Tests of all kinds
- ↳ Welding Projects - Welding project Ideas - Welding project plans
- ↳ Product Reviews
- ↳ Fuel Gas Heating
- Welding Tips & Tricks
- ↳ Video Discussion
- ↳ Wish List
- Announcements & Feedback
- ↳ Forum News
- ↳ Suggestions, Feedback and Support
- Welding Marketplace
- ↳ Welding Jobs - Industrial Welding Jobs - Pipe Welding Jobs - Tig Welding Jobs
- ↳ Classifieds - Buy, Sell, Trade Used Welding Equipment
- Welding Resources
- ↳ Tradeshows, Seminars and Events
- ↳ The Welding Library
- ↳ Education Opportunities