
Hi all
I am a very new to welding so you are welcome to roll your eyes and not even be able to remember when you had these sort of simple problems.
As illustrated in the attachment - I am welding with a Kemppi Mastertig - around 85 to 100amp - gas is straight Argon, flow rate is between 8 to 12 l/m ( I have tried a range), 3.2mm tungsten, 40-55 balance (Kemppi range is 10 - 70).
Even when I melt a tack weld without using any filler rod, the aluminium has been cleaned with chemical etching, it will start OK and then bang I get this small cow pat, as if it just came out of the torch in one hit.
Any ideas would be much appreciated.
Mal
Tig welding tips, questions, equipment, applications, instructions, techniques, tig welding machines, troubleshooting tig welding process
- Braehill
-
Weldmonger

-
Posts:
-
Joined:Sat Jul 06, 2013 11:16 am
-
Location:Near Pittsburgh,Pennsylvania. Steel Buckle of the Rust Belt
malmac,
If you're holding a tight arc (you should be) the molten Aluminum will rise to meet the tungsten and contaminate it. Is the end of your tungsten collecting crud also?
Remember too that on thin material that the whole thickness of it turns liquid and if there's contamination on the back side of it and you're edge welding this can come to the surface.
Since you said you're new, I'll ask a few questions to get a baseline. Have you welded before with the machine without issues? Is the ground hooked to the piece directly? Is there any draft where you're welding? Does it do this if you start in the middle of the practice piece, away from the edge? Is there black smut around the point where this cow patty shows up?
Len
Now go melt something.
Instagram @lenny_gforce
Len
Instagram @lenny_gforce
Len
Hi Len
Thank you for responding to my first real post on the forum. Please see my answers in the copy of your response below.
If you're holding a tight arc (you should be) the molten Aluminum will rise to meet the tungsten and contaminate it. Is the end of your tungsten collecting crud also?
I have been holding the tungsten as close as reasonable - must admit have got caught out a few times and have had to break and regrind to ensure the tip is always - clean but this is happening within 10 seconds of start up - so I am now searching for better understanding of what is happening.
Remember too that on thin material that the whole thickness of it turns liquid and if there's contamination on the back side of it and you're edge welding this can come to the surface.
This is thin material ( 2.5mm) and I have used a bit of 3x1 RHS aluminium in the corner as a heat sink to ensure I can use a good amperage and get decent penetration. While I did clean this RHS, I did not clean it perfectly, so maybe that is the source of the contamination - if what I think your saying is true, the cow pats are actually bubbling up from underneath, and it happens so quickly I think it is coming from the torch.
Since you said you're new, I'll ask a few questions to get a baseline. Have you welded before with the machine without issues?
Yes have had some really good welds with this machine - though I still lack confidence with making all the settings right - there does not seem to be much specific information on Kemppi Mastertigs around - the parameters seem to not really match the likes of Miller really closely.
Is the ground hooked to the piece directly?
Yes direct contact with the ground.
Is there any draft where you're welding?
No
Does it do this if you start in the middle of the practice piece, away from the edge?
Have not tried that - will experiment.
Is there black smut around the point where this cow patty shows up?
Do you mean small dark specks in the weld puddle? It is true that as soon as the cow patty shows up, any continuation, just gets worse.
Thank you for your advice.
While I did etch the back side of the material, It seems I may have a big problems with my backing bar. I will try removing that or replacing with some extremely clean bar and see if that stops what is a migration of contaminates.
Regards
Mal
- Braehill
-
Weldmonger
-
Posts:
-
Joined:Sat Jul 06, 2013 11:16 am
-
Location:Near Pittsburgh,Pennsylvania. Steel Buckle of the Rust Belt
Mal,
You mentioned the size of your tungsten but not the composition, is it pure, lanthanated, thoriated, ceriated? Pure doesn't hold up well on a inverter based welder. You should have plenty of gas flow @ 8-12 l/m with either a regular cup or a gas lens.
What you can try is turn your balance to around 70-80% EN (some welders are opposite from each other, check your manual for which way to turn) and then adjust down from there until the band of etching along side of the weld narrows to about 1mm on either side. Just remember that your penetration will decrease as the cleaning increases. You want enough cleaning to allow for a clean weld but not to the point that it steals all your penetration.
Take a piece of steel cleaned to shiny bright metal and set your machine to DC EN and light up on the steel until a puddle forms then back off the pedal and hold the torch there for about 10 seconds until it cools without moving the torch. The puddle should remain shiny as should your tungsten, this will tell us if you have a leak in your system or bad Argon (it happens).
We'll figure this out, there's just a lot of variables involved with Tig welding and it's easy to look at machine and tell if it's set up right but not through the computer. If not we'll have answered every other question you could have had in the meantime.
Len
Now go melt something.
Instagram @lenny_gforce
Len
Instagram @lenny_gforce
Len
Thanks Len
Yes lots of variables and having the Kemppi is another variable because the manual does not help that much and Jodey's videos are fantastic but the settings he quotes I find hard to translate to my machine.
I will do the test with the bright steel and that should to rule out one variable. I am in Australia, so it is early Saturday morning here so the day lies ahead of me. I will report back this afternoon to let you know how things have progressed.
I would usually use a 2% thoriated tungsten, but the only 3.2mm tungstens I could get were rare earth tungstens - so maybe that is my problem as well.
Regards
Mal
- Braehill
-
Weldmonger
-
Posts:
-
Joined:Sat Jul 06, 2013 11:16 am
-
Location:Near Pittsburgh,Pennsylvania. Steel Buckle of the Rust Belt
Mal,
The rare earth tungsten is fine for your machine, was just making sure it wasn't pure or zirconiated.
I tried to look at your machine's manual and I didn't know how to weld when I was done. A little confusing, must be a little language barrier there. Do you change front panels to weld with different processes? Did I read that right?
I'm working 6pm - 6am here so I'm on your daylight schedule there.
You could try forgoing the chemical cleaning and just use a stainless steel wire brush to remove the heavy oxide layer. The cleaning action of the EN half of the cycle breaks up all but the heaviest oxides so it doesn't have to be surgical clean. If I'm using new metal I don't clean it at all except for a quick wipe down to make sure there's no surface oils on it. Oils will vaporize and contaminate your cover gas. Acetone if I know it has oil on it. I actually spend more time cleaning steel than I do with Aluminum.
Len
The rare earth tungsten is fine for your machine, was just making sure it wasn't pure or zirconiated.
I tried to look at your machine's manual and I didn't know how to weld when I was done.
I'm working 6pm - 6am here so I'm on your daylight schedule there.
You could try forgoing the chemical cleaning and just use a stainless steel wire brush to remove the heavy oxide layer. The cleaning action of the EN half of the cycle breaks up all but the heaviest oxides so it doesn't have to be surgical clean. If I'm using new metal I don't clean it at all except for a quick wipe down to make sure there's no surface oils on it. Oils will vaporize and contaminate your cover gas. Acetone if I know it has oil on it. I actually spend more time cleaning steel than I do with Aluminum.
Len
Now go melt something.
Instagram @lenny_gforce
Len
Instagram @lenny_gforce
Len

Braehill
(" I actually spend more time cleaning steel than I do with Aluminum.").
Like and yes on steel
(" I actually spend more time cleaning steel than I do with Aluminum.").
Like and yes on steel
Everlast 250EX
Miller 250 syncrowave
Sharp LMV Vertical Mill
Takisawa TSL-800-D Lathe
Coupla Bandsaws,Grinders,surface grinder,tool/cutter grinder
and more stuff than I deserve(Thanks Significant Other)
Miller 250 syncrowave
Sharp LMV Vertical Mill
Takisawa TSL-800-D Lathe
Coupla Bandsaws,Grinders,surface grinder,tool/cutter grinder
and more stuff than I deserve(Thanks Significant Other)
Hi Len
Thank you again for your responses - they have been very helpful.
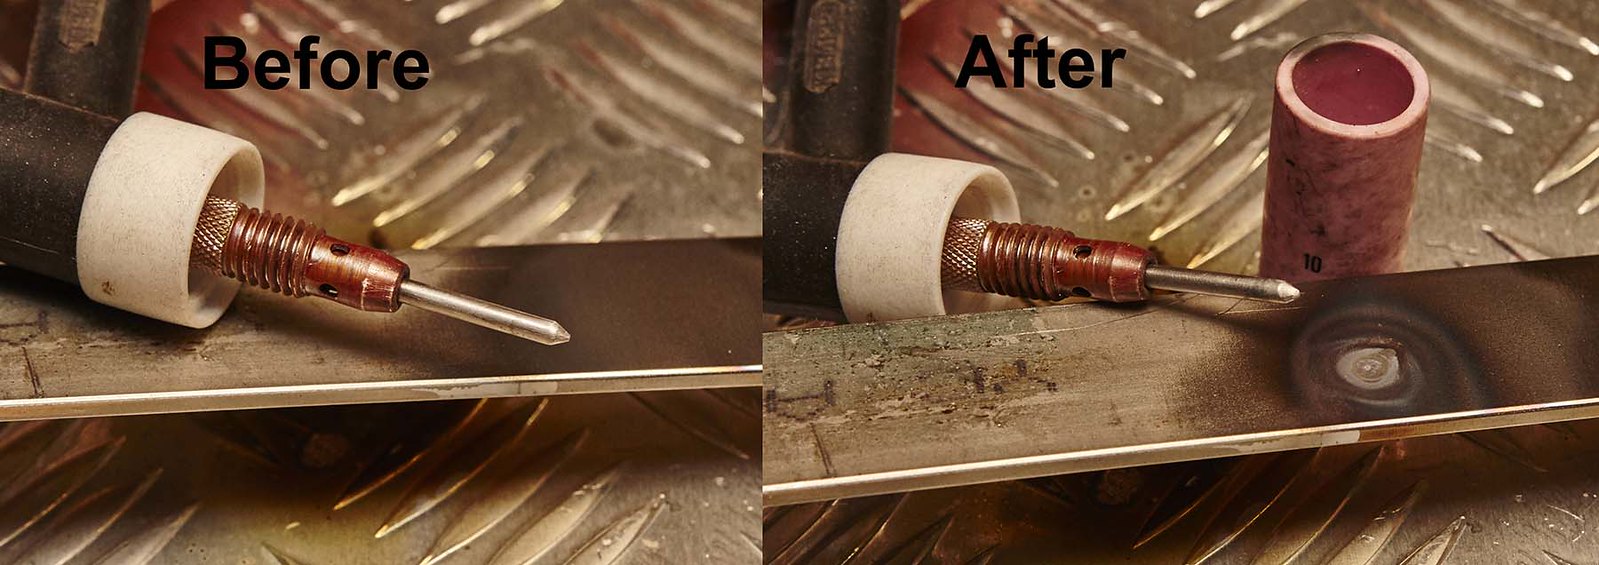
This is the test you told me about to check the gas - this is a bit of stainless steel.
The results seem kind of ambiguous - but I don't believe the gas is contaminated to any great extent, if at all.
I removed the bit of aluminium I was using as a backing bar - that seemed to be one problem out of the way
Then I cleaned with just the stainless steel wire brush, or a clean file.
Then I did some tacking just using a short blast of current - good tacks no contamination.
mmmmm - so then I tried the filler rod - crap there is another problem.
So I went out to clean the rod with some chemical cleaner - then I saw something that might have been the problem.
I had been laying my rods on a piece of 3 ply wood, brushing on the cleaner and then after a bit, cleaning them off with rain water.
So I laid out a clean sheet of aluminium instead of the ply - then the rod was clean - however my job had been fairly messed up so I found that because I had really clean joints, I just fusion welded the last four runs and the only problems I had was a few sites of contamination from some previous indiscretions.
So now I am already planning my next project so I can build on this modest start. Thank you so much for your help.
Now re the Kemppi welder - you are so right about the confusion - the manual just does not come at the settings from the same angle as many of the other welders.
For example the Hz settings are .2 through to 20 - and yet when I set it on 20 as a trial it sounded more like 200 on Jodey's video clips - so the scale may be different.
Also the balance setting is between 10 to 70 -now 70 is max clean and 10 is certainly the penetration end - the default setting is 40 - what ever that means - but I usually start there and move either way depending on the task -
The pulse has no settings for the time that I can see however there is a spot function, but that seems to be manual only.
So still a lot to learn with the machine.
Regards
Mal

malmac wrote: mmmmm - so then I tried the filler rod - crap there is another problem.
So I went out to clean the rod with some chemical cleaner - then I saw something that might have been the problem.
I had been laying my rods on a piece of 3 ply wood, brushing on the cleaner and then after a bit, cleaning them off with rain water.
Why on earth would you do that? Nitrile gloves, clean cloth, pour acetone into clean cloth, using both your hands run filler through the acetone-soaked cloth about 4 times. Done.
Gloves?
Everlast 250EX
Miller 250 syncrowave
Sharp LMV Vertical Mill
Takisawa TSL-800-D Lathe
Coupla Bandsaws,Grinders,surface grinder,tool/cutter grinder
and more stuff than I deserve(Thanks Significant Other)
Miller 250 syncrowave
Sharp LMV Vertical Mill
Takisawa TSL-800-D Lathe
Coupla Bandsaws,Grinders,surface grinder,tool/cutter grinder
and more stuff than I deserve(Thanks Significant Other)

- LtBadd
-
Weldmonger
-
Posts:
-
Joined:Sun Apr 12, 2015 4:00 pm
-
Location:Clearwater FL
-
Contact:
To protect your hands from the acetone, use a chemical-resistant glove while cleaningmalmac wrote:I am using cotton gloves.
Should I be using something different?
Thanks
Mal
Here is a link that may help http://www.glovenation.com/gloves-chemi ... stance.htm
Richard
Website
Website
CanMoulder
- CanMoulder
-
Active Member

-
Posts:
-
Joined:Wed Apr 22, 2015 1:02 pm
-
Location:Ontario Canada
Can you take a picture of the tungsten collet in your previous pic.(the part that pinches the tungsten in place) I have ran into issues where that piece actually swells and depends from the heat of welding and partially blocks the gas flow..
Return to “Tig Welding - Tig Welding Aluminum - Tig Welding Techniques - Aluminum Tig Welding”
Jump to
- Introductions & How to Use the Forum
- ↳ Welcome!
- ↳ Member Introductions
- ↳ How to Use the Forum
- ↳ Moderator Applications
- Welding Discussion
- ↳ Metal Cutting
- ↳ Tig Welding - Tig Welding Aluminum - Tig Welding Techniques - Aluminum Tig Welding
- ↳ Mig and Flux Core - gas metal arc welding & flux cored arc welding
- ↳ Stick Welding/Arc Welding - Shielded Metal Arc Welding
- ↳ Welding Forum General Shop Talk
- ↳ Welding Certification - Stick/Arc Welding, Tig Welding, Mig Welding Certification tests - Welding Tests of all kinds
- ↳ Welding Projects - Welding project Ideas - Welding project plans
- ↳ Product Reviews
- ↳ Fuel Gas Heating
- Welding Tips & Tricks
- ↳ Video Discussion
- ↳ Wish List
- Announcements & Feedback
- ↳ Forum News
- ↳ Suggestions, Feedback and Support
- Welding Marketplace
- ↳ Welding Jobs - Industrial Welding Jobs - Pipe Welding Jobs - Tig Welding Jobs
- ↳ Classifieds - Buy, Sell, Trade Used Welding Equipment
- Welding Resources
- ↳ Tradeshows, Seminars and Events
- ↳ The Welding Library
- ↳ Education Opportunities