
I'm butt welding 20ga round steel tubing, 1-5/8" diameter. I'm fine once I get it tacked up, but I'm burning through on the tacks. I could use some help on:
1. How do I tack without burning through.
2. I'm having a hard time seeing the joint once I get it tacked up. Any tricks to make the joint more visible.
3. I can only weld short sections before I need to rotate the tube because I can't keep the torch at the right angle on such a small diameter. Other than buying a rotator, is there any way to get my hand to more quickly change angle as I come around that small diameter tube. I'm tempted to try putting it in a vertical position so I could more easily move around it as I weld.
Tig welding tips, questions, equipment, applications, instructions, techniques, tig welding machines, troubleshooting tig welding process
Know you understand why pipe welders are so respected  Welding around pipe, either horizontal or vertical, is difficult to say the least. It requires constant adjustment of your body position, or the part.
What you describe can only be symptomatic of poor control of the heat. 20ga tubing and small OD would tend to persuade me to use a small cup (#5) and a 1/16th tungsten and wire, to reduce the heat effect. Rest the bottom lip of the cup directly on the tubing, very short stick out to allow you you to slide cup/torch directly around the circumference along the seam. Even if this orientation puts you in a forward push angle, don't fret, feed the wire directly into the front edge of the puddle and go along. Stop when you get too contorted, or learn to contstantly work your body position and eyes above, ahead, and looking back towards the puddle.
I also hold the torch by the very end of the handle with a very light grip to prevent slippage and creating a lot of tension. If there's any way to create a rest for your feed hand, that will help you control the wire. If not, cut your wire into shorter lengths to make it more manageable instead of bouncing around and wandering.
You also need to monitor how much heat the part is accumulating as you weld. Don't rotate the part and weld directly against the last section of it, skip forward and weld a new section, then come back and tie in. TIG is very tolerant of this and you should be able to make it look almost as is if there are no stops and starts.
Hope that helps-

- LtBadd
-
Weldmonger

-
Posts:
-
Joined:Sun Apr 12, 2015 4:00 pm
-
Location:Clearwater FL
-
Contact:
Hey Mark
Is this something you're welding at home or work?
Just a few or many to do?
Do you have a picture of the part?
How much burn thru, a lot or just a little?
What is the reason to prevent burn thru, your customer? If it's a real pain then purging could solve this.
Prevent burn thru with heat management, try starting at a very low amp and move the arc onto your filler then increase the amps and begin the weld
When doing a diameter I try to start the weld at the furthest point I can reach and as I weld I am moving towards a more comfortable position. There really isn't any other way then to go as far as you can, stop and reposition.
Richard
Website
Website
I know welding pipe is very difficult, I've tried it before without great success, even on larger diameter pipe.cj737 wrote:Know you understand why pipe welders are so respected
I'm using 1/16" with a gas lens and #7 cup. You're right about the heat. I've experimented with lower heat and seem to flip back and forth between melting the end of the filler rod without getting the tack to fuse, and blowing a hole right through the seam. I also tried pulsing, and although that makes the welding easier, it makes the tacking harder. I'm able to lay down a beautiful bead on the pipe itself when I'm not doing the butt joint, so it surprised me how much more sensitive the joint was to heat.What you describe can only be symptomatic of poor control of the heat. 20ga tubing and small OD would tend to persuade me to use a small cup (#5) and a 1/16th tungsten and wire, to reduce the heat effect.
Hadn't thought about using the cup, I'll try that.Rest the bottom lip of the cup directly on the tubing, very short stick out to allow you you to slide cup/torch directly around the circumference along the seam. Even if this orientation puts you in a forward push angle, don't fret, feed the wire directly into the front edge of the puddle and go along. Stop when you get too contorted, or learn to contstantly work your body position and eyes above, ahead, and looking back towards the puddle.
Thanks
Lincoln Square Wave 200
Lincoln 225 AC/DC
Harris Oxy/Acetylene torch
Lincoln 225 AC/DC
Harris Oxy/Acetylene torch
We have a farm, it's for us. Normally I am doing this as a repair, this is more fabrication.LtBadd wrote:Hey Mark
Is this something you're welding at home or work?
Just a few or many to do?
It's this gate. I need this 8' gate to be about 19" smaller to fit a spot in our barn, so I cut a 19" section out of it and am butt welding the two pieces back together.Do you have a picture of the part?
Enough that I'm spending a good bit of time trying to fill in the holes. So far I'm practicing on sample pieces that I cut out. I haven't actually welded the real gate together yet.How much burn thru, a lot or just a little?
I'm not a perfectionist, but I do this often enough that I'd like to get the hang of it. And, as Jody says, I don't want it to look like Fido's butt. I tried using a purge, it reduced a bit of the contamination that tried to pop thru as I was welding the joint, and really made the inside of the tube look better, but didn't seem to have any effect on burn thru.What is the reason to prevent burn thru, your customer? If it's a real pain then purging could solve this.
I tried walking into the tack from the side of the joint, didn't think about walking the arc onto the filler.Prevent burn thru with heat management, try starting at a very low amp and move the arc onto your filler then increase the amps and begin the weld
thanksWhen doing a diameter I try to start the weld at the furthest point I can reach and as I weld I am moving towards a more comfortable position. There really isn't any other way then to go as far as you can, stop and reposition.
Lincoln Square Wave 200
Lincoln 225 AC/DC
Harris Oxy/Acetylene torch
Lincoln 225 AC/DC
Harris Oxy/Acetylene torch
dave powelson
- dave powelson
-
Guide

-
Posts:
-
Joined:Mon Nov 24, 2014 3:09 am
-
Location:yuba city, CA
...and the joint is prepped how?? ...little chamfers, partial bevel??
(On .035 tiny chamfers or none should work)
What size filler rod?
Trying various sizes of filler rod helps.
Firing off on the filler, quickly making it quickly wet out on the joint--works.
Pulsing will help after you get some basic technique--down.
(On .035 tiny chamfers or none should work)
What size filler rod?
Trying various sizes of filler rod helps.
Firing off on the filler, quickly making it quickly wet out on the joint--works.
Pulsing will help after you get some basic technique--down.
Being a farm gate are you cleaning it thoroughly inside and out and a few inches each side of the weld area and acetone wiping it does make a difference on used steel. It isn't galvanized by chance?
Ground flat, no chamfer.dave powelson wrote:...and the joint is prepped how?? ...little chamfers, partial bevel??
(On .035 tiny chamfers or none should work)
1/16"What size filler rod?
Yes, the other poster mentioned that. I'll give it a try.Firing off on the filler, quickly making it quickly wet out on the joint--works.
Lincoln Square Wave 200
Lincoln 225 AC/DC
Harris Oxy/Acetylene torch
Lincoln 225 AC/DC
Harris Oxy/Acetylene torch
It's powder coated. I burned it off with a torch then hand sanded and cleaned with solvent. I don't think contamination is a problem or I would not be able to lay down clean beads. I'm only getting burn through on the tacks, not on the joint weld.bruce991 wrote:Being a farm gate are you cleaning it thoroughly inside and out and a few inches each side of the weld area and acetone wiping it does make a difference on used steel. It isn't galvanized by chance?
Lincoln Square Wave 200
Lincoln 225 AC/DC
Harris Oxy/Acetylene torch
Lincoln 225 AC/DC
Harris Oxy/Acetylene torch
You may need to use a copper spoon to light up on. Some machines have a pretty harsh arc on initial light up. Or light up off to the side and walk the arc over. You could also make a coupling/ sleeve out of pipe just a bit larger. Then weld that over top of the joint. So that it's a fillet weld instead of open butt.
I have more questions than answers
Josh
Josh
dave powelson
- dave powelson
-
Guide
-
Posts:
-
Joined:Mon Nov 24, 2014 3:09 am
-
Location:yuba city, CA
Didn't see the farm gate description before my last comment.
As I recall, that tube stock is 18 ga., .050.
Amen--just sleeve it, inside or outside.
One can mig those, with 'The Right Stuff'...I do.
I modded and installed a 12' behlen gate at my house, 5 years ago. Still looks good,
no rusting.....drill drain holes in any cross tube that has any penetration thru it, provide
for drain holes in the bottom vertical post caps, to drain out water as well.
Drainage and air circulation helps gates live.

Having done similar sized tubing, the only advice I don't agree with is the "holding the torch handle by the end" part, because tiny movements of the hand can work against you if you aren't steady enough, because they may lead to large movements at the torch head and thus tungsten. I prefer a grip up near the torch head, but of course that is just my opinion as everyone is entitled to theirs.
With 20ga tubing, you should be using 0.030-0.040" wire, 0.045" maximum. It takes much more amperage to melt your current filler than it does your base-metal, thus complicating things.
Tacks are easy once you master heat control and arc length. How many amps are you using to tack (at the machine)? Are you using a foot pedal? Do you have a torch mounted on-off switch? A torch mounted amptrol? Exactly how far is your tungsten tip from the joint? What machine are you using? Does it have a "hot start" whereby the amperage the first few milliseconds are super-high then taper down to how-ever-it-is-that-you-have-them-set? These are all critical variables for tacking up quickly and efficiently.
Last edited by Oscar on Fri Feb 17, 2017 1:42 pm, edited 1 time in total.
On thin stuff I love a sharp .040 tungsten. The light up easily and precisely.
I have found that when working on thin material it is hard to get the arc to heat both sides evenly. The arc seems to favor one side or the other. I try to light up on the filler and play the arc side to side while increasing the amperage until it puddles then back off the amps and cruse on.
I picked up some .035 mig wire for these thin jobs and have had good results down to .025 thickness.
Mark
Never heard of a copper spoon. The coupling is a good idea, I could just split a piece of the same tubing and force it around the joint.Poland308 wrote:You may need to use a copper spoon to light up on. Some machines have a pretty harsh arc on initial light up. Or light up off to the side and walk the arc over. You could also make a coupling/ sleeve out of pipe just a bit larger. Then weld that over top of the joint. So that it's a fillet weld instead of open butt.
Lincoln Square Wave 200
Lincoln 225 AC/DC
Harris Oxy/Acetylene torch
Lincoln 225 AC/DC
Harris Oxy/Acetylene torch
There's two qualities of gates, this is the cheaper one that's 20ga. It's for goats so it doesn't need to be that strong. For the horses we use the heavier gates. I can tell these gates were migged from the factory because they leave the wire whiskers all over the place, then they just powder coated over them.dave powelson wrote:Didn't see the farm gate description before my last comment.
As I recall, that tube stock is 18 ga., .050.
Amen--just sleeve it, inside or outside.
One can mig those, with 'The Right Stuff'...I do.
Lincoln Square Wave 200
Lincoln 225 AC/DC
Harris Oxy/Acetylene torch
Lincoln 225 AC/DC
Harris Oxy/Acetylene torch
I don't have any wire that small, maybe I'll pick some up and try itOscar wrote: With 20ga tubing, you should be using 0.030-0.040" wire, 0.045" maximum. It takes much more amperage to melt the filler than it does your base-metal, thus complicating things.
The machine is set to 60A but I"m probably using about half the foot pedal.How many amps are you using to tack (at the machine)? Are you using a foot pedal?
NoDo you have a torch mounted on-off switch? A torch mounted amptrol?
Extremely close, I positioned myself so I had a good perspective on the arc length. Tungstend is 1/16¨, arc length is about the same.Exactly how far is your tungsten tip from the joint?
Lincoln Square Wave 200, and yes the arc starts pretty hot but then drops back very quickly. Thatś why I'm striking the arc off to the side of the joint and walking it in for the tack.What machine are you using? Does it have a "hot start" whereby the amperage the first few milliseconds are super-high then taper down to how-ever-it-is-that-you-have-them-set?
Lincoln Square Wave 200
Lincoln 225 AC/DC
Harris Oxy/Acetylene torch
Lincoln 225 AC/DC
Harris Oxy/Acetylene torch
I have .040 tungsten but only have 1/16" wire. I'm going to pick up some smaller wire to try. I agree the arc likes one side of the joint more than the other- the hole is never a keyhole, it always opens on one side of the joint. Several people have suggested lighting up on the filler, I'll give that a try.mpete53 wrote:On thin stuff I love a sharp .040 tungsten. The light up easily and precisely.
I have found that when working on thin material it is hard to get the arc to heat both sides evenly. The arc seems to favor one side or the other. I try to light up on the filler and play the arc side to side while increasing the amperage until it puddles then back off the amps and cruse on.
I picked up some .035 mig wire for these thin jobs and have had good results down to .025 thickness.
Mark
tnx
Lincoln Square Wave 200
Lincoln 225 AC/DC
Harris Oxy/Acetylene torch
Lincoln 225 AC/DC
Harris Oxy/Acetylene torch

- ldbtx
-
Heavy Hitter

-
Posts:
-
Joined:Thu Jun 13, 2013 12:54 am
-
Location:North Central Texas
-
Contact:
I like the idea of sleeving the joint, but my preference would be to cut a small longitudinal slit out of the sleeve so it'll compress and fit inside the tubing. Then leave a small gap between the pieces of pipe. It'll be an open root joint with a backing strip. Should work well.
Larry
Larry
Miller Bobcat 225
Tweco Fabricator 211i
AHP AlphaTIG 200x
Lincoln SP-135+
Hypertherm Powermax 30 Air
ProStar O/A torch
Tweco Fabricator 211i
AHP AlphaTIG 200x
Lincoln SP-135+
Hypertherm Powermax 30 Air
ProStar O/A torch
MarkL wrote:Never heard of a copper spoon. The coupling is a good idea, I could just split a piece of the same tubing and force it around the joint.Poland308 wrote:You may need to use a copper spoon to light up on. Some machines have a pretty harsh arc on initial light up. Or light up off to the side and walk the arc over. You could also make a coupling/ sleeve out of pipe just a bit larger. Then weld that over top of the joint. So that it's a fillet weld instead of open butt.
http://www.harborfreight.com/welding-spoon-66785.html
Your main weapon for not burning through on tacks is to get a very small tack. For that you need to have hands of stone, the eyes of a brain surgeon, and the foot of Steve McQueen---a fast one.
Get a zero-tolerance fit-up. You don't want any gap, at all. Get the tungsten in there.
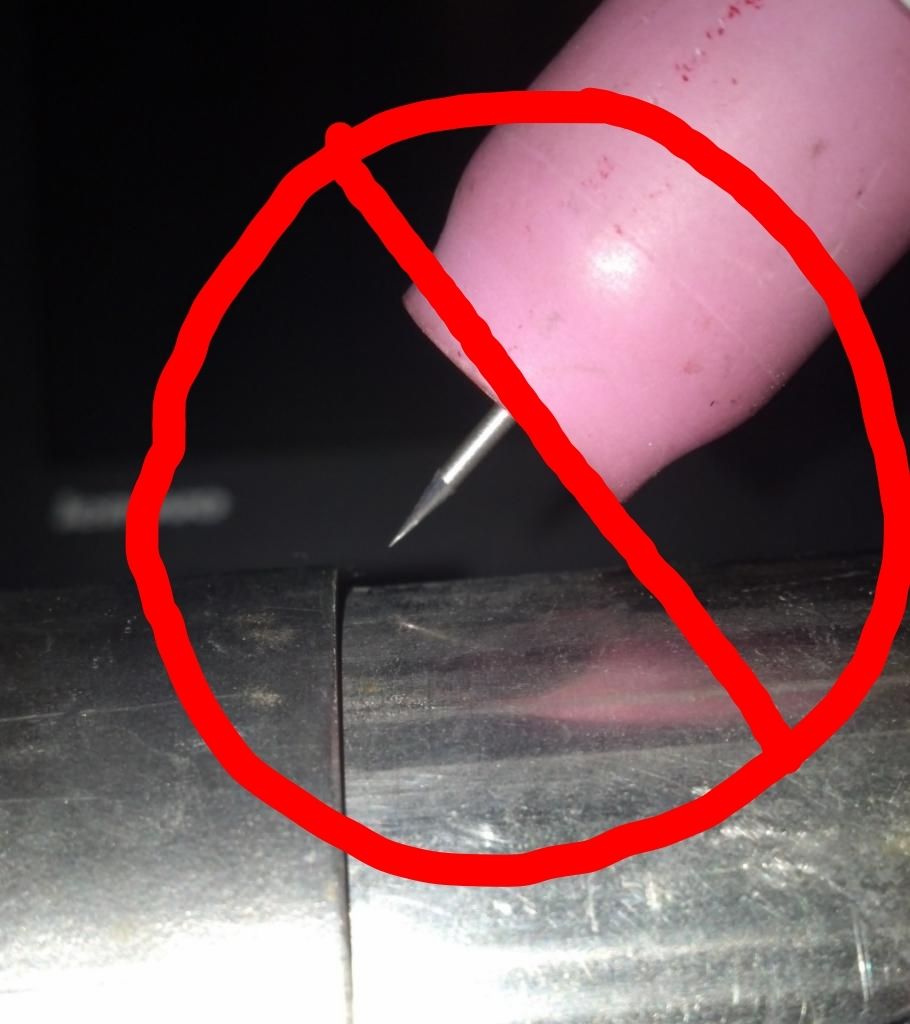
Look at this example see how close the tungsten is to the joint?
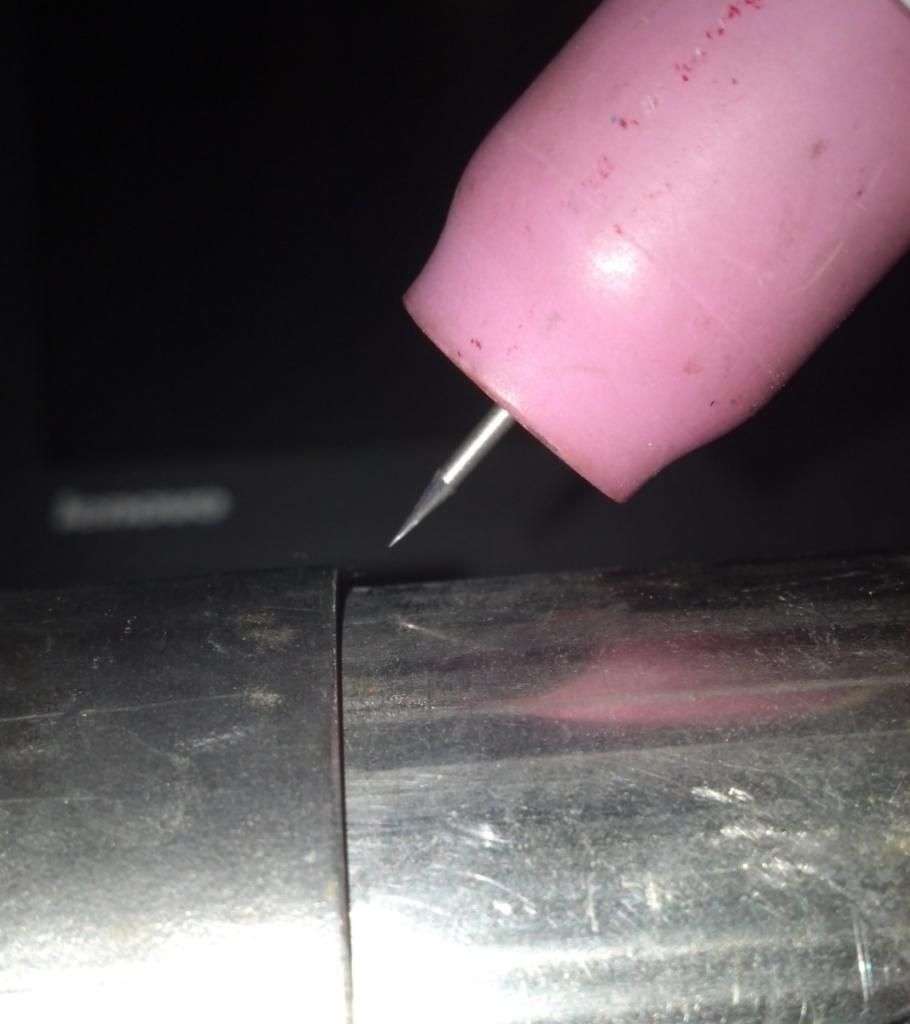
BBBBZZZZZZZZZZZZZZ!!!!! Wrong, thanks for playing!! It's no where near where it needs to be!
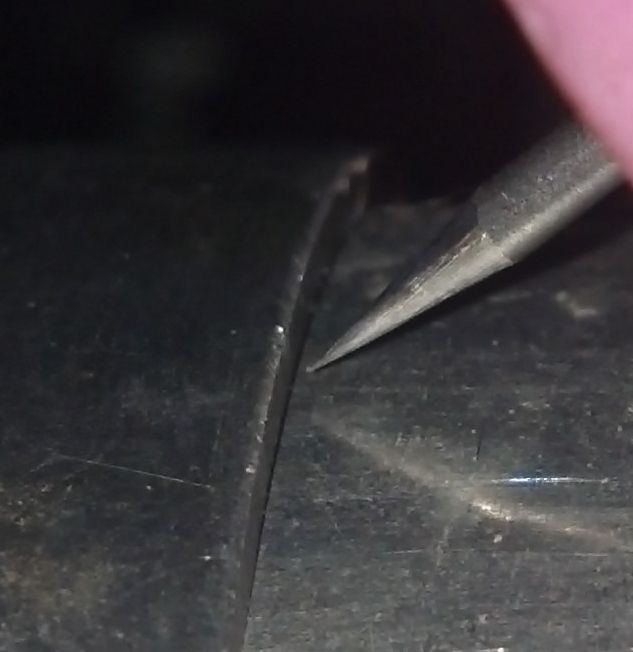
You need to get it close, like this:
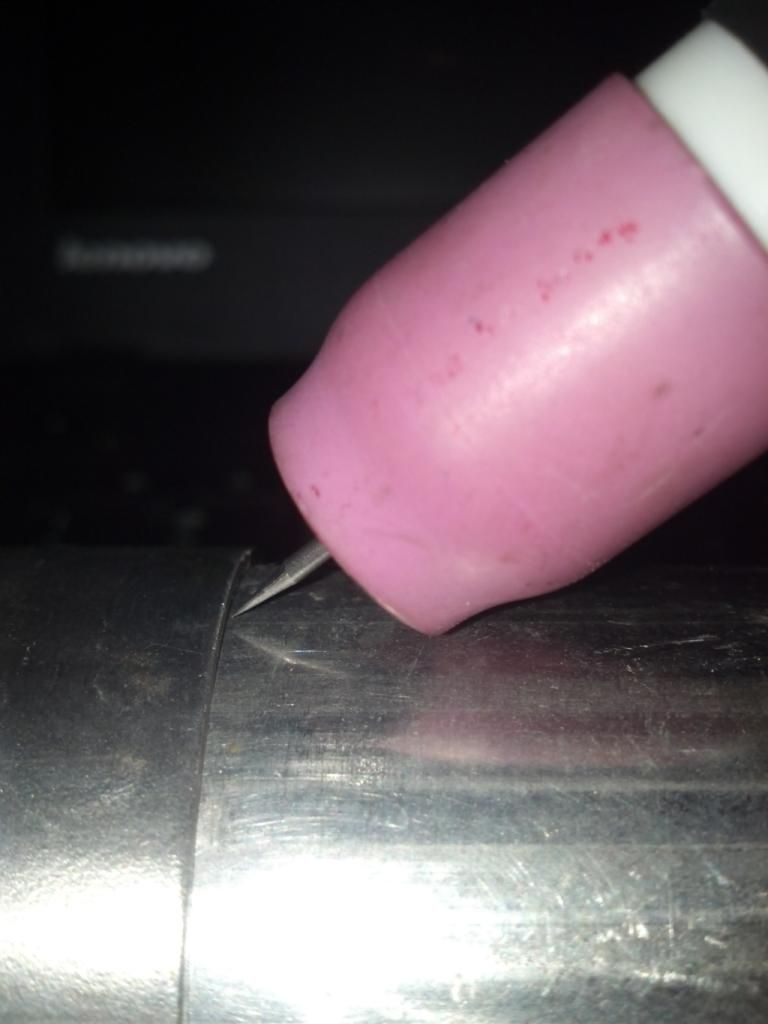
That's a 1/16" (62 thousandths of an inch) by the way. Look at how far the tip is from the joint. How far do you reckon it is? (Keep looking back at the diameter of the tungsten realizing it is only 62-thousandths of an inch.)
That kind of arc length, along with a quick (~0.4-0.6 sec), instantaneous (not ramping up slowly), blast of current will get you a nice small tack. You have to experiment to see what machine settings will get you there, but you definitely don't need pulse I'll tell you that much. Once you can get a tack or 4 like that, you can then start on the tack and add filler from the get go. That's how I do it, anyways.
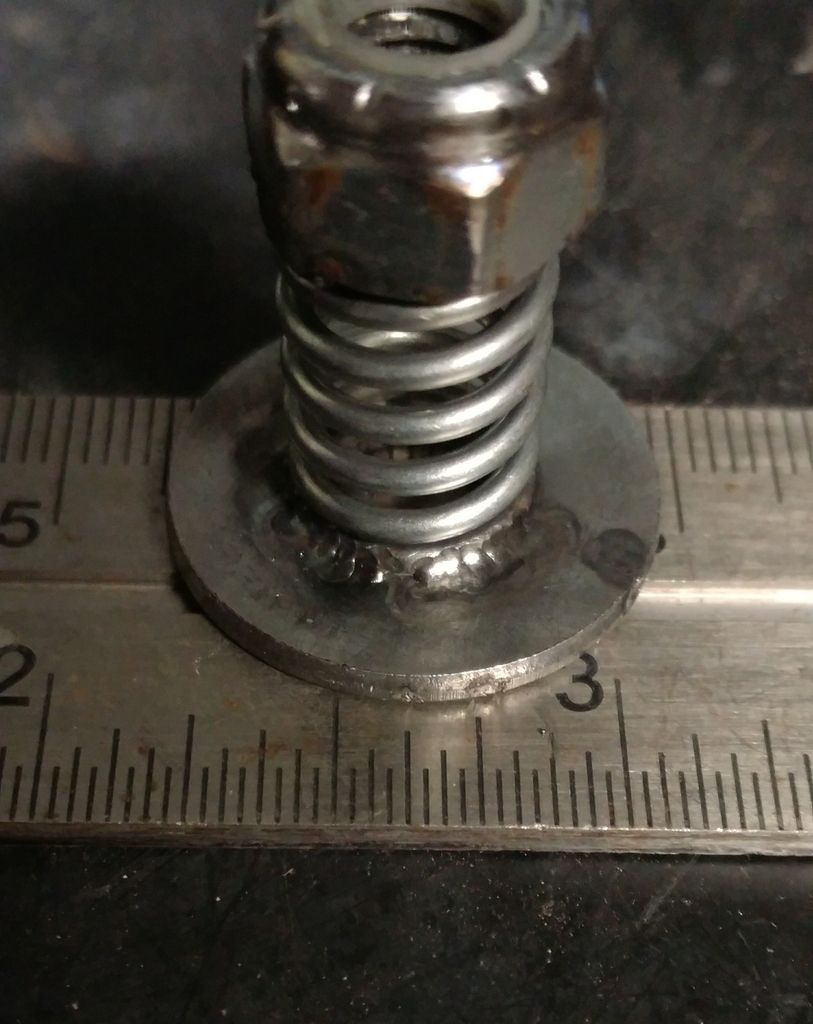
Look at these tack welds I made on this tiny spring-washer. Those were done at about 50A. Why didn't it make a mess of the whole thing? Because they only lasted for a fraction of a second and the arc length was miniscule.
Get a zero-tolerance fit-up. You don't want any gap, at all. Get the tungsten in there.
Look at this example see how close the tungsten is to the joint?
BBBBZZZZZZZZZZZZZZ!!!!! Wrong, thanks for playing!! It's no where near where it needs to be!
You need to get it close, like this:
That's a 1/16" (62 thousandths of an inch) by the way. Look at how far the tip is from the joint. How far do you reckon it is? (Keep looking back at the diameter of the tungsten realizing it is only 62-thousandths of an inch.)
That kind of arc length, along with a quick (~0.4-0.6 sec), instantaneous (not ramping up slowly), blast of current will get you a nice small tack. You have to experiment to see what machine settings will get you there, but you definitely don't need pulse I'll tell you that much. Once you can get a tack or 4 like that, you can then start on the tack and add filler from the get go. That's how I do it, anyways.
Look at these tack welds I made on this tiny spring-washer. Those were done at about 50A. Why didn't it make a mess of the whole thing? Because they only lasted for a fraction of a second and the arc length was miniscule.
I'd rather look like Steve McQueen than have his feet, but I guess I'll take what I can get.Oscar wrote:Your main weapon for not burning through on tacks is to get a very small tack. For that you need to have hands of stone, the eyes of a brain surgeon, and the foot of Steve McQueen---a fast one.
First things first, how did you take those photos, smartphone or camera?
Lincoln Square Wave 200
Lincoln 225 AC/DC
Harris Oxy/Acetylene torch
Lincoln 225 AC/DC
Harris Oxy/Acetylene torch
That might solve another problem, which is getting the two halves of the gate back into alignment. There was a lot of stress in the tubes and when I cut them, they sprung out of alignment. I was going to clamp them to a large table to get them into alignment to tack them. The sleeve might be strong enough to hold them all in alignment while I tack them.ldbtx wrote:I like the idea of sleeving the joint, but my preference would be to cut a small longitudinal slit out of the sleeve so it'll compress and fit inside the tubing. Then leave a small gap between the pieces of pipe. It'll be an open root joint with a backing strip. Should work well.
Larry
Lincoln Square Wave 200
Lincoln 225 AC/DC
Harris Oxy/Acetylene torch
Lincoln 225 AC/DC
Harris Oxy/Acetylene torch
Smartphone.MarkL wrote:I'd rather look like Steve McQueen than have his feet, but I guess I'll take what I can get.Oscar wrote:Your main weapon for not burning through on tacks is to get a very small tack. For that you need to have hands of stone, the eyes of a brain surgeon, and the foot of Steve McQueen---a fast one.
First things first, how did you take those photos, smartphone or camera?

- 5th Street Fab
-
Guide
-
Posts:
-
Joined:Sun Jan 15, 2017 1:08 am
Hey so I used to do lots of thin wall tubing. #1 thing is prep. Belt sand both sides perfectly flat so when you butt them up there is no gap at all. Deburr both inside and out.MarkL wrote:I'm butt welding 20ga round steel tubing, 1-5/8" diameter. I'm fine once I get it tacked up, but I'm burning through on the tacks. I could use some help on:
1. How do I tack without burning through.
2. I'm having a hard time seeing the joint once I get it tacked up. Any tricks to make the joint more visible.
3. I can only weld short sections before I need to rotate the tube because I can't keep the torch at the right angle on such a small diameter. Other than buying a rotator, is there any way to get my hand to more quickly change angle as I come around that small diameter tube. I'm tempted to try putting it in a vertical position so I could more easily move around it as I weld.
They need to be exactly in a line too. Placing them in a piece of angle iron helps but I prefer to put a tube I am vice and slide the pieces I'm tacking over it.
To tack I set my machine to about 25 amps. Then hold my tungsten as close as possible to the piece. Romp on the pedal as fast as you can and let off. Like your tapping your foot. If it didn't tack then do what we call a double tap. You just tap the pedal twice in a row really quickly. Don't use filler, at least until it's tacked.
Then to weld it just leave it on the tube in your vice. You can weld a 1/4 at a time or whatever you want then spin the pipe and go again.
Sent from my SM-G920V using Tapatalk

Return to “Tig Welding - Tig Welding Aluminum - Tig Welding Techniques - Aluminum Tig Welding”
Jump to
- Introductions & How to Use the Forum
- ↳ Welcome!
- ↳ Member Introductions
- ↳ How to Use the Forum
- ↳ Moderator Applications
- Welding Discussion
- ↳ Metal Cutting
- ↳ Tig Welding - Tig Welding Aluminum - Tig Welding Techniques - Aluminum Tig Welding
- ↳ Mig and Flux Core - gas metal arc welding & flux cored arc welding
- ↳ Stick Welding/Arc Welding - Shielded Metal Arc Welding
- ↳ Welding Forum General Shop Talk
- ↳ Welding Certification - Stick/Arc Welding, Tig Welding, Mig Welding Certification tests - Welding Tests of all kinds
- ↳ Welding Projects - Welding project Ideas - Welding project plans
- ↳ Product Reviews
- ↳ Fuel Gas Heating
- Welding Tips & Tricks
- ↳ Video Discussion
- ↳ Wish List
- Announcements & Feedback
- ↳ Forum News
- ↳ Suggestions, Feedback and Support
- Welding Marketplace
- ↳ Welding Jobs - Industrial Welding Jobs - Pipe Welding Jobs - Tig Welding Jobs
- ↳ Classifieds - Buy, Sell, Trade Used Welding Equipment
- Welding Resources
- ↳ Tradeshows, Seminars and Events
- ↳ The Welding Library
- ↳ Education Opportunities