Follow up question to my earlier exhaust welding topic.
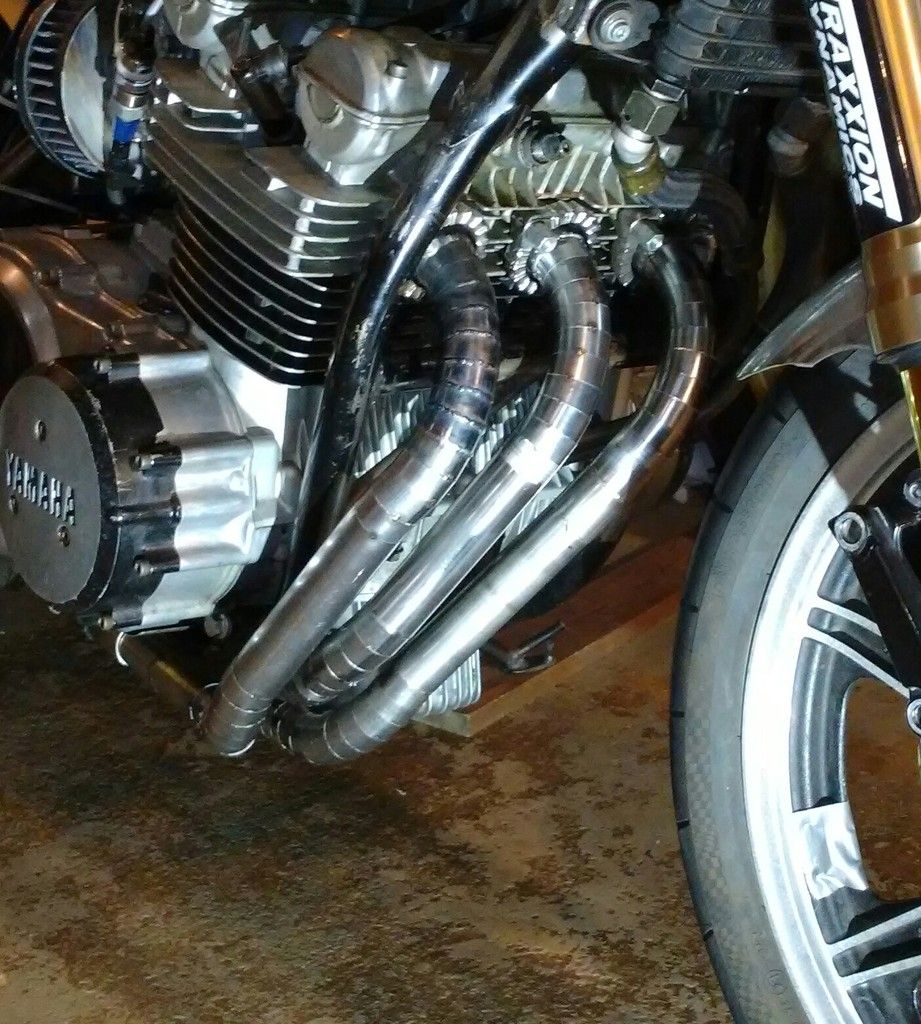
I finished tacking up the pie cut pieces and welded one of the headers tubes. The distortion was much greater than I anticipated even though I was careful to skip weld and distribute them on the length of the tube and alternate sides. The tube fortunately still fits with some persuasion but I was wondering if anyone had suggestions to minimize the distortion.
A fixture would be tough to weld around as I'm flipping and turning the piece all the time.
A smaller cup helps, short runs of welding helps, pulse helps, but patience is key. When you weld that much circumference so close together, adjacent pieces become equally hot. Tack every piece off with 4 control points to help prevent racking. But heat from welding will still cause it to distort. I've even gone so far as to place about 12 tacks around pipes to slowly get them welded up. No one says it has to be a single, uninterrupted string
I didn't see your other post, is it stainless or mild steel? If stainless, a purge can help a little bit. From the small glimpse I can see in this post, your wire diameter looks heavy which causes you to use more heat. If the fit is really good between pieces, a small wire is best.
The section you see welded above was my first try at it.
As a less experienced welder, I have a tendency to over feed the wire fearing I'm going to burn through or lose control of the puddle.
The rest of the header tube was welded with less wire and the beads looks less prominent. I got the settings dialed in and was more comfortable with the heat.
This is 18g mild steel tubing.
Last edited by jcw on Thu Mar 09, 2017 1:56 am, edited 1 time in total.
The section you see welded above was my first try at it.
As a less experienced welder, I have a tendency to over feed the wire fearing I'm going to burn through or lose control of the puddle.
The rest of the header tube was welded with less wire and the beads looks less prominent. I got the settings dialed in and was more comfortable with the heat.
I do a lot of work with pie cuts. They are out of stainless, aluminum and titanium. Best advice I can give that will speed up the learning curve are.
Fit up. Make sure your edges are straight and true. Make sure they are flat and round as well. The thinner the wall thickness the less chance you have to get a good weld with no gaps. The thinner it is, the less forgiving it is.
I normally do three tacks on each joint as I am making up the piece. Once everything fits and there are minimal gaps ill put another three tacks on each joint. If you can make your tacks with out filler, its a good indication that your fit up is good.
After that ill run a bead, depending of the material about the distance between tacks (if your tacks are 1/2 inch apart, done a 1 inch bead. The little trick i found is dont start the bead on your tacks, start in between them. When you do start of a tack I have found once that fusion is gone the metal can move how its wants to.
PeteM wrote:Pardon my ignorance, but why not use bent segments instead of pie pieces to make a bend?
Mandrel bends usually come in only one or two bend radii for a given tube diameter. My particular tube diameter sized for the engine was a less often used 1 3/8". This only came in a single bend radius.
With the piecuts, you can cut the tube to make almost any centerline radius you want just by changing the length of the cut. Even change bend radius within a bend. Like a spiral.
I also find it much easier to make multiple bends in different directions close to one another like going around the frame, around the filter housing. Making two tube ends meet and match up with each other also seems to be easier with the smaller pir cuts.
Some like the unique look as well.
I did it mainly to learn the technique.
Edit- oh yeah the main reason I'm doing it is for increased ground clearance. they don't make an exhaust for this old 78 yamaha xs anymore and when I race around on trackdays with it, I'm grounding out on the muffler and headers.
Last edited by jcw on Thu Mar 09, 2017 1:05 pm, edited 1 time in total.
Skylineauto wrote:I do a lot of work with pie cuts. They are out of stainless, aluminum and titanium. Best advice I can give that will speed up the learning curve are.
Fit up. Make sure your edges are straight and true. Make sure they are flat and round as well. The thinner the wall thickness the less chance you have to get a good weld with no gaps. The thinner it is, the less forgiving it is.
I normally do three tacks on each joint as I am making up the piece. Once everything fits and there are minimal gaps ill put another three tacks on each joint. If you can make your tacks with out filler, its a good indication that your fit up is good.
After that ill run a bead, depending of the material about the distance between tacks (if your tacks are 1/2 inch apart, done a 1 inch bead. The little trick i found is dont start the bead on your tacks, start in between them. When you do start of a tack I have found once that fusion is gone the metal can move how its wants to.
Fit up is good. I can do a speed tack on the parts more than 95% of the time.
As far as thickness, I'm stuck with what I have for now. Interestingly, I am seeing literally no significant gaps at all. In fact, I "could" weld these autogenously if I wanted to but was afraid of thinning the metal a little too much (again started out with too thin metal maybe) and developing cracks. I still might have cracks with filler, though.
I've been tacking more. Up to 6. And waiting between welds a lot more. It has been helping. I do two stitch welds about 3/4" long on a couple pie cut segments, then do the opposite sides. then go the the bike and fit the pipe up to check for distortion. So far so good. I'm 1/2 way through the second pipe.
PeteM wrote:Pardon my ignorance, but why not use bent segments instead of pie pieces to make a bend?
For me its used when you need a really tight bend to make something work. With titanium the mandrel bends are very expensive to buy. If you mess one up is a huge cost for mistakes. With the titanium pie cuts I can pre weld up 45 deg sections and piece what I need together. The first picture I put up an bend made for a Porsche tail pipe. The one that was installed had two 45s, like a picture frame corner to make the 90. not good flow at all.
The third picture is an intake for a Nissan 240 that has a LS1 swapped into it. Needed a tight 90 to get past the rad support and to the side of the engine bay.
Thanks. I was curious because they look very work intensive.
Mu suggestion would be to get some practice pieces and dial in youre set up. I would do that by just using the foot control. The pre flow when doing steel sometimes unnecessary but cant hurt, lust the amount of gas you will go through. Keep and eye on your tungsten after the post has stooped to see that you're getting the right amount. You will have work on your tie ins as well. 60 amps should be more than enough to weld those pieces nicely. And remember what you mom always use to say. Beauty is only skin deep, its whats on the inside that counts. This means your penetration.