Page 1 of 1
Is there a better way to do this
Posted: Sun Jun 18, 2017 5:38 pm
by MarkL
- 20170618_154531.jpg (32.17 KiB) Viewed 762 times
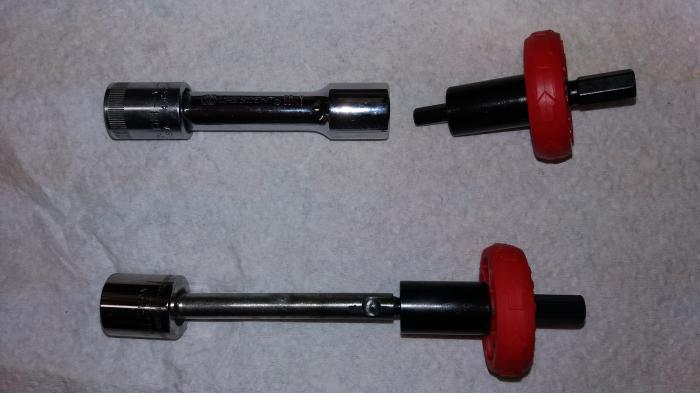
I made the gizmo on the bottom to start my string trimmer without using the pull cord. The socket attaches to the crankshaft nut and a cordless drill spins the other end to start the trimmer. The red thing is a one way clutch so that once the trimmer starts, the drill free spins and you can remove it from the nut. The problem is attaching the one way clutch to the socket. I took a 1/4" extension and cut the female end off, center drilled a hole that closely matched the output shaft on the clutch, then plug welded the extension to the clutch output shaft. The clutch has 2 sealed bearings in it, so it can't get very hot. The problem is keeping the centerline of the clutch in line with the centerline of the extension while I weld it. I used 2 V blocks and that worked OK, but the diameter of the clutch is different than the diameter of the extension, so I have to shim one of the V blocks. And once the plug weld cools, it tries to pull things a bit off center. I'm going to use a 3/8" extension next time (shown in top photo). There wasn't enough material left on a 1/4" extension once I center drilled the hole. Is there a better way to do this? The goal is to attach the socket to the output shaft of the clutch, and it needs about 2" of extension.
Re: Is there a better way to do this
Posted: Sun Jun 18, 2017 7:08 pm
by Coldman
I was working in the bush one time and had to think up a way to weld together two halves of a broken shaft as I had very little equipment available and no way of straightening the shaft. What I did was lay the pieces together in a steel angle and tack in two flat bars on edge over the top of the shaft pieces (two per piece) so that they could spin freely but were restrained from lateral movement. I drilled a large enough hole in each side of the angle to allow a cap bead to rotate through. As I tacked and welded the shaft together I punched the joint while hot so the shaft would continue to spin freely. The fully welded shaft came out nice and straight.
You would need to step the angle for the different diameters but a similar method could work for you.
Re: Is there a better way to do this
Posted: Sun Jun 18, 2017 8:42 pm
by MarkL
Coldman wrote: What I did was lay the pieces together in a steel angle ...
You would need to step the angle for the different diameters but a similar method could work for you.
This gave me an idea, I think if I put a socket on the extension that is the same outer diameter as the body of the clutch, I can lay the whole assembly in a V block (or angle), and that guarantees the clutch and extension are on the same centerline. I'll give that a try.
Re: Is there a better way to do this
Posted: Tue Jun 20, 2017 9:37 pm
by MarkL
Here's my setup based on Coldman's suggestion, I used a V block and a socket that's the same outer diameter as the clutch housing to get everything at the right level. I'll do the plug welds tomorrrow.
Re: Is there a better way to do this
Posted: Wed Jun 21, 2017 9:30 am
by thespian
I have done this type of thing before, and I found a piece of tube that both pieces fit in , and cut a window out on it, and slid in the pieces welded them, and left them in the tube to cool, they stayed pretty straight.
Re: Is there a better way to do this
Posted: Wed Jun 21, 2017 12:51 pm
by Skylineauto
If you have access to a drill press you could use that to keep everything aliened. Make sure the deck and drill head are square. Clamp one end in the chuck and set the other against the deck. Move the head so the assembly is clamped between the chuck and the deck. Tack it, let it cool and weld it.