
Good morning all,
Just started to learn tig welding and was wondering if some folks would be able to take a look at some practice welds and suggest what I could be doing wrong and how to improve.
Material: 1.6mm galvanized rectangular tube
Electrode: 2.4mm E3 tungsten
Filler: 2.4mm ER70S-2
Current: 70A, no foot pedal, 3 seconds down slope
Gas: Argon, 9 litres/min, #8 cup, gas lens
Weld 3 is the most consistent, but they have sucken rather than the filler building up.
Thanks,
Chris
Tig welding tips, questions, equipment, applications, instructions, techniques, tig welding machines, troubleshooting tig welding process
- Attachments
-
- Weld4b
- Weld4b.jpg (44.62 KiB) Viewed 1301 times
-
- Weld4a
- Weld4a.jpg (61.7 KiB) Viewed 1301 times
-
- Weld3b
- Weld3b.jpg (47.59 KiB) Viewed 1301 times
-
- Weld3a
- Weld3a.jpg (67.42 KiB) Viewed 1301 times
-
- Weld2b
- Weld2b.jpg (44.81 KiB) Viewed 1301 times
-
- Weld2a
- Weld2a.jpg (73.61 KiB) Viewed 1301 times
-
- Weld1b
- Weld1b.jpg (44.7 KiB) Viewed 1301 times
-
- Weld1a
- Weld1a.jpg (72.91 KiB) Viewed 1301 times
my $0.02 from another beginner,
it looks to hot and slow. i think probably way to slow.
check the backside it should tell you what happened.
tube can be funny in that it tends to overheat quicker for the given size.
also i would not use galv tube. your going to burn galv off the inside and make nasty fumes.
not the best stuff to learn on.
tweak it until it breaks
Bill Beauregard
- Bill Beauregard
-
Weldmonger

-
Posts:
-
Joined:Thu Jan 24, 2013 9:32 pm
-
Location:Green Mountains of Vermont
Do not weld galvanized if you can avoid it. When you do TIG galv. you must figure out how to avoid fumes. A fan blowing on your face if it doesn't blow away shielding gas might work. An expensive fume extractor is desired.
Start with clean bare mild steel.
Start with clean bare mild steel.
90 amps for 1.6mm thick material? I think you misread something... probably closer to 55 amps would be better than 70.Poland308 wrote:Try 90-120 amps. Your low heat is causing you to travel slow allowing the heat to saturate and cook the steel. Not ideal. But not bad for your first attempts.
Definitely do NOT practice on galvanized material. And, clean your tungsten now that you have welded galvanized with it.
Hi all,
Thanks for your replies and apologies for the delay. Wanted to wait until I could get some more mild steel that was not galvanised to try again.
First photo is from stick welding at 50A. Guess I'm using that as my benchmark, not sure if that weld is decent or not. The finish isn't the greatest but for the most part is it okay?
Second photo I welded from right to left, started at 50A but had trouble getting the tube and filler to melt. Stopped 1/3 of the way and bumped up to 60A. Moved too slow and same problem, flat?
Third photo I bumped up to 70A, not the best looking but the filler is starting to build up.
Fourth photo I bumped up to 90A. This felt the best for melting the tube and filler. Looks like I moved too slow or didn't dip the filler often enough?
Has the welding improved, declined or indifferent?
I think in my 90A attempt I was still moving too slow??
These welds look really dull and flat. Is it possible my welder is not working correctly? It's second hand and given I haven't welded with another tig welder I don't have much to compare with. It doesn't seem to melt the metal as cleanly as I've seen in Jody's tig videos. And the welds certainly don't have the same silvery shiny appearance.
Cheers,
Chris
Thanks for your replies and apologies for the delay. Wanted to wait until I could get some more mild steel that was not galvanised to try again.
First photo is from stick welding at 50A. Guess I'm using that as my benchmark, not sure if that weld is decent or not. The finish isn't the greatest but for the most part is it okay?
Second photo I welded from right to left, started at 50A but had trouble getting the tube and filler to melt. Stopped 1/3 of the way and bumped up to 60A. Moved too slow and same problem, flat?
Third photo I bumped up to 70A, not the best looking but the filler is starting to build up.
Fourth photo I bumped up to 90A. This felt the best for melting the tube and filler. Looks like I moved too slow or didn't dip the filler often enough?
Has the welding improved, declined or indifferent?
tweake, yes it did feel like I was going slow. Had trouble getting the base metal and filler to melt at low amps. The backside actually has the typical concave "meaty" look too it that I was expecting.tweake wrote:my $0.02 from another beginner,
it looks to hot and slow. i think probably way to slow.
check the backside it should tell you what happened.
tube can be funny in that it tends to overheat quicker for the given size.
also i would not use galv tube. your going to burn galv off the inside and make nasty fumes.
not the best stuff to learn on.
Thanks Poland308, 90-120A is inline with one of Jody's square tube welding videos: https://youtu.be/chUOzYmxOH4?t=4m09sPoland308 wrote:Try 90-120 amps. Your low heat is causing you to travel slow allowing the heat to saturate and cook the steel. Not ideal. But not bad for your first attempts.
I think in my 90A attempt I was still moving too slow??
cj737: 90+ amps seems high doesn't it, but I had quite a bit of trouble trying to get the tube to melt at 50A.cj737 wrote:90 amps for 1.6mm thick material? I think you misread something... probably closer to 55 amps would be better than 70.Poland308 wrote:Try 90-120 amps. Your low heat is causing you to travel slow allowing the heat to saturate and cook the steel. Not ideal. But not bad for your first attempts.
Definitely do NOT practice on galvanized material. And, clean your tungsten now that you have welded galvanized with it.
These welds look really dull and flat. Is it possible my welder is not working correctly? It's second hand and given I haven't welded with another tig welder I don't have much to compare with. It doesn't seem to melt the metal as cleanly as I've seen in Jody's tig videos. And the welds certainly don't have the same silvery shiny appearance.
Cheers,
Chris
- Attachments
-
- Stick.jpg (76.95 KiB) Viewed 1203 times
-
- Tig50A_60A.jpg (68.82 KiB) Viewed 1203 times
-
- Tig70A.jpg (67.47 KiB) Viewed 1203 times
-
- Tig90A.jpg (66.14 KiB) Viewed 1203 times
In this latest set of pictures, all of them show a lack of preparation. Your metal needs to be VERY CLEAN. Hot rolled, cold rolled, it doesn't matter. You need it to be bright and shiny. If the material is thin, you also need to clean the backside else the grime will pull through to the weld.
The 70 amp welds look plenty hot to me. Even the section of 60 amps looks about right since you had some heat in the material from the 50 amp portion of welding. I'd like to see a snapshot of your tungsten and cup setup. I suspect your tungsten is not properly tapered or is even slightly contaminated. And your stick out could be an issue. I don't see a defined gas coverage area either. This leads me to suspect improper arc length and torch angle issues (associated with being a new, less than immortal welder
 ).
).
Learning to TIG weld by video and across the internet is a hard, hard, hard thing. Be patient, you're making progress every time to lay a bead. It will be many months, if not a few years before you develop real consistency and beautiful welds. Don't get hung up on that aspect. They must be strong, beauty is secondary. Even professional welders don't leave perfect welds every time. Instagram welding is NOT something to judge yourself by.
The 70 amp welds look plenty hot to me. Even the section of 60 amps looks about right since you had some heat in the material from the 50 amp portion of welding. I'd like to see a snapshot of your tungsten and cup setup. I suspect your tungsten is not properly tapered or is even slightly contaminated. And your stick out could be an issue. I don't see a defined gas coverage area either. This leads me to suspect improper arc length and torch angle issues (associated with being a new, less than immortal welder
Learning to TIG weld by video and across the internet is a hard, hard, hard thing. Be patient, you're making progress every time to lay a bead. It will be many months, if not a few years before you develop real consistency and beautiful welds. Don't get hung up on that aspect. They must be strong, beauty is secondary. Even professional welders don't leave perfect welds every time. Instagram welding is NOT something to judge yourself by.
Let me give you a few practice ideas, if I may.
Clean your metal well first. Then set your machine to 80 amps. Tack two pieces together at both ends. Reset your amps to 50, and butt weld a section 1" long. Stop and let it cool. Bump your machine to 60 amps. Weld another 1" length. Stop and let it cool. Repeat this process, bumping every section by 5 amps.
After its cooled off, cut out the welds by making a parallel cut 2" to the side of each weld.This will give you a 4" wide section of flat metal, with welds down the middle. Inspect the backside. Then cut straight through the middle of each weld. Polish them up and inspect the fusion.
This type of test will help you to really understand heat and weld fusion. Plus, as a new welder, shorter repetitive welds is better practice than long beads. Once you get dialed in your amps, then, prepare some flat stock and weld longer beads (3-6"). If you pursue welding long straight beads with a TIG, you'll quickly get out of position and produce poor results. The best part of TIG is that you can start, weld, stop, and restart without any issues whatsoever. So there's no need to try and run a 2' long bead at one time.
Does the tube have that standard oil coating that’s on most square tube? If so it’s on the inside as well and will pull through the puddle as you weld. It’s also partially from the fact that it’s galv tube. Even after you grind it there’s still some zinc in the pores of the metal especially if it was hot dipped. What size filler are you using? Can you cut out a cross section of one of the welds to see your penetration? This can reveal a lot even if you don’t etch.
I have more questions than answers
Josh
Josh
Thanks for the feedback guys.
Sounds like I did not clean the tube as much as I need too. Here is how I prepared the joint. Ignore the top half, that's where I cut out the beads from.
It's a mild steel tube from the scrap yard, so had to wire brush the surface rust with a grinder and then cleaned the area to be welded with a flap disc. The bottom half is how I prepped the joints. As you can see, I didn't make it overly clean which I can see now that I should.
Here is what the tungsten looks like after finishing the 4 beads. It was needle sharp when I started:
Does the amount of stickout and cup size (#8) seem okay? Reasonable taper?
I've sliced up the tube similar to how you both have described. Here is how they look in the same order as my previous post. Stick50A, Tig50A, Tig60A, Tig70A and Tig90A:
Quite surprised there is so much filler on the back. Is that an indication of too much heat and penetration?
Here are the 4 beads sliced in half for a cross section view:
What do you make of the beads. Most of the filler (ER70S-2) has ended up on the backside. Would you say the fusion is good and would have been a strong weld?
Cheers,
Chris
Sounds like I did not clean the tube as much as I need too. Here is how I prepared the joint. Ignore the top half, that's where I cut out the beads from.
- RawTube.jpg (46.24 KiB) Viewed 1134 times
Here is what the tungsten looks like after finishing the 4 beads. It was needle sharp when I started:
- Tungsten.jpg (53.51 KiB) Viewed 1134 times
I've sliced up the tube similar to how you both have described. Here is how they look in the same order as my previous post. Stick50A, Tig50A, Tig60A, Tig70A and Tig90A:
- BacksideRaw.jpg (102.33 KiB) Viewed 1134 times
- BacksideWireBrushed.jpg (79.25 KiB) Viewed 1134 times
Here are the 4 beads sliced in half for a cross section view:
- BacksideStick50A.jpg (51.87 KiB) Viewed 1134 times
- BacksideTig50A.jpg (31.09 KiB) Viewed 1134 times
- BacksideTig60A.jpg (47.04 KiB) Viewed 1134 times
- BacksideTig70A.jpg (43.65 KiB) Viewed 1134 times
- BacksideTig90A.jpg (43.36 KiB) Viewed 1134 times
Cheers,
Chris
Responses in order-
Metal prep: NOT goo enough. Clean at least 1/2" to 2" of material fully, shiny bright away from your welding area. You will also see that material had a terribly grungy backside, which is no doubt pulling through to the front.
Tungsten: Taper looks fine, reduce your stick out. This will help prevent fouling the tungsten. Any time you foul your tungsten, stop welding. Clean it, taper it, and begin again. That "bauble" on the tip, is from dipping the tungsten and/or the grime in your metal jumping off the material and up to your tungsten. Hence, clean your material better, and more.
Backside photos: You see now that even at 50 amps, you had full penetration. The reason your front side welds looked bulky is due to torch movement, travel speed, and inconsistent filler dipping.
If you are holding the torch away from the metal (air welding) and trying to keep the distance of the tungsten from the material as you slide, you will get inconsistent results. Reduce the stick out until the tip is just barely exposed, lay the cup on the material, tilt forward until you have about 10-15* of laying it back, then weld. You position your eyes in front, and then move the cup along. This eliminates the arc length inconsistency. It also enables you to see how much filler to add as go.
You may also need to "weave" the torch angle side-to-side a bit as you slide forward. Having the cup in contact while doing this helps immensely. Welding tubing is a b!tch because getting at the backside to clean it is difficult. Practice with flat stock as you begin.
After seeing the cut out it became clear that it was indeed thin wall tube. I guess if you really needed to have a shiny weld you could internal purge even though it’s mild steel.
I have more questions than answers
Josh
Josh
BillE.Dee
- BillE.Dee
-
Weldmonger
-
Posts:
-
Joined:Mon Nov 27, 2017 8:53 pm
-
Location:Pennsylvania (Northeast corner)
I'm basically new to tig welding. I've watched Jody's videos and taken note that as soon as he lights up, the puddle forms and away we go. I light up, wait, wait and wait for the puddle. I do have the machine cranked up, but still have to wait, nothing like when Jody demonstrates. WHAT am I doing or not doing? This appears on both steel and aluminum.
- tungstendipper
-
Weldmonger
-
Posts:
-
Joined:Sun Nov 19, 2017 10:09 am
Is your machine cranked all the way up? (thinking your machine is too small for the thickness of material) What kind is your welder? Your puddle should form in 3 seconds or less. What are your settings, and thickness of material? Are you using 220 or 110 volts?BillE.Dee wrote:I'm basically new to tig welding. I've watched Jody's videos and taken note that as soon as he lights up, the puddle forms and away we go. I light up, wait, wait and wait for the puddle. I do have the machine cranked up, but still have to wait, nothing like when Jody demonstrates. WHAT am I doing or not doing? This appears on both steel and aluminum.
Lincoln MP 210, Lincoln Square Wave 200,
Everlast 210 EXT
Thermal Dynamics 25 Plasma cutter
" Anything that carries your livelihood wants to be welded so that Thor can’t break it."
CJ737
Everlast 210 EXT
Thermal Dynamics 25 Plasma cutter
" Anything that carries your livelihood wants to be welded so that Thor can’t break it."
CJ737
Okay finally got a chance to try again following what you guys have suggested.
Settings:
50A
1.6mm Filler
90A tacks (too high, didn't realise until the second tack)
Starting with Prep, all four sides to be welded were ground with a flap disc. The metal is not great, has quite a bit of pitting that I couldn't get into, but for the most part it looks clean.
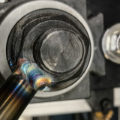
Next is electrode prep and stickout:
Very little stickout which made it harder to see the weld puddle but made it easier to not touch the tungsten into the puddle.
One thing I did change this time around was to drop down to 1.6mm filler. I think this also helped quite a bit making it much easier to melt the filler.
Three practice welds in no particular order:
Fourth weld I tried going back to 2.4mm filler for a small section but it didn't melt as nicely.
Lastly is how the electrode held up. Looks good I think.
Overall I'd say these welds are much cleaner looking in color. The filler is building up on the top side now.
There is a big difference in how the clean tube welded compared to the mill scale one. Smoother is one way to describe it.
The biggest problem I had was with the short stickout making it harder to slide the cup over the bead and seeing the puddle.
Yet to cut them up and check the cross section.
Thoughts?
Cheers,
Chris
Settings:
50A
1.6mm Filler
90A tacks (too high, didn't realise until the second tack)
Starting with Prep, all four sides to be welded were ground with a flap disc. The metal is not great, has quite a bit of pitting that I couldn't get into, but for the most part it looks clean.
- Prep.jpg (49.17 KiB) Viewed 919 times
- ElectrodeBefore.jpg (31.35 KiB) Viewed 919 times
- ElectrodeStickOut.jpg (30.66 KiB) Viewed 919 times
One thing I did change this time around was to drop down to 1.6mm filler. I think this also helped quite a bit making it much easier to melt the filler.
Three practice welds in no particular order:
- TubeA.jpg (35.1 KiB) Viewed 919 times
- WeldB.jpg (41.4 KiB) Viewed 919 times
- WeldC.jpg (40.02 KiB) Viewed 919 times
- Weld_2.4mmFiller.jpg (34.76 KiB) Viewed 919 times
- ElectrodeAfterWelding.jpg (33.63 KiB) Viewed 919 times
There is a big difference in how the clean tube welded compared to the mill scale one. Smoother is one way to describe it.
The biggest problem I had was with the short stickout making it harder to slide the cup over the bead and seeing the puddle.
Yet to cut them up and check the cross section.
Thoughts?
Cheers,
Chris
As a general practice my stickout is 1/2 the diameter of the cup opening size I’m using. IE if the opening of the cup is 1/2 inch then my stickout would be a 1/4 inch. That’s usually a good starting point I then adjust in or out based on the needs of the particular job.
I have more questions than answers
Josh
Josh
You could run a little bit more stick out since your cup is so large. Is there a gas lens in there too? I like to run less angle on my tungsten. Yours is needle-like. That make the arc come off the tungsten further up than if it were a more “blunt” angle.
Welds look better. You can add less filler and achieve flatter welds. Or, you can weave the tungsten sideways across the joint slightly to help tie in the weld, and spread the heat away from the joint solely.
Welds look better. You can add less filler and achieve flatter welds. Or, you can weave the tungsten sideways across the joint slightly to help tie in the weld, and spread the heat away from the joint solely.
- tungstendipper
-
Weldmonger
-
Posts:
-
Joined:Sun Nov 19, 2017 10:09 am
I wish someone would write a book, or just do a picture book showing the cause and effects of welding. Just as you point out with sharpening tungsten, I would like to see pictures what welds would look like with the different ground angles given to the tungsten. Or pictures of welds without gas and too much gas and etc. Pics of tungsten without post flow. Welds that look fine but are not, and so on.cj737 wrote:You could run a little bit more stick out since your cup is so large. Is there a gas lens in there too? I like to run less angle on my tungsten. Yours is needle-like. That make the arc come off the tungsten further up than if it were a more “blunt” angle.
Welds look better. You can add less filler and achieve flatter welds. Or, you can weave the tungsten sideways across the joint slightly to help tie in the weld, and spread the heat away from the joint solely.
Lincoln MP 210, Lincoln Square Wave 200,
Everlast 210 EXT
Thermal Dynamics 25 Plasma cutter
" Anything that carries your livelihood wants to be welded so that Thor can’t break it."
CJ737
Everlast 210 EXT
Thermal Dynamics 25 Plasma cutter
" Anything that carries your livelihood wants to be welded so that Thor can’t break it."
CJ737
Return to “Tig Welding - Tig Welding Aluminum - Tig Welding Techniques - Aluminum Tig Welding”
Jump to
- Introductions & How to Use the Forum
- ↳ Welcome!
- ↳ Member Introductions
- ↳ How to Use the Forum
- ↳ Moderator Applications
- Welding Discussion
- ↳ Metal Cutting
- ↳ Tig Welding - Tig Welding Aluminum - Tig Welding Techniques - Aluminum Tig Welding
- ↳ Mig and Flux Core - gas metal arc welding & flux cored arc welding
- ↳ Stick Welding/Arc Welding - Shielded Metal Arc Welding
- ↳ Welding Forum General Shop Talk
- ↳ Welding Certification - Stick/Arc Welding, Tig Welding, Mig Welding Certification tests - Welding Tests of all kinds
- ↳ Welding Projects - Welding project Ideas - Welding project plans
- ↳ Product Reviews
- ↳ Fuel Gas Heating
- Welding Tips & Tricks
- ↳ Video Discussion
- ↳ Wish List
- Announcements & Feedback
- ↳ Forum News
- ↳ Suggestions, Feedback and Support
- Welding Marketplace
- ↳ Welding Jobs - Industrial Welding Jobs - Pipe Welding Jobs - Tig Welding Jobs
- ↳ Classifieds - Buy, Sell, Trade Used Welding Equipment
- Welding Resources
- ↳ Tradeshows, Seminars and Events
- ↳ The Welding Library
- ↳ Education Opportunities