
Hello everyone!
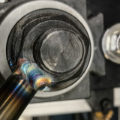
I am working on an aluminium thin wall pipe oil catch can of about 2mm thick (under 3/32" thick) and I am having an issue with my restarts...
Since I add a dab or two at the "end" of a bead to avoid the crater cracks the "end" looks bigger than the rest of the bead.
After I reposition myself and the part and I light up on that bigger end tack, I haven't been able to smooth the tie in out..
I'm not wanting to blow a hole through it and maybe I'm just not doing something correctly?
Any advice I could use?
Thanks in advance
Tig welding tips, questions, equipment, applications, instructions, techniques, tig welding machines, troubleshooting tig welding process
Light up behind it, and "wash it" in the opposite direction with no filler. Its darn near impossible to get these perfect unless you're Rush Kane.
Another trick is as you approach the end/tie-in, start to flatten the tungsten angle and "point the arc" beyond the last dip. That creates a bit of a tear drop final bead. Gotta still keep a tight arc though. I do this but add some extra filler over the final two beads to have more filler to "push" out to the tie-in.
Another trick is as you approach the end/tie-in, start to flatten the tungsten angle and "point the arc" beyond the last dip. That creates a bit of a tear drop final bead. Gotta still keep a tight arc though. I do this but add some extra filler over the final two beads to have more filler to "push" out to the tie-in.
i still struggle with appearance on restarts on corners of alum square tubing. even wrapping the corners
i never looks very continuous.
craig
i never looks very continuous.
craig
htp invertig 221
syncrowave 250
miller 140 mig
hypertherm plasma
morse 14 metal devil
syncrowave 250
miller 140 mig
hypertherm plasma
morse 14 metal devil

- LtBadd
-
Weldmonger

-
Posts:
-
Joined:Sun Apr 12, 2015 4:00 pm
-
Location:Clearwater FL
-
Contact:
me too Craig, but then I don't weld aluminum a lot these days, even so the DC+ side which creates the frost appearance would still be a tell tale signmotox wrote:i still struggle with appearance on restarts on corners of alum square tubing. even wrapping the corners
i never looks very continuous.
craig
Richard
Website
Website
Thanks guys!
Hah! I didn't think off that! I should've just not added the extra dabs when I ended each run.. I was worried I'd blow a hole if I didn't put the dabs when I'd go do the restarts....
CJ, Next time I will try to increase the torch angle like you mentioned and see if I get an improvement!
The two spouts and the small tab on the top "cap" came like that..
I only did the middle seam and the large tab with the two bolts... The large tab I only did it after I'd welded the two shortened halves together to make the container much smaller so I can fit it on my motorcycle and it looks kinda funky..
- tungstendipper
-
Weldmonger
-
Posts:
-
Joined:Sun Nov 19, 2017 10:09 am
Where is 5th Street Fab? This is a perfect thread for his skills.
Lincoln MP 210, Lincoln Square Wave 200,
Everlast 210 EXT
Thermal Dynamics 25 Plasma cutter
" Anything that carries your livelihood wants to be welded so that Thor can’t break it."
CJ737
Everlast 210 EXT
Thermal Dynamics 25 Plasma cutter
" Anything that carries your livelihood wants to be welded so that Thor can’t break it."
CJ737
One thing that will help you get a more consistent result with welding a tube is to weld in the same direction all the way around. Your catch can shows you welded the 2 halves from multiple directions.Breezer28 wrote:Thanks guys!
I only did the middle seam and the large tab with the two bolts... The large tab I only did it after I'd welded the two shortened halves together to make the container much smaller so I can fit it on my motorcycle and it looks kinda funky..
Also, when you weld circular tubing/piping, you need to keep the torch angle very consistent by moving your hand to remain in the same relative position to the weld. If the pipe is a small part on your bench, then weld a specific number of dips, stop, then rotate the part. Repeat the number of dips, stop. Be really diligent on this and you will get a very consistent bead size and profile because the longer you weld with ally, the more heat gets soaked into the part.
Another thing I do on thin material with TIG is to weld mostly "downhill". This helps keep the heat in my puddle, not racing uphill before I get filler to it. I get to push the puddle as I move my torch. Of course, some type of orbital poisoner makes it very easy to weld like a machine too

- 5th Street Fab
-
Guide

-
Posts:
-
Joined:Sun Jan 15, 2017 1:08 am
Hey guys. If I'm going to be restarting I do like LtBadd said and don't add filler and move about 1/4" ahead and taper off. When I restart I let that soak in for a few seconds and quickly back into the last dab I did and add a drop of filler and move from there.
Sent from my XT1635-01 using Tapatalk
Sent from my XT1635-01 using Tapatalk
Ahh, sorry.. small illusion there..
I flipped the piece around, that's why it looks like there's uphill and downhill.. but It is possible that I flipped the piece around and went downhill the other way
I do try to keep the torch angle but didn't even think of counting how many dips I was doing. I either went as far as to get out of position or ran out of filler wire but next time I will try to keep that in mind for sure!
I'm also adjusting to the fact that now I have a foot pedal which I had never used before.. could be a culprit of my "high" restarts if I'm not using all the necessary heat input?
I was really trying to avoid blowing a hole on the piece.. and could've possibly used more Amps..I'm just not used to the feel on the Aluminium...
Thanks for all the advice! Good night gents!
Ah, Breeze, you’re doing fine. No worries. Not many IG welders on this forum, just happy-go-luckies with a passion to melt metal. Only reason I gave you these “critiques” is so as you go along with your bike customization, you can up your game each successive time. Makes owning a welder and building your own stuff more pleasing. And as you look back over time at some of your earlier projects, you’ll say, “Geez, I was crap then!” “But look at me now!” It’s a time capsule of your progress. We’ve all been there, truly.
The tips, techniques and insights are learned through trial and error or are passed along from Old School Guys. It’s how knowledge is transferred through the ages. Embrace the learning curve, Man. Never regret trying or failing, it’s how you learn to improve!
Pictures of the rest of the bike, please
Thanks CJ!
The bike is still in a very raw state..
Since my brother had a bad motorcycle crash 3 years back when he almost died, I kinda "neglected" my own bike :\
It's a 1990 Yamaha XT600E (very modified) but original frame, engine, rear suspension..
I'm hoping that I'll have time this next weekend to take the engine off, clean it up and repaint it, flush new oil and such.
But before I take the engine off I need to make two brackets to hold the air intake boots to the new carburetor up to the frame where it connects to the two Air pod filters..
I'll just weld one tab on each carburetor boot/airfilter connection "spacer" made out of 63mm OD thinwall aluminium pipe so the boots don't vibrate off...
Have a good night gents!
Vando
Those carb boots may be cast aluminum. Welding to those can be a whole new set of frustrating tricks! Cast ally is prone to producing porosity when you weld it. Just be mindful of that when you get junk looking beads.
If your machine has adjustable frequency and AC Balance, tinkering with those settings makes it easier.
If your machine has adjustable frequency and AC Balance, tinkering with those settings makes it easier.
CJ
I know now! I've actually dealt once with cast aluminum from my dad's Yamaha outboard lower unit that cracked due to corrosion.. Indeed it was a pain in the arse to weld that crap..
Used 4043 filler because of all the deoxidizers, keeping in mind all the heat cycles it goes through and "protection" from saltwater..
Degresased, ground up the cracks, scuffed it with a brand new SS brush and ran AC balance all the way up to 90% on a "dry run".. It was Nasty!
The carb boots are rubber..I've got the Raptor 660 carbs on my motorcycle with the Raptor's carb-to-air filter rubber boots.
I have a section of 63mm OD pipe that slips inside and lets me attach air filter pods to those rubber boots.
I used to have the big twin style K&N air filter but it was taking up way too much space under the bike frame top part and I want to clean up the bike's looks and that spot is perfect to hold the battery and electronics..
The brackets only function will only be to support the weight of those rubber boots and air pod filters so they don't try to pull away from the carb with all the vibrations and such
Return to “Tig Welding - Tig Welding Aluminum - Tig Welding Techniques - Aluminum Tig Welding”
Jump to
- Introductions & How to Use the Forum
- ↳ Welcome!
- ↳ Member Introductions
- ↳ How to Use the Forum
- ↳ Moderator Applications
- Welding Discussion
- ↳ Metal Cutting
- ↳ Tig Welding - Tig Welding Aluminum - Tig Welding Techniques - Aluminum Tig Welding
- ↳ Mig and Flux Core - gas metal arc welding & flux cored arc welding
- ↳ Stick Welding/Arc Welding - Shielded Metal Arc Welding
- ↳ Welding Forum General Shop Talk
- ↳ Welding Certification - Stick/Arc Welding, Tig Welding, Mig Welding Certification tests - Welding Tests of all kinds
- ↳ Welding Projects - Welding project Ideas - Welding project plans
- ↳ Product Reviews
- ↳ Fuel Gas Heating
- Welding Tips & Tricks
- ↳ Video Discussion
- ↳ Wish List
- Announcements & Feedback
- ↳ Forum News
- ↳ Suggestions, Feedback and Support
- Welding Marketplace
- ↳ Welding Jobs - Industrial Welding Jobs - Pipe Welding Jobs - Tig Welding Jobs
- ↳ Classifieds - Buy, Sell, Trade Used Welding Equipment
- Welding Resources
- ↳ Tradeshows, Seminars and Events
- ↳ The Welding Library
- ↳ Education Opportunities