Hi all.
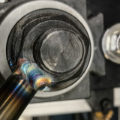
I've picked up a 'new' lathe, ex school, with a bit of damage here and there. The Pratt Burnerd 4-jaw chuck has damage to 2 of the 4 jaw adjustment screws.
The plan is to clean these and then build up material before turning off the excess and hand finishing. Any tips on which filler? Silicon bronze? 309 stainless?
All tips appreciated!
K
Tig welding tips, questions, equipment, applications, instructions, techniques, tig welding machines, troubleshooting tig welding process

- MosquitoMoto
-
Weldmonger

-
Posts:
-
Joined:Sat Aug 01, 2015 8:38 am
-
Location:The Land Down Under
- tungstendipper
-
Weldmonger
-
Posts:
-
Joined:Sun Nov 19, 2017 10:09 am
Check with the manufacture of the chuck to get replacement parts. If you build up the side of the screw with weld how are you going to broach the square hole? If you have the side piece I would use silicone bronze rod.
Lincoln MP 210, Lincoln Square Wave 200,
Everlast 210 EXT
Thermal Dynamics 25 Plasma cutter
" Anything that carries your livelihood wants to be welded so that Thor can’t break it."
CJ737
Everlast 210 EXT
Thermal Dynamics 25 Plasma cutter
" Anything that carries your livelihood wants to be welded so that Thor can’t break it."
CJ737

If you are dead keen to tig repair these cast screws, I have had excellent results with EZ Weld Tig Wire
https://ezweldtigwire.com/
You can order some in, it's strong as. If you build it up I suppose you can use a small 3mm pointy burr to get in and shape the square hole.
https://ezweldtigwire.com/
You can order some in, it's strong as. If you build it up I suppose you can use a small 3mm pointy burr to get in and shape the square hole.
Flat out like a lizard drinkin'
- MosquitoMoto
-
Weldmonger
-
Posts:
-
Joined:Sat Aug 01, 2015 8:38 am
-
Location:The Land Down Under
Thanks for the tips guys.
Dipper, the parts are available...but I am seeing $50-ish EACH for those screws. If I repair, I'll get into the hex with a tiny carbide bit on my Dremel to make the best hex fit I can.
Coldie - I already have a 3-jaw self-centring chuck, came with the lathe along with a bundle of other stuff. (Did I mention that the lathe in great condition, plus all the other gear...cost me a carton of beer?)
Oscar, cheers for the offer but I'll try to keep it local.
All...stay tuned for updates as I set about this. Thanks again for the advice.
K
Some flat machinist files will enable you to broach those hexes back into shape. Going to require a bit of "doing", but can be done. If you have a hydraulic press, you can buy the broach yourself and just do it that way. Or, you can make a broach and do it yourself.
I know, all that DIY is a lot of work and more time than $50, but just offering you up some ideas to keep you busy in the cold winter days until Spring arrives in Oz Or whilst its too bloody hot to venture outdoors-
I know, all that DIY is a lot of work and more time than $50, but just offering you up some ideas to keep you busy in the cold winter days until Spring arrives in Oz
- MosquitoMoto
-
Weldmonger
-
Posts:
-
Joined:Sat Aug 01, 2015 8:38 am
-
Location:The Land Down Under
CJ -cj737 wrote:Some flat machinist files will enable you to broach those hexes back into shape. Going to require a bit of "doing", but can be done. If you have a hydraulic press, you can buy the broach yourself and just do it that way. Or, you can make a broach and do it yourself.
I know, all that DIY is a lot of work and more time than $50, but just offering you up some ideas to keep you busy in the cold winter days until Spring arrives in Oz
Spring is here in Oz...it better be, I'm riding my bike to the Phillip Island MotoGP soon!
Thanks for the tips, and hey, all the DIY work is no problem...I have many, many hours of work ahead of me as I set up and get to know my new lathe, so this repair is no biggie. Funny thing is, no matter how difficult and time consuming the repair might wind up being, on principle I'm simply not the type of person who will pay $50 for a single adjustment screw!
Also...however I wind up fixing these screws, they will be fixed for good because from here on in, this chuck will see 100 percent tender loving care compared to what it's had in the hands of school kids for the past decade or so.
Cheers,
K

I would grind a brass rod or bolt to a square shape to fit the screw. TIG weld the missing area, letting the weld lay against the brass. I would make the brass sure slightly undersize to facilitate it's removal. Good luck !
- tungstendipper
-
Weldmonger
-
Posts:
-
Joined:Sun Nov 19, 2017 10:09 am
Great idea!!!!Coldman wrote:If you can get piece of aluminium square bar to snug in the hole while you build it up, the job will get a whole lot easier.
Lincoln MP 210, Lincoln Square Wave 200,
Everlast 210 EXT
Thermal Dynamics 25 Plasma cutter
" Anything that carries your livelihood wants to be welded so that Thor can’t break it."
CJ737
Everlast 210 EXT
Thermal Dynamics 25 Plasma cutter
" Anything that carries your livelihood wants to be welded so that Thor can’t break it."
CJ737

- weldin mike 27
-
Weldmonger
-
Posts:
-
Joined:Fri Apr 01, 2011 10:59 pm
-
Location:Australia; Victoria
Just approved a post with a similar idea, I also second and third and fourth some kind of removable backing bar.
- MosquitoMoto
-
Weldmonger
-
Posts:
-
Joined:Sat Aug 01, 2015 8:38 am
-
Location:The Land Down Under
Lots of good suggestions here guys, thanks.
I like the idea of the square aluminium backing bar - perfect!
Have also considered lopping the hex off a Allen head bolt, grinding the end of the old screw flat and welding the hex to the screw.
Will post pics of whatever I do, thanks for the tips.
K
I like the idea of the square aluminium backing bar - perfect!
Have also considered lopping the hex off a Allen head bolt, grinding the end of the old screw flat and welding the hex to the screw.
Will post pics of whatever I do, thanks for the tips.
K
Return to “Tig Welding - Tig Welding Aluminum - Tig Welding Techniques - Aluminum Tig Welding”
Jump to
- Introductions & How to Use the Forum
- ↳ Welcome!
- ↳ Member Introductions
- ↳ How to Use the Forum
- ↳ Moderator Applications
- Welding Discussion
- ↳ Metal Cutting
- ↳ Tig Welding - Tig Welding Aluminum - Tig Welding Techniques - Aluminum Tig Welding
- ↳ Mig and Flux Core - gas metal arc welding & flux cored arc welding
- ↳ Stick Welding/Arc Welding - Shielded Metal Arc Welding
- ↳ Welding Forum General Shop Talk
- ↳ Welding Certification - Stick/Arc Welding, Tig Welding, Mig Welding Certification tests - Welding Tests of all kinds
- ↳ Welding Projects - Welding project Ideas - Welding project plans
- ↳ Product Reviews
- ↳ Fuel Gas Heating
- Welding Tips & Tricks
- ↳ Video Discussion
- ↳ Wish List
- Announcements & Feedback
- ↳ Forum News
- ↳ Suggestions, Feedback and Support
- Welding Marketplace
- ↳ Welding Jobs - Industrial Welding Jobs - Pipe Welding Jobs - Tig Welding Jobs
- ↳ Classifieds - Buy, Sell, Trade Used Welding Equipment
- Welding Resources
- ↳ Tradeshows, Seminars and Events
- ↳ The Welding Library
- ↳ Education Opportunities