Tig welding tips, questions, equipment, applications, instructions, techniques, tig welding machines, troubleshooting tig welding process
Kodokan
  • Posts:
  • Joined:
    Thu Nov 04, 2021 2:05 am

Stainless setup for a corner weld.

Image

Above the corner weld (penetration) on the backside, there is a gray-looking bead with a small bit of sugaring. That was done without purge Argon.

Image

Nothing to see on the outside. I used filler rod on the corner, but didn't get much penetration. So, I went over the corner again with a fusion weld.

Image

Got some 1mm and 2mm Titanium and cut my own coupons. No school next week, but will do more testing soon.

Image
Kodokan
  • Posts:
  • Joined:
    Thu Nov 04, 2021 2:05 am

Want to get back to the torch tomorrow. It's Spring Break, so I'll just be welding at home this week.

I'll repeat the coping weld with the home torch, and compare to the school TIG.

Been trying hard to come up with other fun projects.

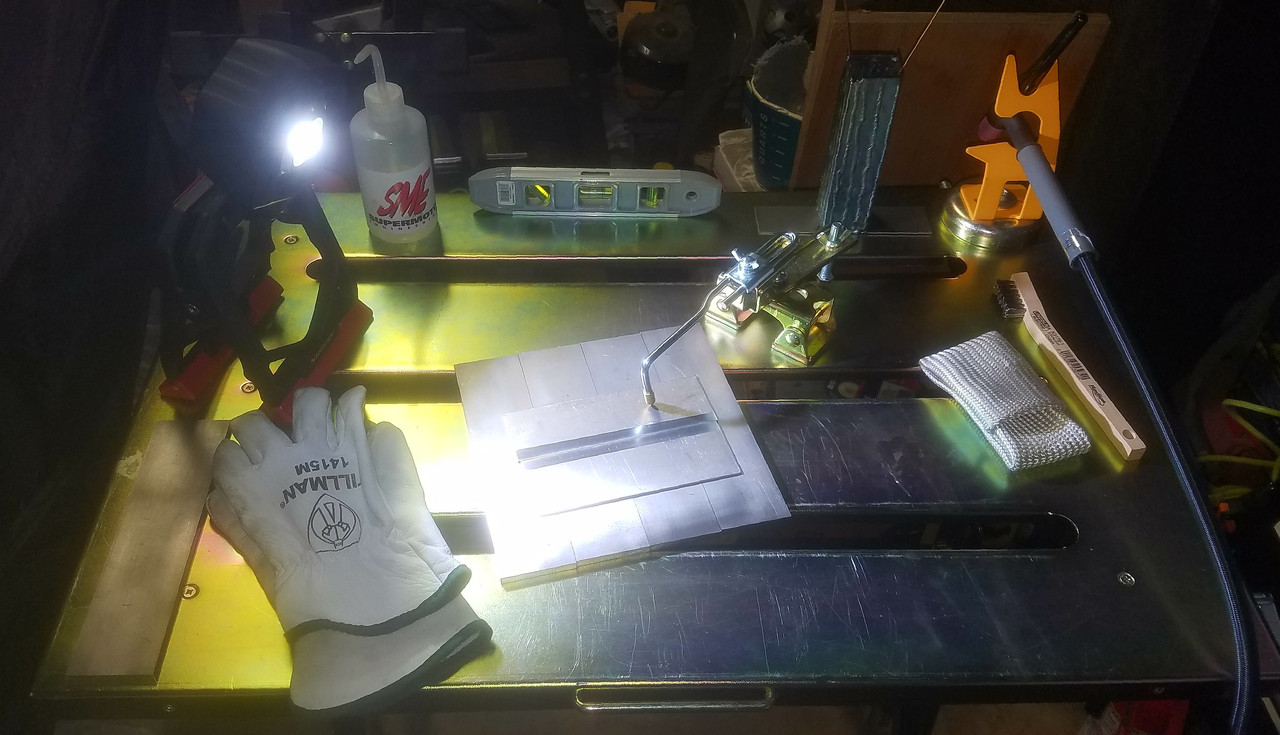
Definitely need to work on my tack welding. I've been doing a quick blast, sometimes with a bit of filler rod to prevent burning a hole. Works great for practice coupons, but isn't going go cut it for fabrication. I need to tack using minimal rod, and also melt a minimal amount of the parent metal. That way, I can cut the tacks and reuse the pieces. Will take some practice.

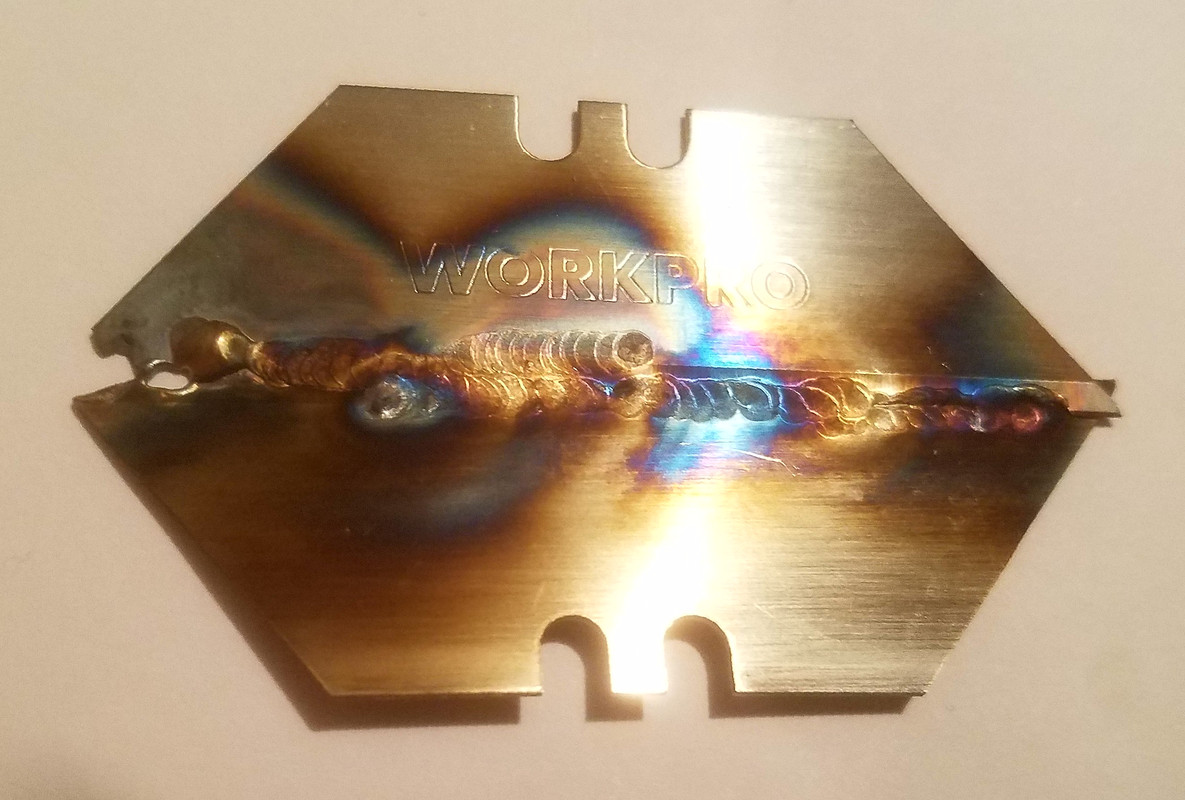
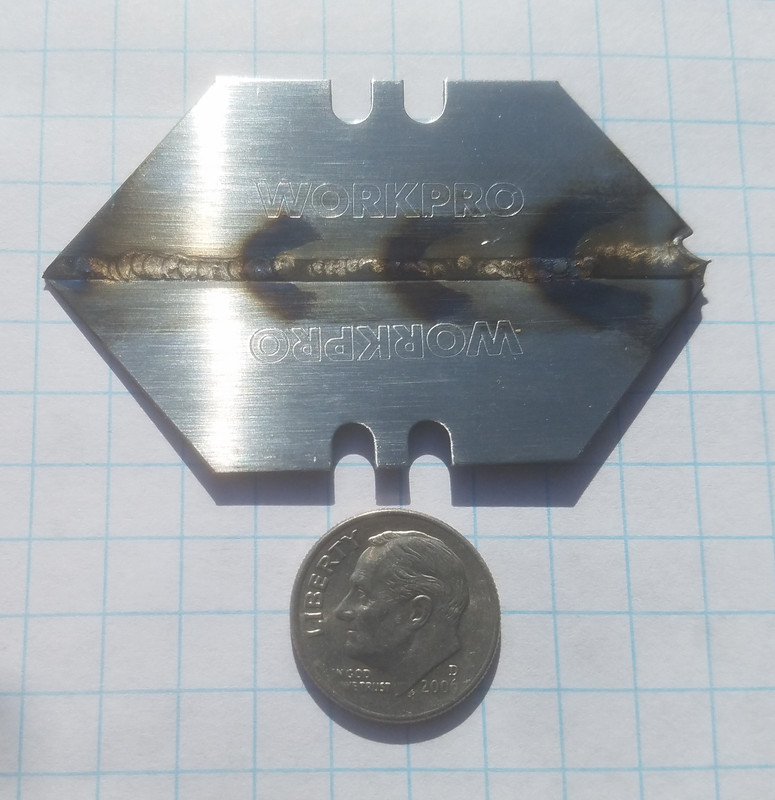
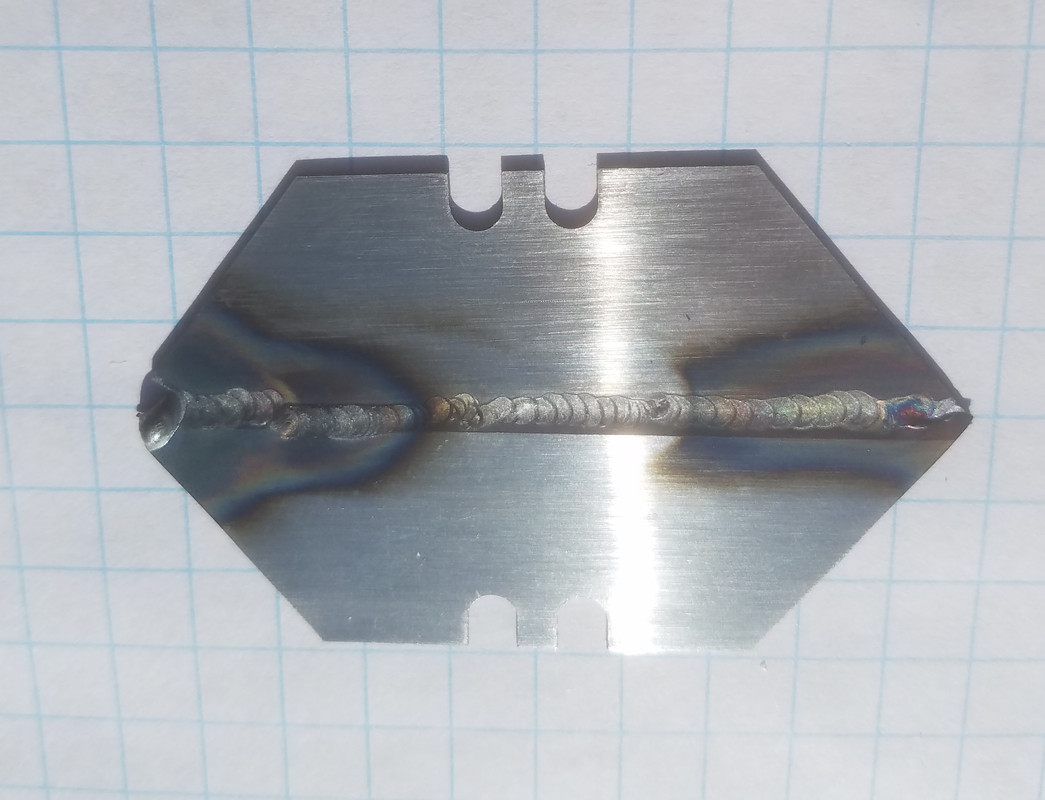
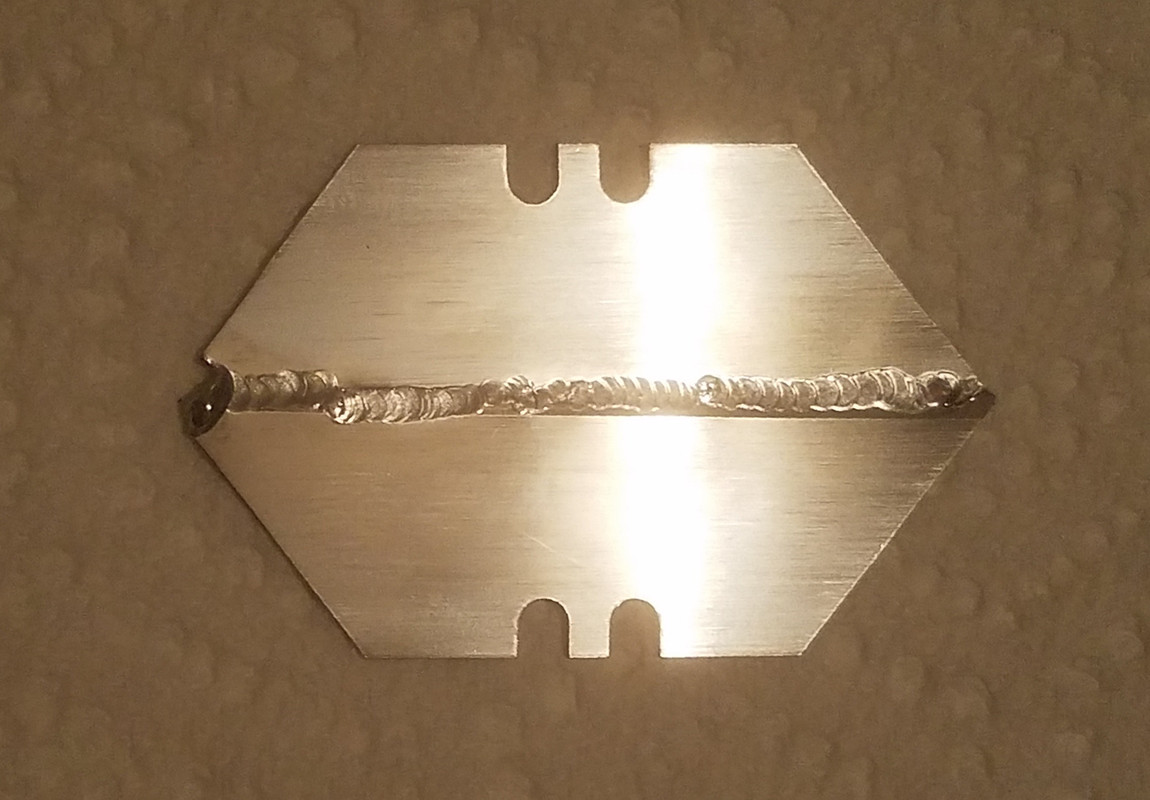
Planning on doing a Razor Blade Challenge. Should be fun.

Planning on welding some nuts & bolts together. I've see it done a lot for different reasons.

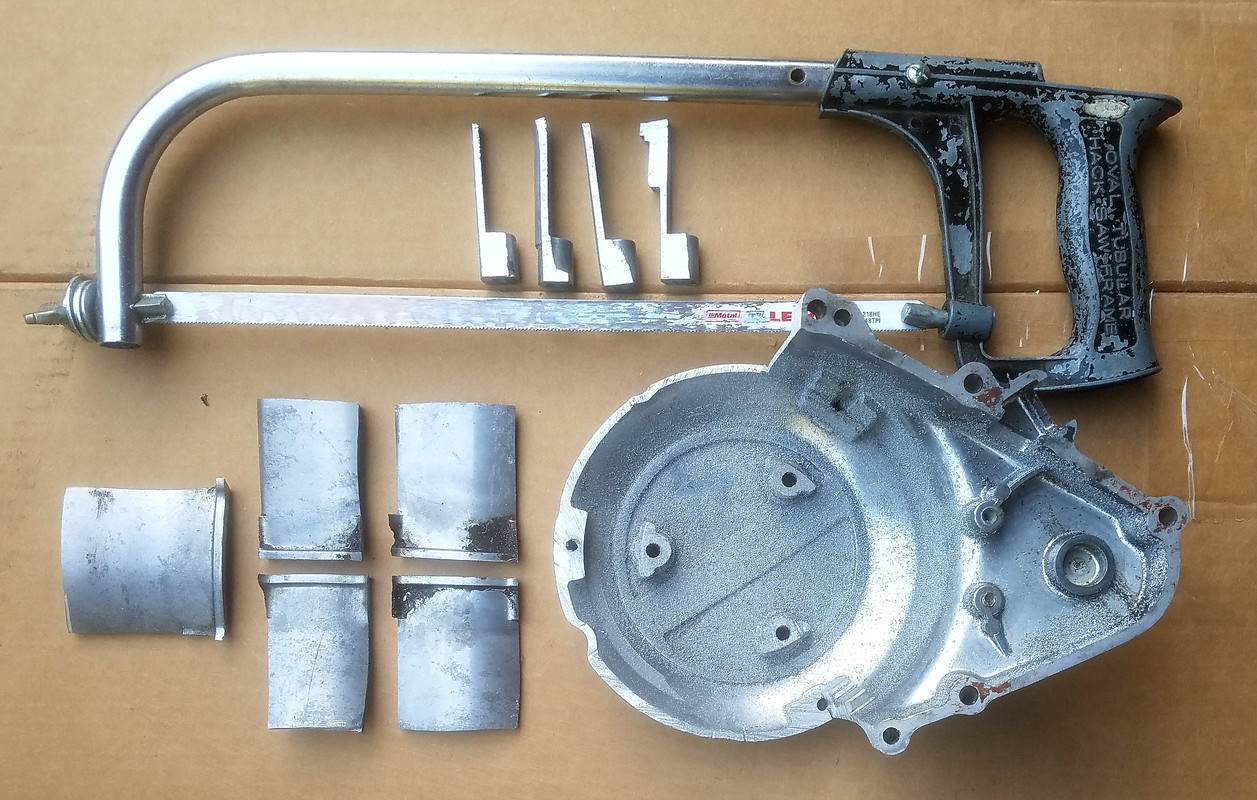
Would like to weld some motorcycle cast aluminum. Need to get some trashed aluminum side covers to practice on. No idea where to find them, though.

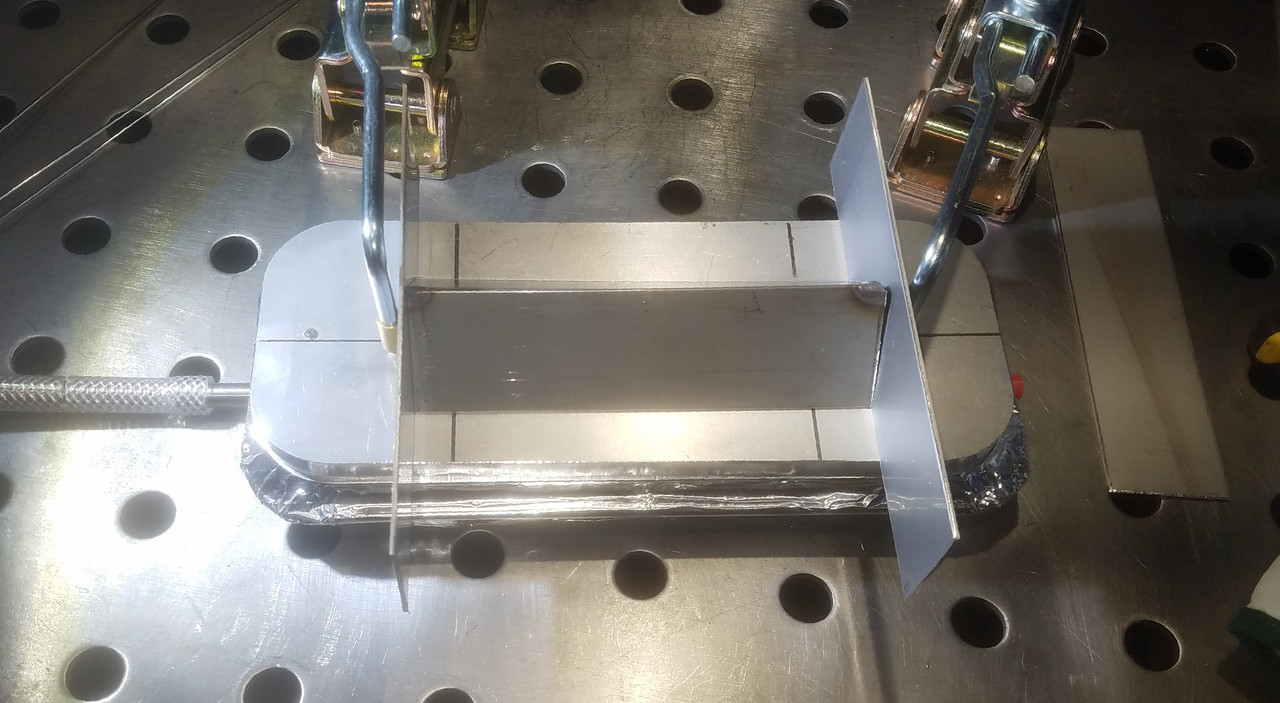
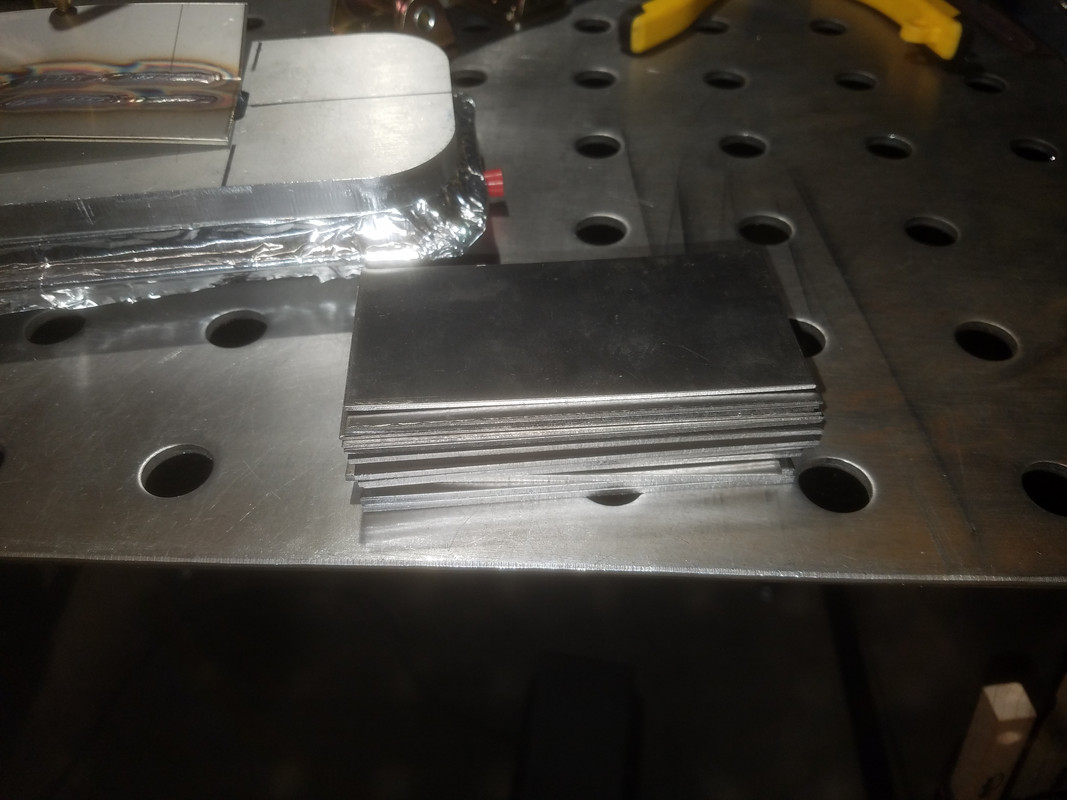
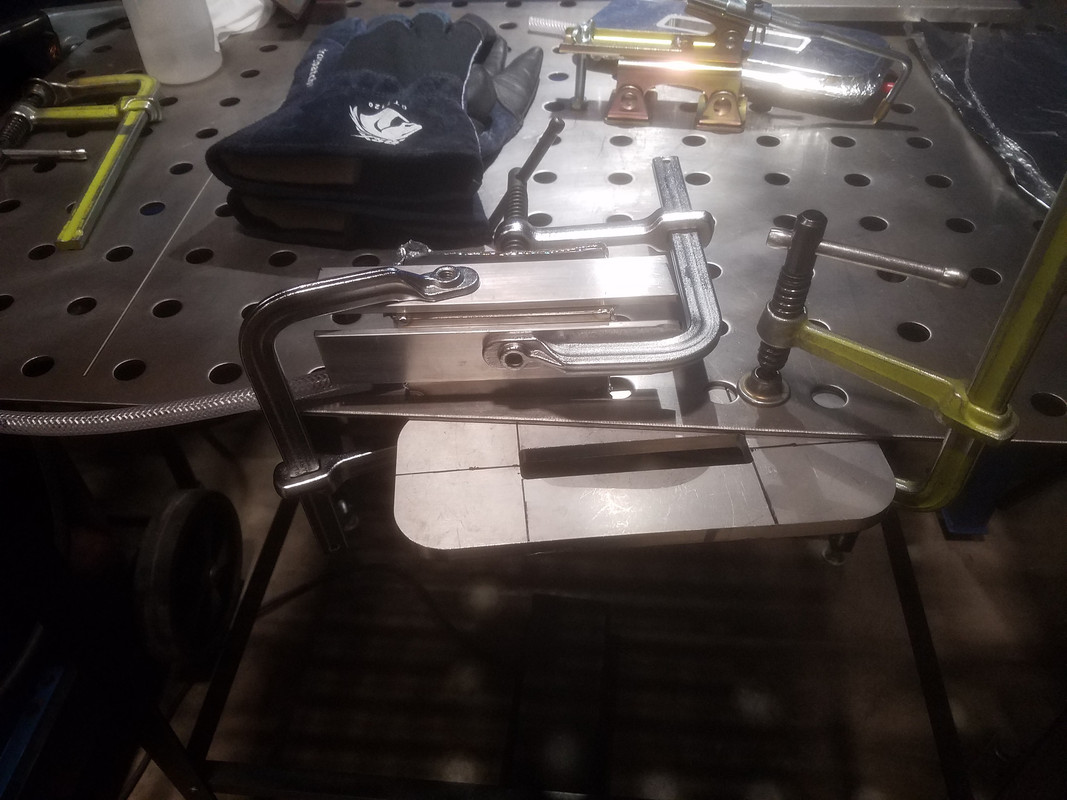
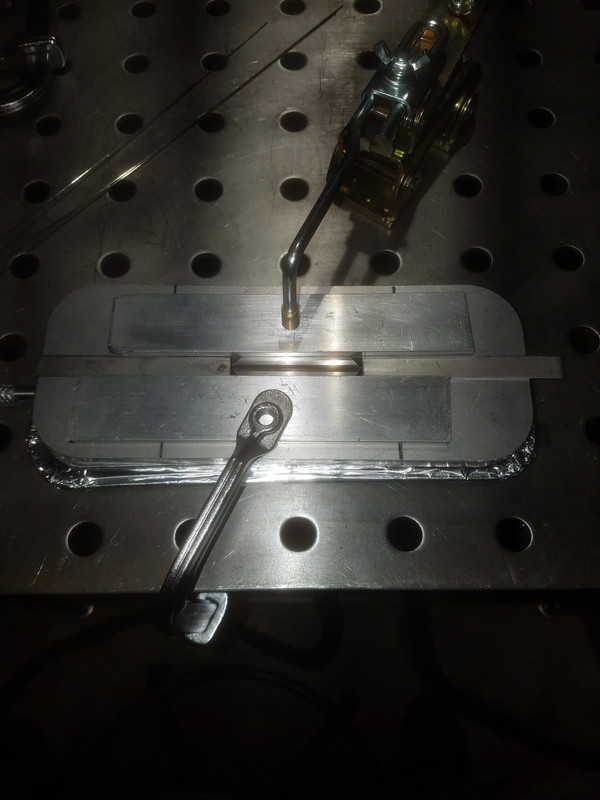
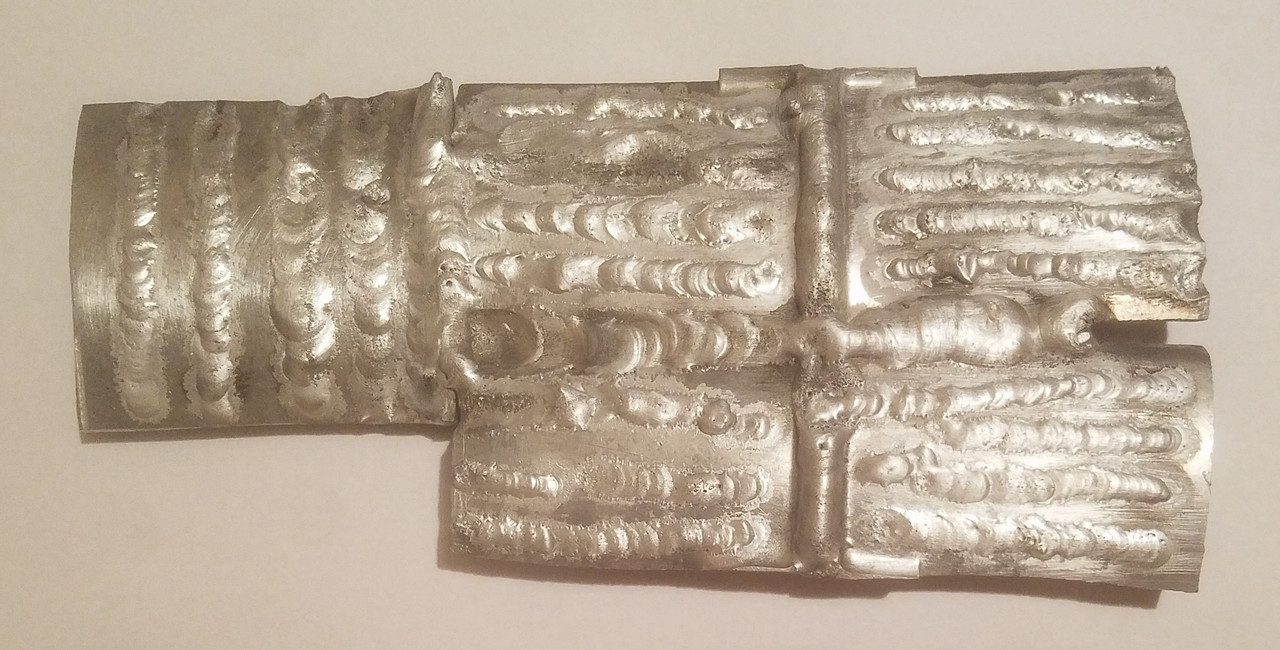
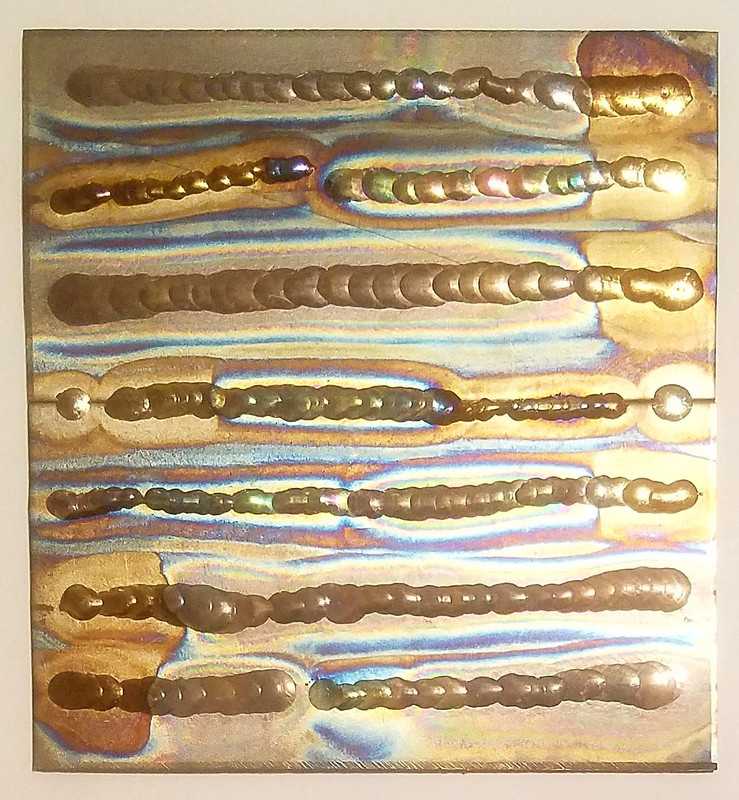
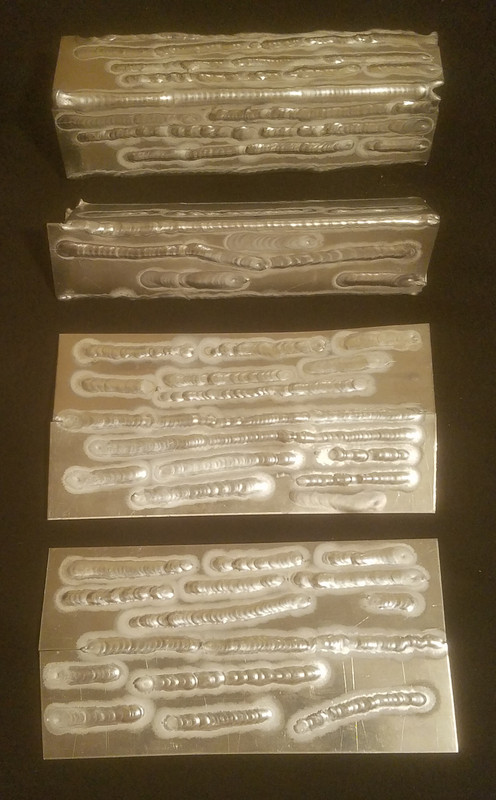
Wasn't able to get scrap titanium. The titanium coupons I made were from brand new retail stock. I've already started dipping into my good stuff, too. Grabbed some nice 1/8" aluminum to practice on:

Image

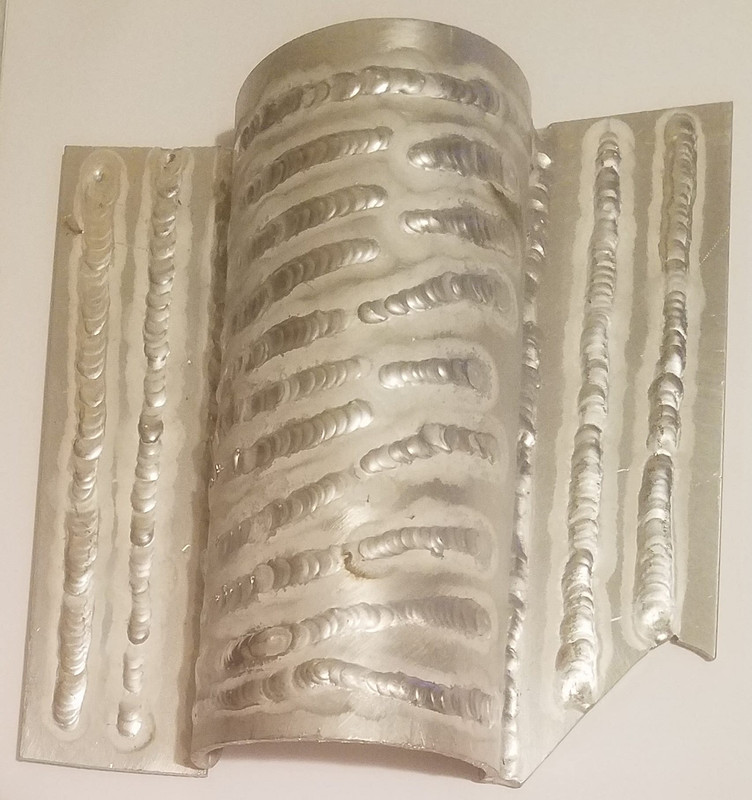
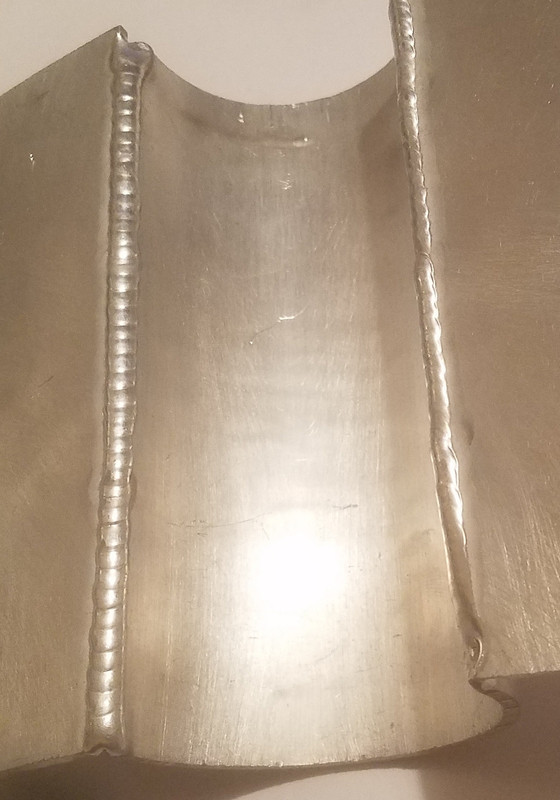
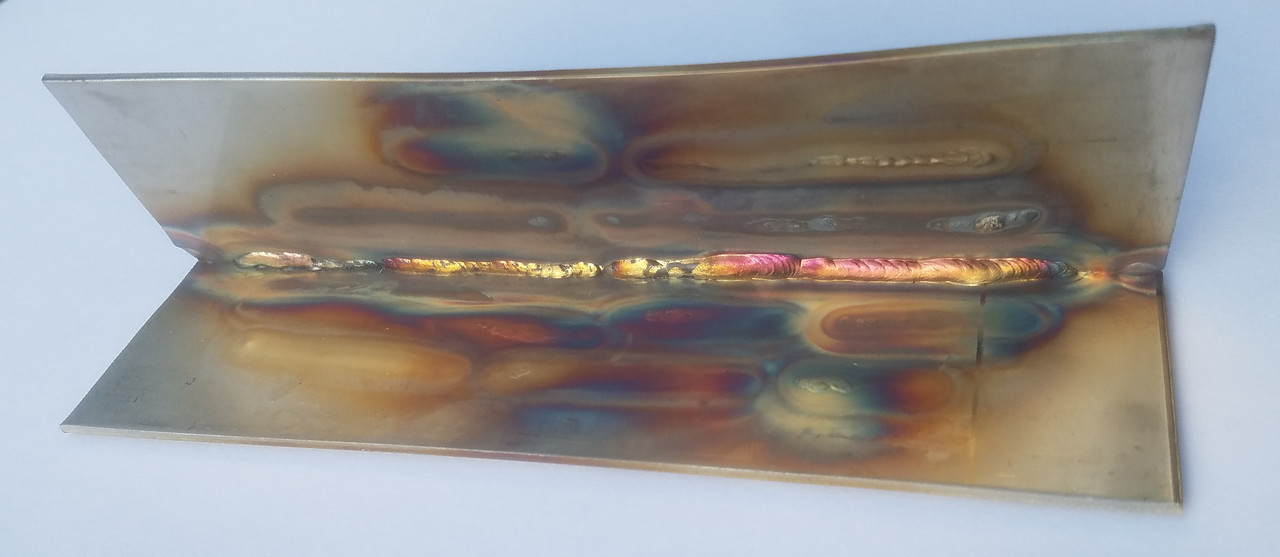
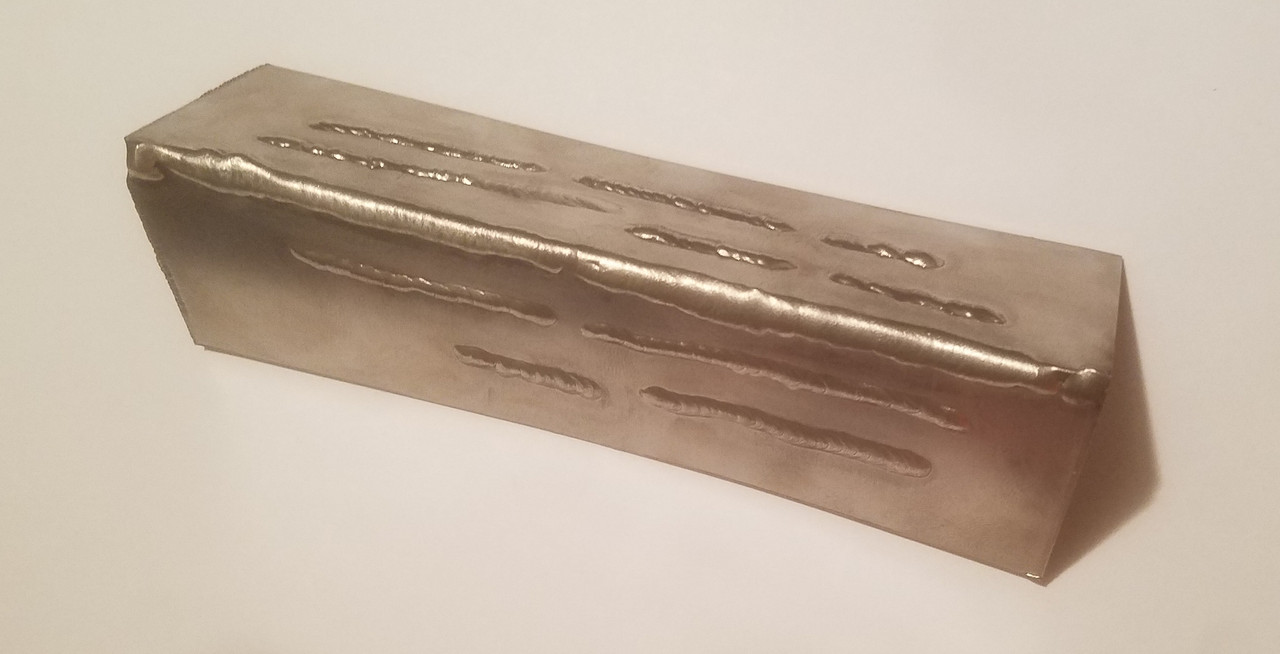
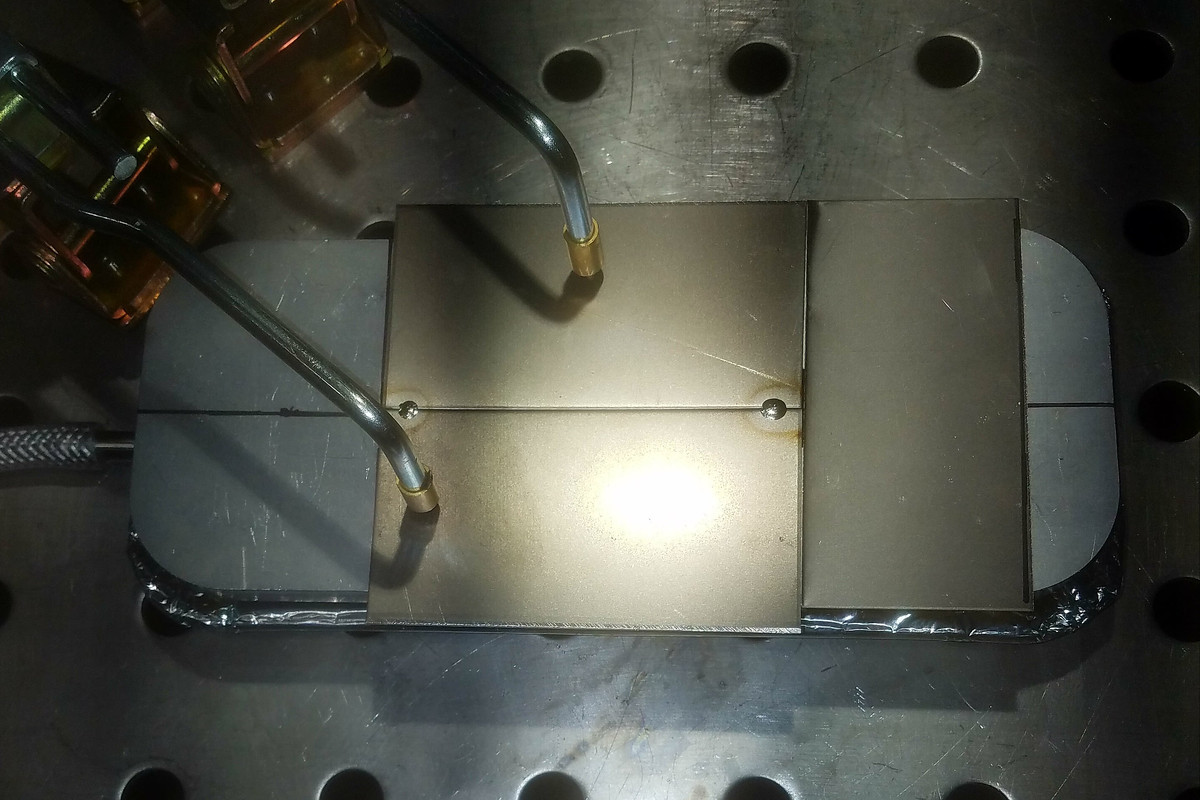
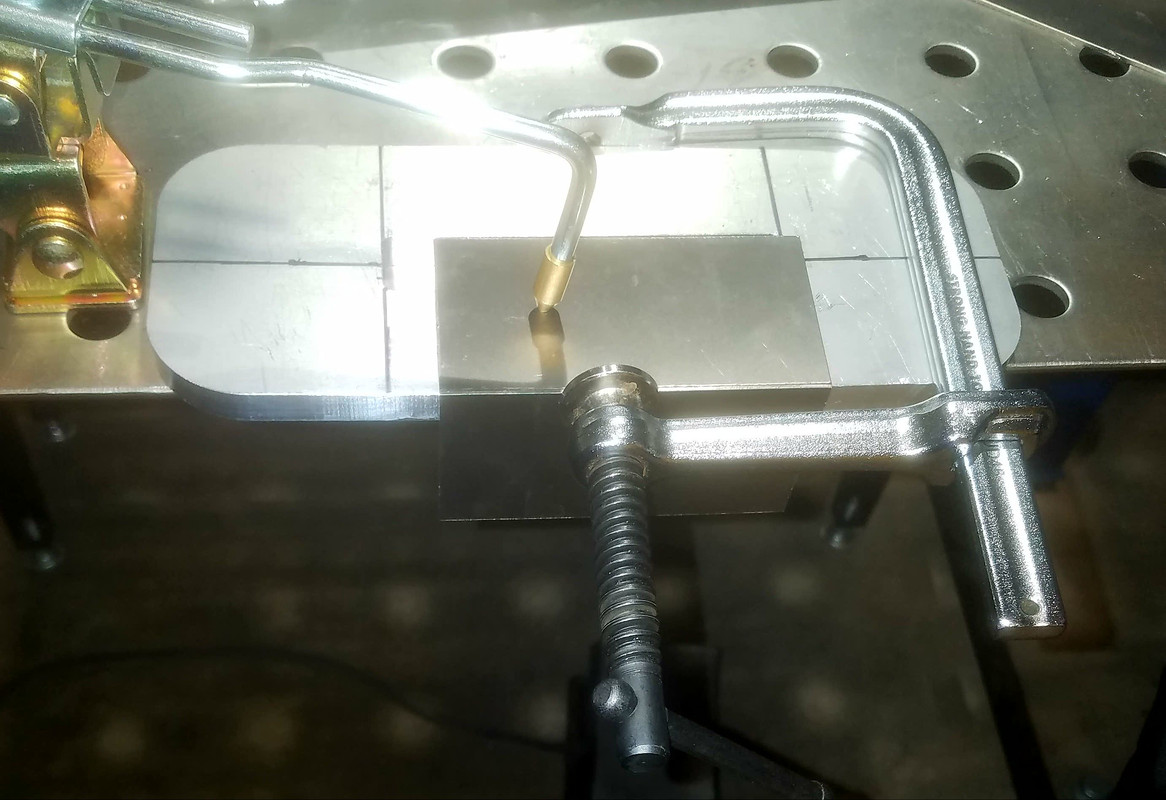
The aluminum half pipe was really fun. Moving the torch from the top, to the side, I wasn't maintaining a proper angle, or tight arc, or both. The fillet welds look a bit shoddy, but strong. Fillet welds are hard for me, so I'm happy. Had a good run on the other side.

Image
Kodokan
  • Posts:
  • Joined:
    Thu Nov 04, 2021 2:05 am

The 2 videos I saw showed razor blades being welded end to end. The utility blades I have are 0.021" thick, so that isn't so impressive. I decided to try edge to edge.

Tried welding and TIG brazing. Unfortunately, I didn't have any ER70S filler rod in 0.035". Tried some .045" rod, but it didn't want to melt. It worked, but not well. The welds you see here are fusion welds (no filler). Pretty difficult on the edge.

Image

Image

Will try again soon.
Kodokan
  • Posts:
  • Joined:
    Thu Nov 04, 2021 2:05 am

Titanium filler rod arrived. Got Grade 1 titanium in 3 sizes to try out.

Image
Kodokan
  • Posts:
  • Joined:
    Thu Nov 04, 2021 2:05 am

Watched a couple more razor welding videos.

Next time, I'll use aluminum chill blocks and a needle grind on the tungsten.

Should have said I used 15 amps, 15 cfh argon, .040 2% Lan electrode. Tried a filler rod from the instructor. Was supposed to be .035 or .045 stainless. Couldn't get it to melt. Tried .045 ER70S rod which seemed to thick. Will try my own .035 308L filler rod next time. The brazing rod was .035 silicone bronze.

Tried to figure out why I can't see where I'm going when welding. Bad news is, it's not my hand position. I can see the puddle clearly, but everything outside the arc light is black.

I'll check the shade setting on my helmet, but I know I didn't set it very dark. I've always had poor night vision.
User avatar
  • Posts:
  • Joined:
    Mon Nov 04, 2013 7:51 am
  • Location:
    The Netherlands

Kodokan wrote: Fri Apr 29, 2022 10:01 am Tried to figure out why I can't see where I'm going when welding. Bad news is, it's not my hand position. I can see the puddle clearly, but everything outside the arc light is black.

I'll check the shade setting on my helmet, but I know I didn't set it very dark. I've always had poor night vision.
A good, strong, work-light illuminating the area you work on could help a lot there.

Also make sure there's as little light as possible coming in from the back of your helmet (eg. a roof light shining down behind/above you) and getting you light reflection from the lense on the inside. That can also ruin your vision for seeing low contrast features outside the arc and puddle itself. As a test you can clip a rag or similar to the back of your helmet to see if it improves things.

Bye, Arno.
Kodokan
  • Posts:
  • Joined:
    Thu Nov 04, 2021 2:05 am

I posted pics of my DIY purging fixture, and how I do the corner weld setup. Here are a few more.

Purging flat tacks on titanium:

Image

Used the top plate to hold and cool titanium for corner weld tacking:

Image

Purging stainless for vertical corner welds:

Image

My clamps don't fit through the holes in the welding table at school, so I have to clamp near the edge. I use the purging top plate as a shelf to support my hand/wrist. Here, I set up titanium corner welds with aluminum chill blocks. The ends are sealed with heavy aluminum foil, and the purge tube goes in one side.

Image

Figured out a setup for razor blades. Need all the help I can get, for a good outcome.

Image
Kodokan
  • Posts:
  • Joined:
    Thu Nov 04, 2021 2:05 am

Arno wrote: Mon May 02, 2022 1:00 am A good, strong, work-light illuminating the area you work on could help a lot there.

Also make sure there's as little light as possible coming in from the back of your helmet (eg. a roof light shining down behind/above you) and getting you light reflection from the lense on the inside. That can also ruin your vision for seeing low contrast features outside the arc and puddle itself. As a test you can clip a rag or similar to the back of your helmet to see if it improves things.

Bye, Arno.
Thanks, Arno.

I guess I forgot to mention that I use a very good work light. Bought it after my very first day of welding class. It's super bright, but only helps a little when welding. Sometimes, I can't get it into the right position, or it makes a shadow on the welding area. Happy to have it, though.

Image

Once, I was welding in my open garage, with the sun at my back. So much light was coming in the back of the helmet, I could hardly see through the lens. I threw a rag over my head, and problem solved. Haven't thought about it at school, so I'll check it out. Thanks much for your help.
Kodokan
  • Posts:
  • Joined:
    Thu Nov 04, 2021 2:05 am

2mm dimes.

Image

Image

The larger cup I used takes a 3/32" tungsten. I would have preferred an 0.040" size, or at least a 1/16". Need more practice, but happy with my progress.

Image

Image
cj737
  • Posts:
  • Joined:
    Thu Sep 29, 2016 8:59 am

Most gas lenses don’t require a specific “cup”. The tungsten size is dictated by the gas lens, but you can still use a variety of cup sizes with different lenses and tungstens.
Toggatug
  • Posts:
  • Joined:
    Sat Mar 25, 2017 12:06 pm
  • Location:
    Ontario, Canada

cj737 wrote: Mon May 09, 2022 3:11 pm Most gas lenses don’t require a specific “cup”. The tungsten size is dictated by the gas lens, but you can still use a variety of cup sizes with different lenses and tungstens.

I think the only difference is the isolator gets changed out on the face. Least that is how mine was, the gas lense cups didn't sit quite right and seal on the backside with the collet body isolator.

But who knows everything is usually slightly different between brands etc etc
Kodokan
  • Posts:
  • Joined:
    Thu Nov 04, 2021 2:05 am

I guess I didn't explain that very well.

The cup I used on the blades was a Furick FUPA (gas lens) cup. The only diffuser screens I have for it take a 3/32" tungsten.

I also have a Furick BBW. It comes with 3/32" screens, but I also got a 1/16" size. Haven't tried it, yet.

I wanted to try welding some cast aluminum, so a friend gave me a couple of motorcycle engine covers.

I don't have an ultrasonic cleaner, or even a parts washer. I could spend a lot of time with acetone and a brush, but it's not going to clean out the decades of grime from the screw holes. Decided to get a workout and cut some (easy to clean) coupons by hand, since I'm just practicing/learning.

Image

Well, it's definitely different. Started at 125 amps, then 100, ended up at 65 which might be a bit low. Instructor gave me some unknown number filler rod which was shit. I used 4043, but the beads look porous. Was trying to get some 4047, but it's pretty hard to find. Next time, I'll try 5056 filler for comparison.

Image

For sure, it's the most difficult type of welding I've tried. The large craters are where I tried the shit rod. Still have more cast aluminum to work on. Also want to try welding cast aluminum to billet.

I cleaned the coupons with acetone, but probably should have used Scotch-Brite, too. Will do, next time.
Kodokan
  • Posts:
  • Joined:
    Thu Nov 04, 2021 2:05 am

Just about every class, I've been trying new stuff. Definitely more fun than just running beads or butt welds, but my technique isn't getting much better.

Just signed up for Summer semester. Classes are shorter, but one class is 4 days per week for 6 weeks. Good time to work on my technique.

Trying to order some supplies today. Hopefully, I can start on a small metal sculpture this week. I'm sure I could do it with oxy-acetylene, but I want to try it with TIG.
cj737
  • Posts:
  • Joined:
    Thu Sep 29, 2016 8:59 am

Welding cast motorcycle parts is a real treat. Some things you can do to help:
- Preheat them. Don’t just clean them with chemicals and wire brushes, but use some heat to help drive the impurities out of the part before you ever light up an arc.
- Run a pass with the arc over the area to be welded. This too will help “prep” the surface before you begin adding filler.
- Peen each pass, even the “prep” pass. Peening helps drive porosity out of the weld in between passes.
- Manage the heat input. The longer/more time you spend with an arc on the part, air trapped inside the casting will expand and cause “blisters” in the parent part and shows as porosity. These old motorcycle parts were not high quality castings from high grade alloys. So expect there to be heaps of trash and grime in them.
- Avoid 4043 for cast parts. It works well on nearly everything else, and can in a pinch, but 4047 or 4943 work much, much better. I don’t like 5356 for cast either, it just doesn’t seem suitable as a filler.
- Brush and chemically clean between each pass. With cast, there’s just no substitute for constant cleaning.
Kodokan
  • Posts:
  • Joined:
    Thu Nov 04, 2021 2:05 am

Thanks, cj737. That's good info. I'll get some 4047 and try cast aluminum again, soon.

Thought of a good challenge for school tomorrow.

Will try to TIG braze two 1/16" ER70 rods together lengthwise.

Also bought a copper toilet float to try TIG brazing.

Thinner than rice paper, Grasshopper.
cj737
  • Posts:
  • Joined:
    Thu Sep 29, 2016 8:59 am

If you really want a challenge, weld some 0.023 MIG wire together with your TIG torch ;)
Kodokan
  • Posts:
  • Joined:
    Thu Nov 04, 2021 2:05 am

cj737 wrote: Thu May 19, 2022 8:24 am If you really want a challenge, weld some 0.023 MIG wire together with your TIG torch ;)
Maybe I'll get there. :mrgreen:

Both of this weeks challenges relate to the metal sculpture.

Realized I havent posted pics of my titanium practice. Will do, soon.
Kodokan
  • Posts:
  • Joined:
    Thu Nov 04, 2021 2:05 am

Really appreciate the support from you guys. Sure hope I can keep rolling for a while. Haven't been posting as much as I want to, either.

Forgot to post my first attempt at welding titanium. Used 2mm grade 2 titanium, 1/16" grade 1 filler rod, 3/32 2% Lanth tungsten, 20 CFH argon, 1/2" cup, 100 amps.

Didn't get much penetration, but that's normal for me. Have to say that titanium is the most enjoyable metal to weld. Puddle and filler rod flow super smooth.

Can't get good pics with my phone. The coupon finish is flat/unpolished, so after welding the HAZ colors are flat. But, the welds are as shiny as can be. They shimmer, glisten, and sparkle under the light- with no cleaning, whatsoever.

Image

Image

Pretty sure a good titanium weld should look like the third one from the top. Colorless/silver in appearance. Will probably take some time to get it figured out.
Kodokan
  • Posts:
  • Joined:
    Thu Nov 04, 2021 2:05 am

Tried brazing the 1/16" filler rods. One was okay. One got brittle, and broke after welding. Need more practice. Deleted the finished pics by accident, then lost the pieces, as well.

Image

Now have ideas for 2 sculptures. Not sure if either one will work out. Just experimenting with the TIG torch. First is an old school hot air balloon, then an old school air ship.

Ordered some brass tire valve parts to cut up and fabricate a burner. Should be here in a week. The air ship propeller is coming on a slow boat from China. Probably a month before it arrives.

Took a ridiculous amount of time to get the upper harness ring round and flat. Must have bent it a hundred times with my bare hands. Very happy the brazing went well. Looks like there's a small kink, but that's where the numbers are stamped.

Image

Cut down the height of the basket today. Will try to add some rails around the top tomorrow.
Kodokan
  • Posts:
  • Joined:
    Thu Nov 04, 2021 2:05 am

Problem with the Miller Dynasty 400 at school.

Couldn't get over about 8cfh when on AC. No matter how much I open the argon valve. No problems with DC-.

Instructor couldn't fix it. Had to go to a shitty booth. Hope I can figure out how to do a factory RESET by tomorrow night, so I can get back to my clean booth.

Any help is welcome.
Kodokan
  • Posts:
  • Joined:
    Thu Nov 04, 2021 2:05 am

Been pretty quiet because I had some scary shit happen. As if the terminal cancer isn't enough.

About 3 weeks ago I was waiting outside for class to start. The sky was overcast. No visible clouds, just solid gray sky around 5pm. I look up at the sky and my entire visual field, both eyes, is completely covered with floaters. Hundreds of floaters. Not like dots. Like transparent gray worms and blobs.

Never seen or heard of this before. And I've been welding for about 8 months. I researched welding eye problems and didn't find this. So, lately in class, I've been just fabricating my little sculpture parts and a bit of TIG brazing.

I sent an email to a good eye surgeon that I know, but didn't hear back. About a week ago, I got another eye problem. Like a minor foriegn body or scratch. So, I went into urgent care. Was EXTREMELY lucky that the Chief of Ophthalmology was on call. I've done anesthesia for his cases hundreds of times in the past, so he took great care of me.

I knew the recent injury was not a big deal, but probably needed some antibiotic drops. Got those, all good. Now, the big issue. Are my eyes fucked from welding? Am I headed for cataract surgery or vitrectomy? I've spent thousands on all this welding stuff. Do I have to bail out now?

My medical knowledge is vast, but I don't know everything. Never heard of this. Chief said- "No way did welding for 8 months cause this." Evidently, it takes decades. Not uncommon for someone of my age that's near-sided. Probably never been in the correct light background to see it. Normally, I just notice a few floaters that are always visible.

Man, this scared the shit out of me, but I'm calming down. Can hardly wait to start bending & burning again!

Got the manual for the Miller TIG. Took about 5 seconds to do the factory reset. Back in my good booth. Will post up some more pics soon.
tweake
  • Posts:
  • Joined:
    Mon Dec 18, 2017 4:53 am
  • Location:
    New Zealand

good to see your still with us 8-)
tweak it until it breaks
Kodokan
  • Posts:
  • Joined:
    Thu Nov 04, 2021 2:05 am

Thanks, tweake.

Okay, so back to where I was. Trying out some brazing on very small parts.

These ER70 rods measure 0.059". Tried to add enough silicone bronze filler to flow completely around the rods. Without melting or burning the rods, of course. Already posted a pic of the setup.

Image

First try was lumpy. Second try cracked in the middle. Must have got it too hot.

Still pleased with the results.
Kodokan
  • Posts:
  • Joined:
    Thu Nov 04, 2021 2:05 am

So with those rods I TIG brazed, I applied the bronze on top and let it flow all around and onto the bottom. I was curious if I could control the flow, so I did a little experiment.

I placed a 1/16 inch rod onto an unwelded corner joint. Then applied silicone bronze to one side without letting it flow to the other side. Pics aren't very good, but the experiment worked great.

Bronze applied to one side.
Image

No flow onto the other side.
Image

I did more, but the pics aren't much to see.
Kodokan
  • Posts:
  • Joined:
    Thu Nov 04, 2021 2:05 am

Some aluminum practice. Not cleaned up.

Image
Post Reply