Tig welding tips, questions, equipment, applications, instructions, techniques, tig welding machines, troubleshooting tig welding process
sportster
  • Posts:
  • Joined:
    Mon Dec 24, 2018 11:52 am
  • Location:
    Toronto, Ontario

Warning - question from rookie, wanna be welder...... but I learned long ago that a wide gap is a disaster waiting to happen. So here I am.

Situation:
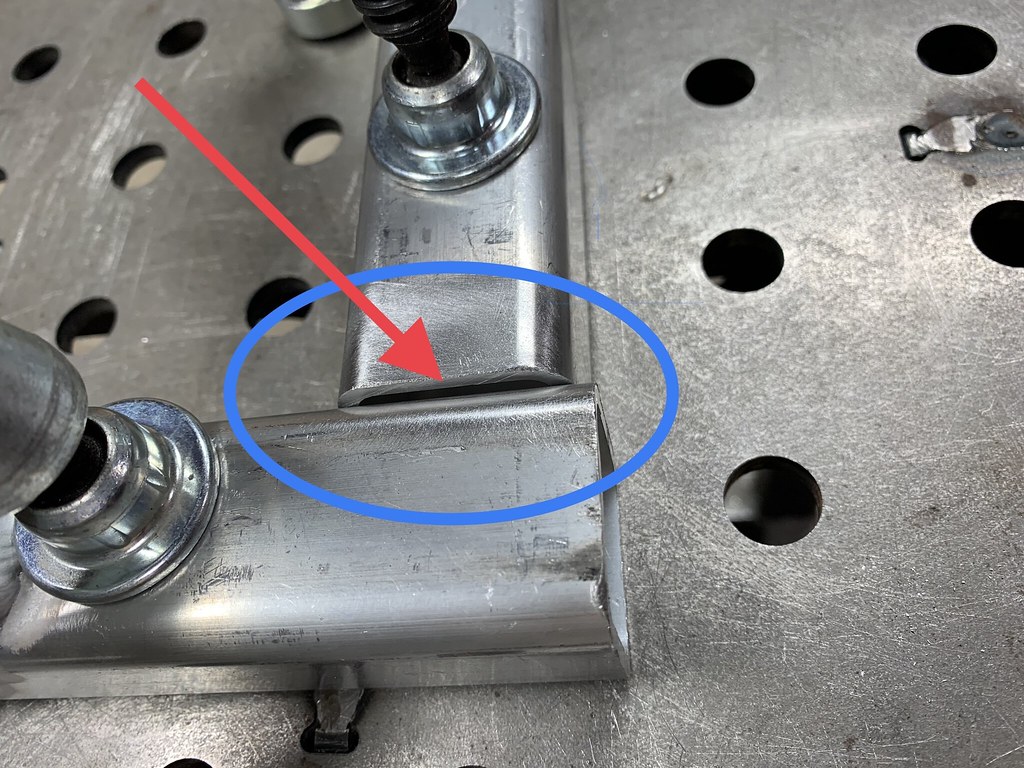
  • 1 1/2" square aluminum, WITH rounded corners - 1/8" wall thickness
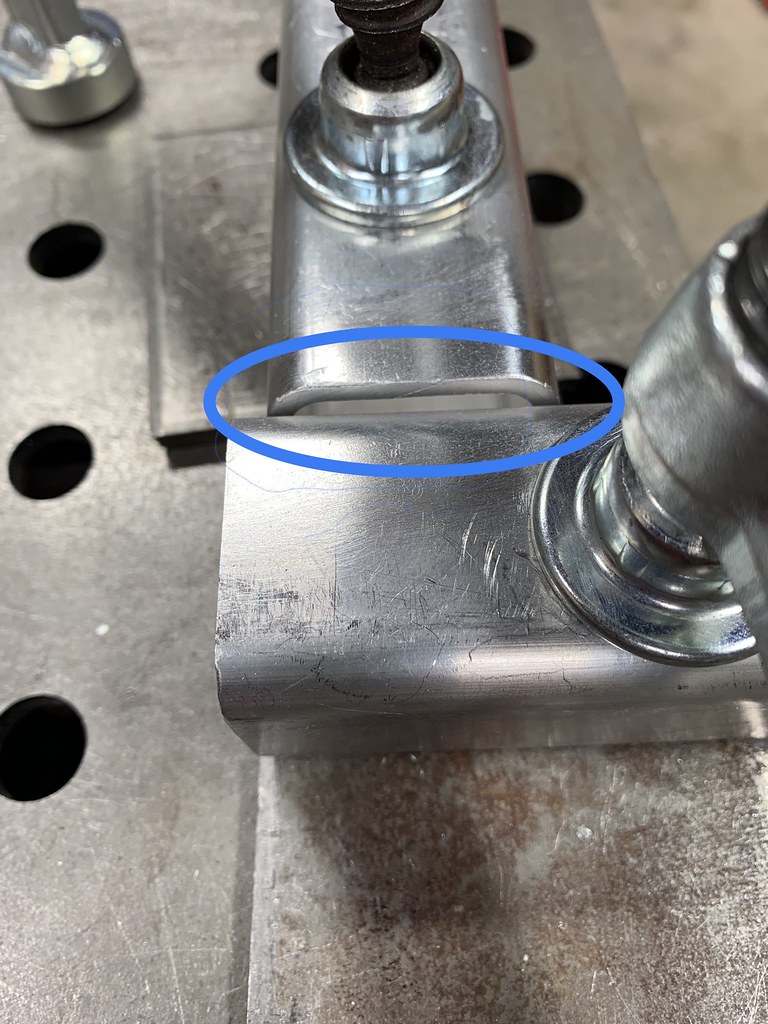
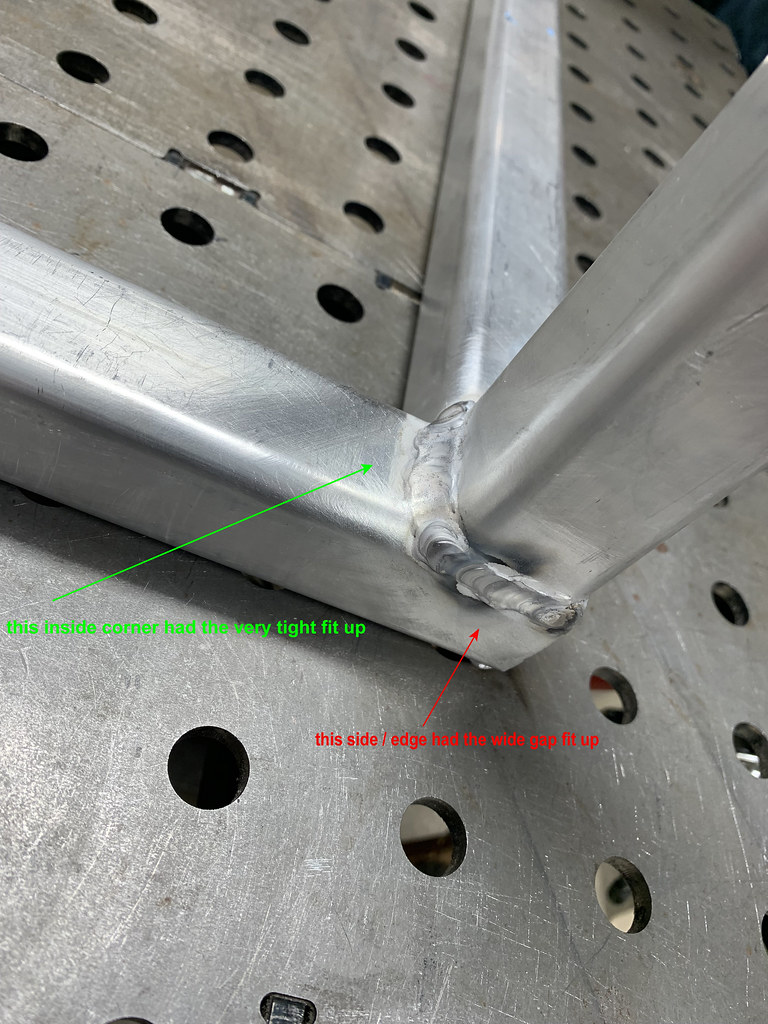
  • when doing a 90 degree joint, 2 of 4 edges fit flush, the other 2 edges have a super wide gap, 1/4" gap or so. (due to the rounded corners)
My dilemma is:
  • how does one bridge such a wide gap ?
The gap is clearly much wider than a 3/32 filler rod (which is the largest filler rod I have).

Options I've considered:
  • don't weld all 4 sides. aka don't over weld it. Just weld the 2 x flush fit sides & call it a day
  • start with 2 or 3 edge welds (at the RED arrow) and build up that edge, until a bridge is formed
  • get out the grinder & free hand a cut into the vertical leg so all 4 edges line up tighter (I'm not real comfortable I can pull this off & do a decent job. But you do what you have to:))
Here's a couple pics of scrap pieces I'm practicing on first (before I tackle the real pieces).

Is there a best practice for dealing with this gap? Thanks for your insight.

Image

Image
tweake
  • Posts:
  • Joined:
    Mon Dec 18, 2017 4:53 am
  • Location:
    New Zealand

sportster wrote: Fri Dec 17, 2021 2:39 pm
Options I've considered:
  • don't weld all 4 sides. aka don't over weld it. Just weld the 2 x flush fit sides & call it a day
  • start with 2 or 3 edge welds (at the RED arrow) and build up that edge, until a bridge is formed
don't start the weld on the edge. start on the curve section and run beads across until you fill it in to the edge of the other piece. the edge will take a lot less heat to melt it.
if you want to cut down welding, put a filler/packer in there. cut a strip to fill it. if you stick it up higher than parent metal it gives you some material to grind down and blend.
tweak it until it breaks
User avatar
  • Posts:
  • Joined:
    Thu Dec 26, 2013 12:41 am
  • Location:
    Laredo, Tx

I agree with packing it before hand. Lay a 3/32" or a 1/8" piece of filler rod in the gap, blast-tack WITH LARGE AMOUNT OF AMPERAGE(!) the ends A & C first, then a blast-tack at B . Then since it will now stay in place, you can run over it with the arc and weld it out with filler just like normal.

Image
Image
cj737
  • Posts:
  • Joined:
    Thu Sep 29, 2016 8:59 am

Along with Tweake’s advice of “padding” the gap with multiple passes, you can run a single pass of 3/32 filler across there but you’ll be stuffing and weaving filler rod pretty aggressively.

Truth is, that “joint” won’t be very strong anyway. 1/8” aluminum welded by a new welder, will probably lack the penetration needed to make a strong joint. And using 3/32 filler, you will tend to wet the weld onto the surface without penetrating. Just how it goes when you’re new at it.

Is it safe to assume that “structure” is decorative or ornamental and not “critical”? Because if is critical (maybe a shelf frame, or something that will bear a lot of weight) then you should also weld some gussets across the top and bottom corners. And do buy some 1/8” filler to always have on hand when welding aluminum. Makes life a lot easier.
BugHunter
  • Posts:
  • Joined:
    Sun Apr 19, 2020 12:54 pm

You can take several filler rods with one end chucked in a vise and the other end chucked in a cordless drill, and spin them into one rod. That'll give you the benefit of larger filler without buying more.

Next, be sure to tack all the locations that are easily tacked and touching already. From there, it really doesn't look hard ( I weld a lot of aluminum), you can just do a "Keyhole" technique and just stuff filler in like crazy to fill it up. Don't try to fill 100% on one pass, just get coverage on the first pass with subsequent passes over top to fill in the large void. I hope that makes sense. You'll be joining the gap in the first pass, but don't need to fill the entire bevel all at once. That's easier on the second / third passes.

Everything looks nice and clean so it should go well.
sportster
  • Posts:
  • Joined:
    Mon Dec 24, 2018 11:52 am
  • Location:
    Toronto, Ontario

I like the idea of the "filler/packing" approach. I can do that..... so will practice that first & work on my tacks & welding it out, using scrap pieces.

Admittedly, the jury was out on the "gussets" idea. In my mind, I wasn't sure if gussets would be needed.... but thanks for that push. Bottom line, I've re-considered & will add the gussets. I don't need it breaking :).

Thank you all for sharing your ideas & expertise.
Toggatug
  • Posts:
  • Joined:
    Sat Mar 25, 2017 12:06 pm
  • Location:
    Ontario, Canada

Little bit late to the party but you can weld that in one shot eventually once you get used to riding the keyhole.

It is alot easier of you cope the tube slightly though to get the edges to come together more.

The two pics are are from a job I did a few months back for a customer who was having troubles welding his ladder rack together. I stuck it together how it was in the picture he sent me.

I couldn't cope the tubing as he had already cut the tubing to his required length. Memory tells me I rode the corner of the one tube and got the puddle to 'grab' the other edge of tubing and then just stuffed filler in as I went along so the tubing's edge didn't melt away.

ImageImage

Sent from my Pixel 3a using Tapatalk

sbaker56
  • Posts:
  • Joined:
    Sat Feb 08, 2020 12:12 am

I've ran a bead along one of the two edges before which helped bridge the gap, then ran a second pass to tie the now smaller gap together, and also used the whole lay a piece of 1/8" filler in the gap and blast it in before laying a bead over the top method before. I'd suggest the second one for a newbie as it's easy to blow the edge away if you don't have enough control and try to build it up.
sportster
  • Posts:
  • Joined:
    Mon Dec 24, 2018 11:52 am
  • Location:
    Toronto, Ontario

Just to close my question off. It's not pretty, ugly actually, but I got it done.

I struggled closing the wide gap..... tried a few things, adding packing, added filler rod. In pretty much every case the packing or rod would melt first and not meld into the base material. Eventually, after multiple do-overs, I got them to meld together without blowing away too many edges.

Anyway, here's a sample of what it looks like, before I added the gussets. No one will be hiring me to do aluminum welding, I get that. I'm an inexperienced novice so I'm ok with that. It did pass my hammer test, without the gussets. lol.

My only regret is I don't have the need to get a fresh set of aluminum square tubing, to do it all over again. It'd be nice to know if:
  • I learned / retained anything
  • what results I could obtain after just a single pass, this time around
Meanwhile, I'll keep practicing on the scrap material I have.

Thank you all for the suggestions & advice.

EDIT: I thought the notations on the pic were in a much larger font. My apologies for the eye strain.

Image
Post Reply