Tig welding tips, questions, equipment, applications, instructions, techniques, tig welding machines, troubleshooting tig welding process
Warrenh
  • Posts:
  • Joined:
    Thu Apr 27, 2017 12:31 pm

A flying bridge for a 28 foot boat. The first set are the original build to the customer's specs. He wanted all the lines from the bottom structure to continue into the top and the front legs had to land on top of the bottom pipes for control wire accesd. After completion he decided it was too tall. I had to cut it down 8 inches. I added kickers to match the bottom. Those are the second set of pics.
Also some interior rails that were built in place at a beach house in Panama City Beach.ImageImageImageImageImageImageImage

Sent from my SCH-I545 using Tapatalk
User avatar
  • Posts:
  • Joined:
    Sun Nov 19, 2017 10:09 am

Beautiful work! How long did the boat railing take you to build?
Lincoln MP 210, Lincoln Square Wave 200,
Everlast 210 EXT
Thermal Dynamics 25 Plasma cutter

" Anything that carries your livelihood wants to be welded so that Thor can’t break it."
CJ737
Warrenh
  • Posts:
  • Joined:
    Thu Apr 27, 2017 12:31 pm

I had about 40 hours in the boat including the rework. Thanks, also. I like the boat work.

Sent from my SCH-I545 using Tapatalk
Warrenh
  • Posts:
  • Joined:
    Thu Apr 27, 2017 12:31 pm

I had some pictures of railings for a home in Sandestin Resort. It was an interesting design. Built In the shop and installed by us ImageImageImageImageImage

Sent from my SCH-I545 using Tapatalk
Coldman
  • Posts:
  • Joined:
    Mon Dec 15, 2014 2:16 am
  • Location:
    Oz

My daughter recons I need more exercise so she bought me a flatpak bike to ride in front of the tv at night instead if drinking beer and eating chips. My objection was more to questionable quality and suitability coming from a flat box, she assured me she researched it thoroughly and it would be suitable for me. She said if I peddled hard enough maybe I could make it to the beer fridge.

I assembled it, turns out it was made for the vertically challenged.
B1.jpg
B1.jpg (66.72 KiB) Viewed 3201 times
So I took it to the shop, cut it up and re-welded it with 3/4" sched40 pipe extensions to the seat and handlebars.
B2.jpg
B2.jpg (52.3 KiB) Viewed 3201 times
It fits me now and works. The peddle radius is still a little small, the peddle arms I need to look at closely as they may be die cast. The seat needs to be re-worked as currently it messes with my junk. The friction brake on the wheel is noisy. Overall the ergonomics is a fail but it was cheap right?
Flat out like a lizard drinkin'
motox
  • Posts:
  • Joined:
    Thu Nov 28, 2013 12:49 pm
  • Location:
    Delaware

cold
i suggest a camelback for hands free beer distribution......
craig
htp invertig 221
syncrowave 250
miller 140 mig
hypertherm plasma
morse 14 metal devil
Poland308
  • Posts:
  • Joined:
    Thu Sep 10, 2015 8:45 pm
  • Location:
    Iowa

Set up your phone to take video first, I want to see what happens when the physical activity releases the carbonation. :lol:
I have more questions than answers

Josh
Coldman
  • Posts:
  • Joined:
    Mon Dec 15, 2014 2:16 am
  • Location:
    Oz

No way. If the government find out they might reintroduce the carbon tax :)


Sent using Tapatalk
Flat out like a lizard drinkin'
  • Posts:
  • Joined:
    Sun Jan 15, 2017 1:08 am

Heya guys here's a big flag pole I built a while back. It was somewhere around 130" tall. The center holds some type of lightImageImageImageImageImageImageImage

Sent from my XT1635-01 using Tapatalk
User avatar
  • Posts:
  • Joined:
    Sun Nov 19, 2017 10:09 am

You have beautiful welds, and you know it. Why don't you contribute here and help us out, to get where you're at?
Lincoln MP 210, Lincoln Square Wave 200,
Everlast 210 EXT
Thermal Dynamics 25 Plasma cutter

" Anything that carries your livelihood wants to be welded so that Thor can’t break it."
CJ737
motox
  • Posts:
  • Joined:
    Thu Nov 28, 2013 12:49 pm
  • Location:
    Delaware

5th
you must buy filler by the truck load!
craig
htp invertig 221
syncrowave 250
miller 140 mig
hypertherm plasma
morse 14 metal devil
  • Posts:
  • Joined:
    Sun Jan 15, 2017 1:08 am

tungstendipper wrote:You have beautiful welds, and you know it. Why don't you contribute here and help us out, to get where you're at?
Sure ask any questions you want and I'll do my best to answer them.

Sent from my XT1635-01 using Tapatalk
Warrenh
  • Posts:
  • Joined:
    Thu Apr 27, 2017 12:31 pm

Some new cantilevered, rolling gates ready for installation. All aluminum construction.ImageImage

Sent from my SCH-I545 using Tapatalk
motox
  • Posts:
  • Joined:
    Thu Nov 28, 2013 12:49 pm
  • Location:
    Delaware

Warren
awesome!
do you have a close up of how your joining pieces in the top photo
are made?
craig
htp invertig 221
syncrowave 250
miller 140 mig
hypertherm plasma
morse 14 metal devil
User avatar

motox wrote:Warren
awesome!
do you have a close up of how your joining pieces in the top photo
are made?
craig
And why does it look like every other vertical piece isn't welded?
Richard
Website
Warrenh
  • Posts:
  • Joined:
    Thu Apr 27, 2017 12:31 pm

We alternate the welds. I really dont know why, it's just how we do them. We hand twist 3/8 aluminum rod to make the twist. The owner of the shop designed this fence. Its callec coastal dune fence and we sell a ton of it. All hand made. Image

Sent from my SCH-I545 using Tapatalk
User avatar

Warrenh wrote:We alternate the welds. I really dont know why, it's just how we do them. We hand twist 3/8 aluminum rod to make the twist. The owner of the shop designed this fence. Its callec coastal dune fence and we sell a ton of it. All hand made.

Sent from my SCH-I545 using Tapatalk
That's cool, would like to see how the twist is done, nice fab work there.
Richard
Website
Warrenh
  • Posts:
  • Joined:
    Thu Apr 27, 2017 12:31 pm

We have one guy on the torch and one twisting. It does take some practice to get tight twists and keep it even across a 7 foot panel.

Sent from my SCH-I545 using Tapatalk
BigD
  • Posts:
  • Joined:
    Thu Jan 07, 2016 1:56 pm

Stainless diff cover to replace the stock aluminum one, and 4" side exit titanium exhaust
B4CD06D1-E634-4FFE-881E-B84A5D230E23.jpeg
B4CD06D1-E634-4FFE-881E-B84A5D230E23.jpeg (59.86 KiB) Viewed 2947 times
71899ADF-E90F-43EE-963C-81E5F656ACA7.jpeg
71899ADF-E90F-43EE-963C-81E5F656ACA7.jpeg (49.43 KiB) Viewed 2947 times
Captainbeaky
  • Posts:
  • Joined:
    Fri May 29, 2015 6:00 pm
  • Location:
    Madeira, Portugal

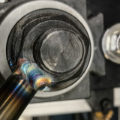
Ok,ok, it’s far from perfect, but it was a rush job to change the baffles in a stainless exhaust for a customer.

Normally, a simple enough job, cut open the end of the silencer, modify and re-weld.

But - I’m unpacking all my kit after moving out to Madeira in Portugal, and I’m still setting up my workshop, so I haven’t got all my grinders etc to hand.

Also, it was the first time I’ve seen my TIG in two years, let alone lifted the torch in anger. The stainless exhaust was badly contaminated, so the weld blackened, but we got the car out today, ready for a car show on the weekend.

We will be revisiting this again - the customer wants more power and noise, but his will keep him happy until I’m better prepared.
Attachments
2B0F7043-4F03-41E1-8699-9AD63B84A4E6.jpeg
2B0F7043-4F03-41E1-8699-9AD63B84A4E6.jpeg (38.5 KiB) Viewed 2866 times
ignatz200
  • Posts:
  • Joined:
    Wed Sep 16, 2015 2:01 pm

Just a little fantasy piece I have been working on for the past week or so - "The World is Nuts" - not quite finished. ;)
Attachments
Nuts_03_small.jpg
Nuts_03_small.jpg (111.4 KiB) Viewed 3329 times
Nuts_02_small.jpg
Nuts_02_small.jpg (50.47 KiB) Viewed 3329 times
Nuts_01_small.jpg
Nuts_01_small.jpg (83.39 KiB) Viewed 3329 times
User avatar
  • Posts:
  • Joined:
    Sun Nov 19, 2017 10:09 am

Good job. All though I won't let you get close to my tool box.
Lincoln MP 210, Lincoln Square Wave 200,
Everlast 210 EXT
Thermal Dynamics 25 Plasma cutter

" Anything that carries your livelihood wants to be welded so that Thor can’t break it."
CJ737
Mike Westbrook
  • Posts:
  • Joined:
    Wed Apr 04, 2018 8:13 pm
  • Location:
    Central pa

That's pretty sweet how do you make the hands there almost anatomically correct

Sent from my XT1254 using Tapatalk
Cutting torch hammer and a full vocabulary
ignatz200
  • Posts:
  • Joined:
    Wed Sep 16, 2015 2:01 pm

Mike,
The hands are the hex-heads of those bolts, sawed off and welded back on end-wise (at the appropriate angle). The fingers are made from sections of large carpenters finishing nails. I did some low-amperage long-arcing to heat them to the point where I could easily put a bend into 'em, then cut out the curved bits that matched what I wanted and welded them on. The rest of that is simply built-up work, melting it all in as I went. I just kept adding on until it seemed right. In general, just lots of patient work.

PS I cheated and looked at my own hands for shape and pose. :D
Mike Westbrook
  • Posts:
  • Joined:
    Wed Apr 04, 2018 8:13 pm
  • Location:
    Central pa

Grab some tweezers and crank the welder up to warm nice work

Sent from my XT1254 using Tapatalk
Cutting torch hammer and a full vocabulary
Post Reply