Tig welding tips, questions, equipment, applications, instructions, techniques, tig welding machines, troubleshooting tig welding process

Not sure on the diameter but its something like 9' round....flange was cut back and we are re welding inside and out. 1/4 rolled gores and a 3 x 3 3/8 angle flange...good times out in the potash mines in Saskatchewan!
- Attachments
-
- image.jpg (56.59 KiB) Viewed 6418 times
-
- image.jpg (60.85 KiB) Viewed 6418 times
Mrkil
- Mrkil
-
Workhorse

-
Posts:
-
Joined:Wed Jan 30, 2013 10:04 pm
-
Location:Hamilton, Ontario, Canada
I've been working on this in school for a bit. My wife collects old tin robots, so I wanted to make he one cor her birthday.
It is finished. I'm going to work on some patina methods to give it some "age"
It's all 1/16 sheet with the exception of the feet and arms that are 1/8.

It is finished. I'm going to work on some patina methods to give it some "age"
It's all 1/16 sheet with the exception of the feet and arms that are 1/8.

- weldin mike 27
-
Weldmonger

-
Posts:
-
Joined:Fri Apr 01, 2011 10:59 pm
-
Location:Australia; Victoria
Hey,
That is very cool. Your wife will love it, simply because of the effort you put into it. And because its awesome .
Have you checked out www.browndogwelding.com ? He makes robot sculptures and they rock.
Mick
That is very cool. Your wife will love it, simply because of the effort you put into it. And because its awesome .
Have you checked out www.browndogwelding.com ? He makes robot sculptures and they rock.
Mick

- Otto Nobedder
-
Weldmonger
-
Posts:
-
Joined:Thu Jan 06, 2011 11:40 pm
-
Location:Near New Orleans
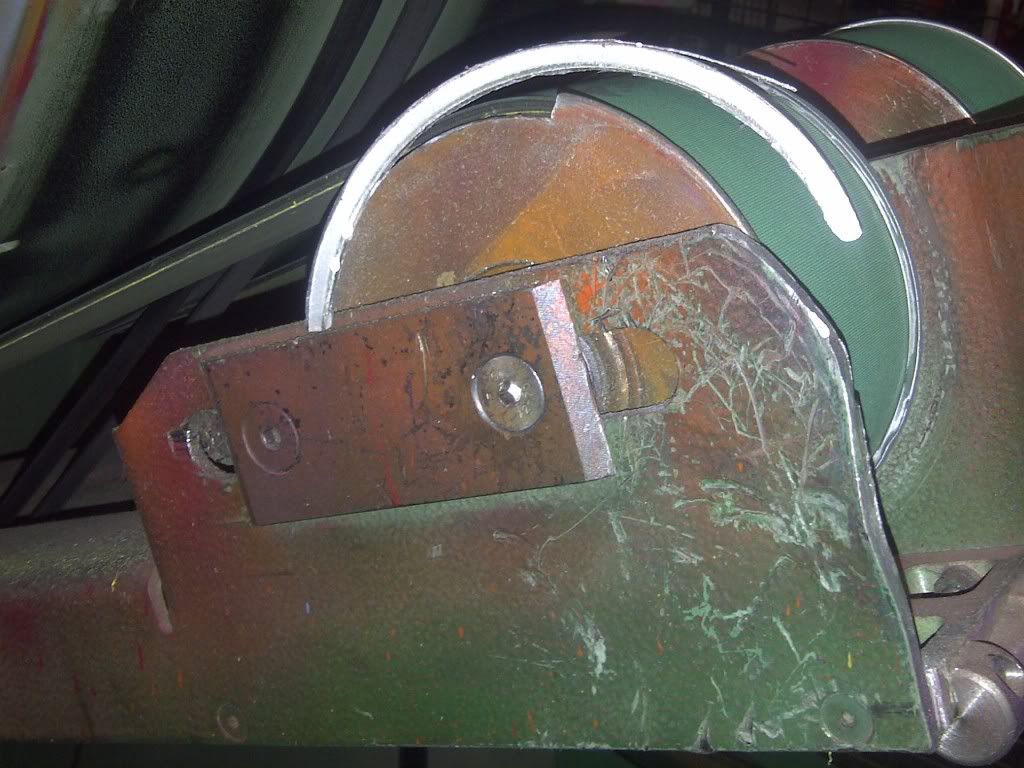
Had to make a new mount for this motor. New location means lots of mods. Machined the flange mount plate and slotted the angle iron in order to tension the chain.
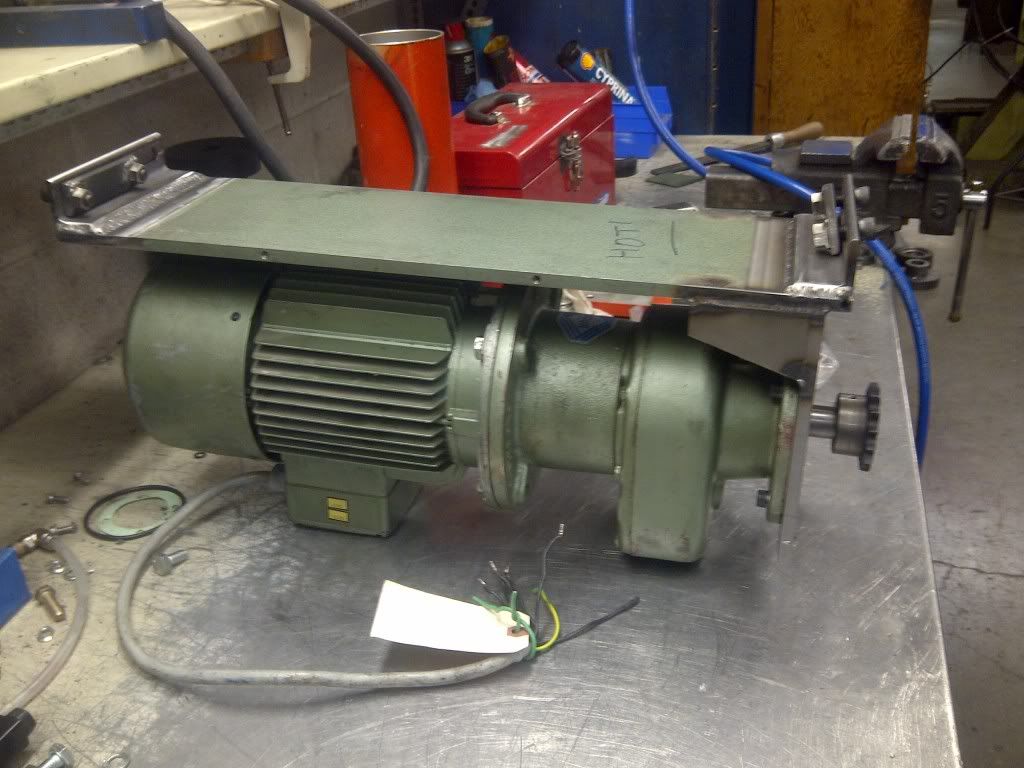
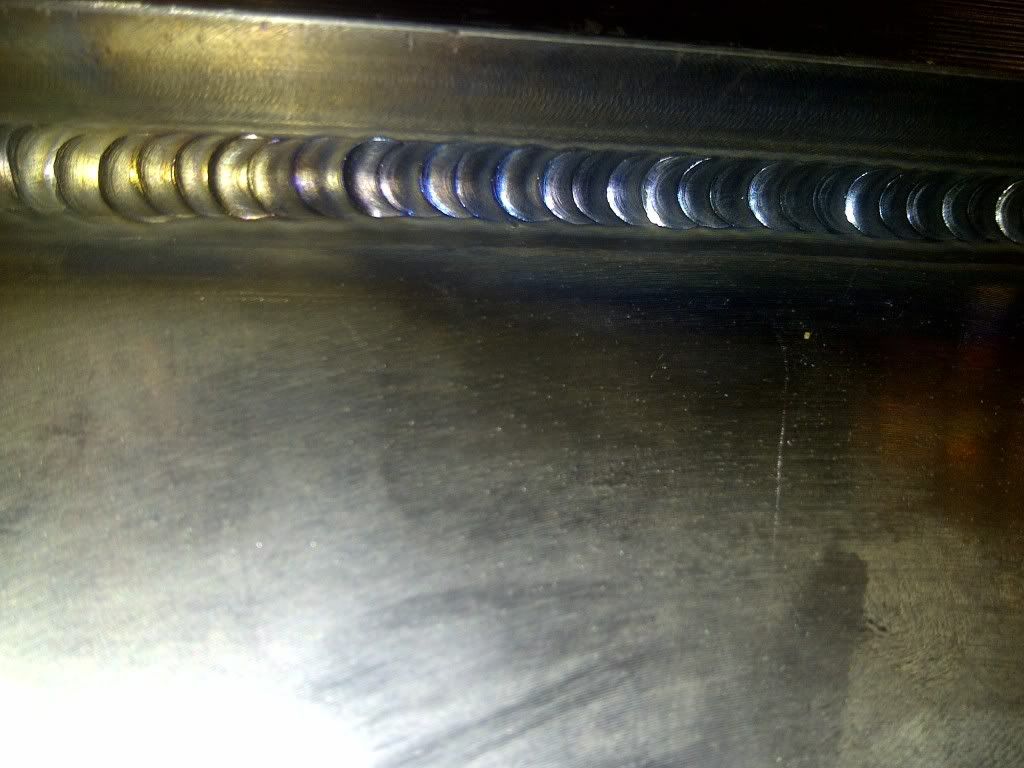
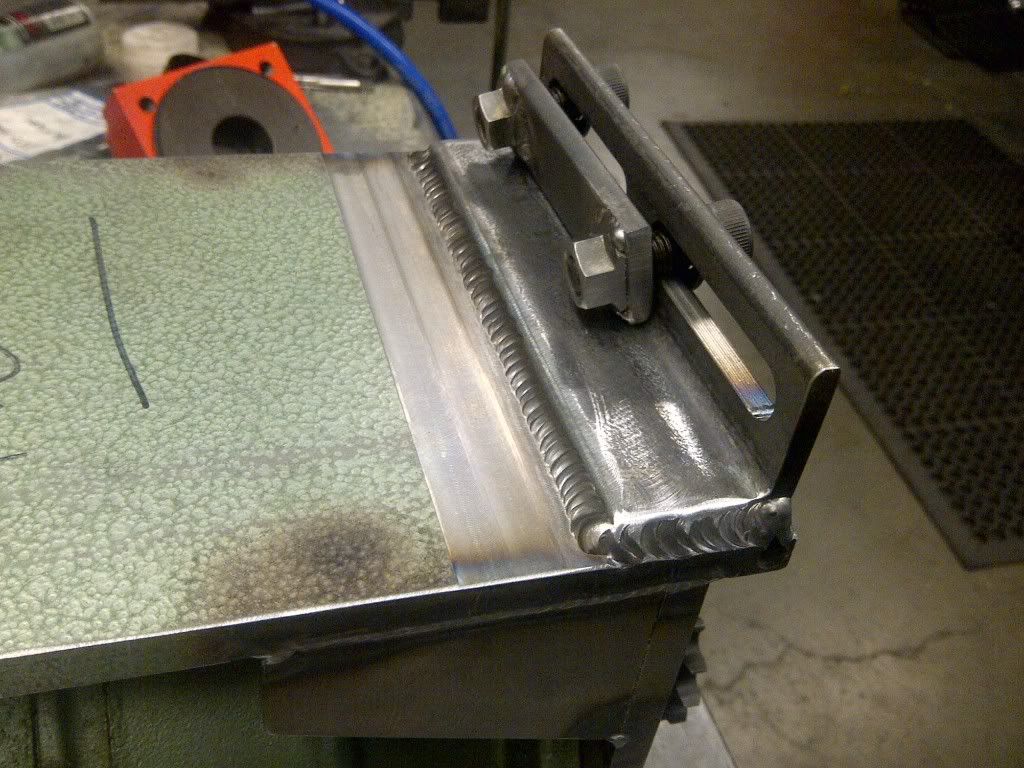
Welds are looking OK. I think I needed to add more filler on the angle iron.


Welds are looking OK. I think I needed to add more filler on the angle iron.
- Otto Nobedder
-
Weldmonger
-
Posts:
-
Joined:Thu Jan 06, 2011 11:40 pm
-
Location:Near New Orleans
Blaz,
I think you're golden with that amount of filler and tie-in.
I also noted you have a sense of safety... I saw where you marked "hot"...
Not everyone thinks of that.
Steve S
I think you're golden with that amount of filler and tie-in.
I also noted you have a sense of safety... I saw where you marked "hot"...
Not everyone thinks of that.
Steve S
Thanks for the comment Steve. Like everyone, I am still learning. Every little bit of info goes in the memory bank.
I won't mark it hot on the welding bench. If it leaves the welding area, it gets marked HOT! It only takes a second.
I enjoy TIG welding, so it is time to get one for home. I have a syncrowave 250dx @ work and it is great but I can't afford one for home. I am currently looking @ a lincoln squarewave 175. I did look at the diversion 180 but I like the stick option on the lincoln. Is it worth the extra $700 to get an inverter machine when all I have ever used is a transformer machine? Yes, I should ask this elsewhere.
Busted transom engine bracket that holds twin 250hp. It had previously been welded. 3/8" aluminum mounting plate with adjoining sides of 1/4". Analysis reveals that when they sanded the weld bead smooth, they took too much meat from a minimal weld to start with. I clamped a piece of 2"x2" angle aluminum to a standard 7-1/4" circular saw base with a carbide combination blade and cut the 1/4" side (top) back 5/16", creating a substantial open corner all the way across the top, exposing all but a 16th of the edge of the 3/8" plate.

3 full penetration build passes, sanded flush and (the large plate was stretched) straight with a 3/16" bevel, and a finish cap bead on top in the event they decide to sand it smooth again, that there will be enough filler to save from compromising the weld, or having to make such a large radius round over to get to solid metal. Being that the joint came out nice, and is mostly obscured by both engines, I would leave the weld and just paint it if it were mine.

I preheated the first 12" of the joint with a propane torch until I got it moving.
3 full penetration build passes, sanded flush and (the large plate was stretched) straight with a 3/16" bevel, and a finish cap bead on top in the event they decide to sand it smooth again, that there will be enough filler to save from compromising the weld, or having to make such a large radius round over to get to solid metal. Being that the joint came out nice, and is mostly obscured by both engines, I would leave the weld and just paint it if it were mine.
I preheated the first 12" of the joint with a propane torch until I got it moving.
Miller ABP 330, Syncrowave 250, Dynasty 300 DX.
Honorary member of the Fraternity of Faded Tee Shirts.
Honorary member of the Fraternity of Faded Tee Shirts.
awill4wd
- awill4wd
-
Active Member

-
Posts:
-
Joined:Thu Jan 31, 2013 3:57 am
-
Location:Berwick, Melbourne, Australia
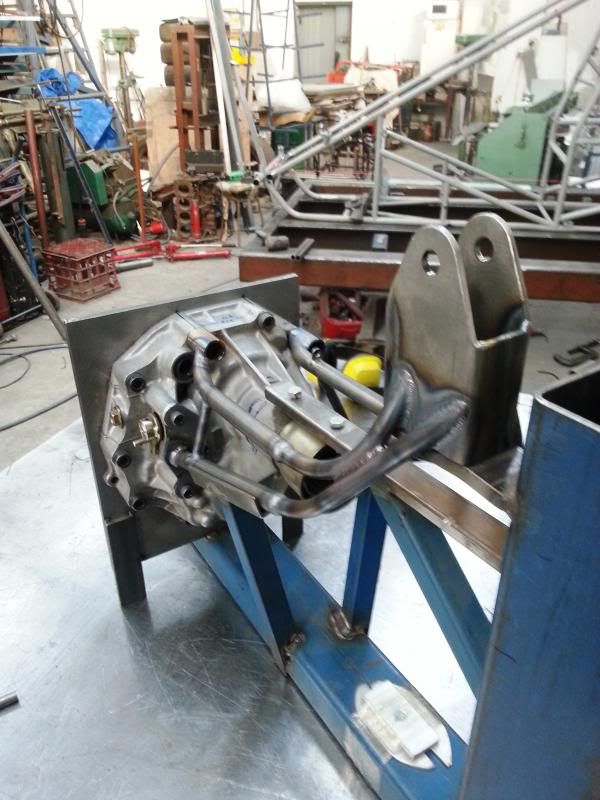
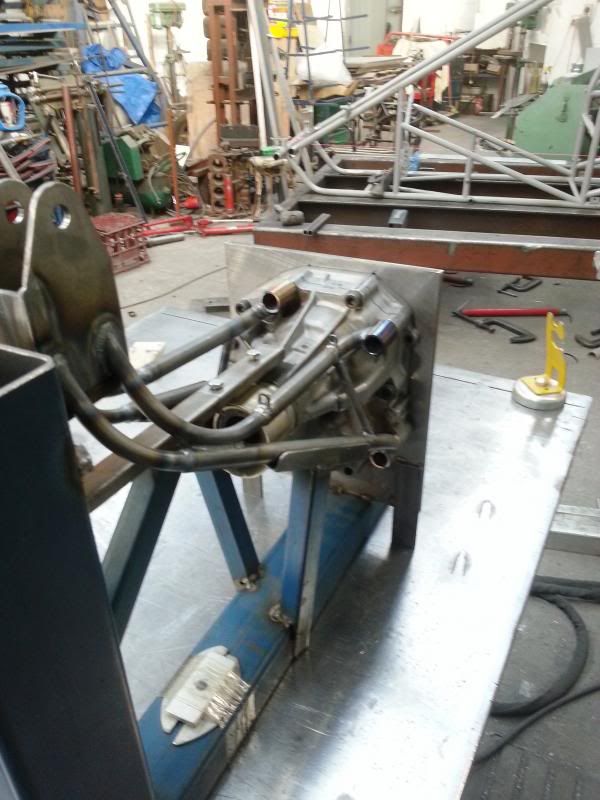
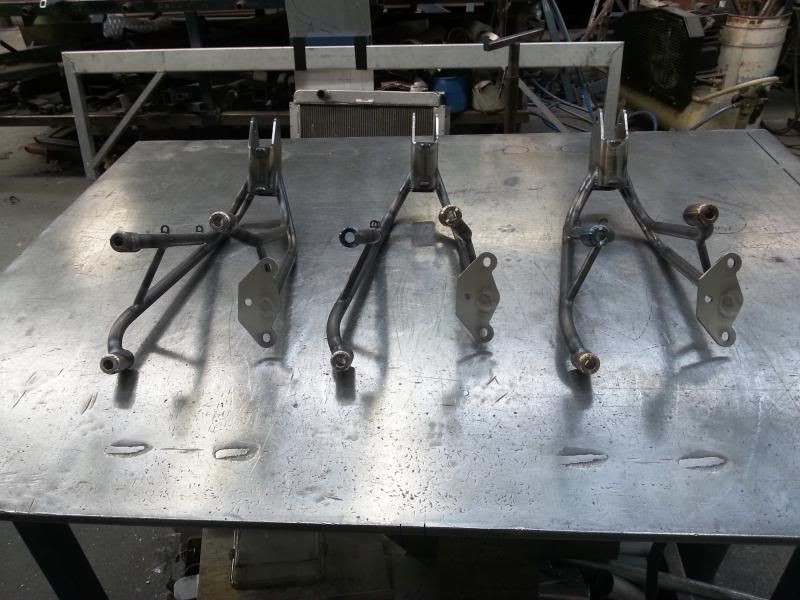
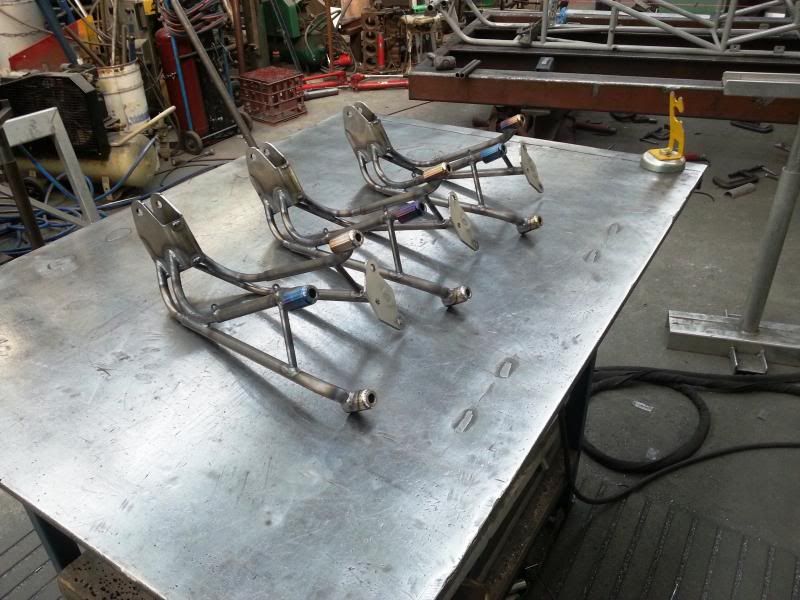
Again, something a bit different from me.
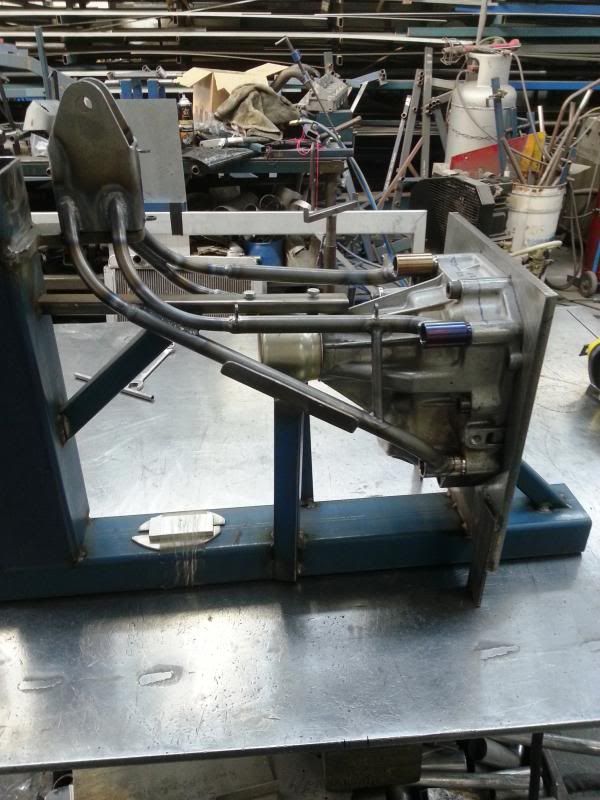
We do some fabrication work for a specialist gearbox and component company that builds high performance and racing gearboxes.
The pics below are part of the shifter arrangement we have to fabricate for our customer and these locate the shifter as it comes through the underfloor of the car to position the shifter in the correct position.
These are for for Rally cars and are full sequential dog gear gearboxes.
They are quite tricky to build as all the tubing is bent and cut and ground to shape by hand and as much welding as possible is done in the jig before removal when the welding is finished.
The tubing is all 4130 Cr/Mo and is small diameter 5/8" X .058", 1/2" X .065" and 3/8" X .058" tubing
Regards Andrew from Oz.
We are Tig welders, gravity doesn't worry us.
Miller Dynasty 350
OTC hybrid wave 300 amp inverter Tig at work (Now retired)
Kemppi MLS 2300 inverter, 230 amps of welding brilliance for home use
Miller Dynasty 350
OTC hybrid wave 300 amp inverter Tig at work (Now retired)
Kemppi MLS 2300 inverter, 230 amps of welding brilliance for home use
- Otto Nobedder
-
Weldmonger
-
Posts:
-
Joined:Thu Jan 06, 2011 11:40 pm
-
Location:Near New Orleans
In my opinion, there are two advantages to the inverter which may or may not apply to you. They are far lighter for a comparable capacity, and they offer more precision when welding aluminum, particularly thin sections.blaz wrote:Thanks for the comment Steve. Like everyone, I am still learning. Every little bit of info goes in the memory bank.
I won't mark it hot on the welding bench. If it leaves the welding area, it gets marked HOT! It only takes a second.
I enjoy TIG welding, so it is time to get one for home. I have a syncrowave 250dx @ work and it is great but I can't afford one for home. I am currently looking @ a lincoln squarewave 175. I did look at the diversion 180 but I like the stick option on the lincoln. Is it worth the extra $700 to get an inverter machine when all I have ever used is a transformer machine? Yes, I should ask this elsewhere.
The chief disadvantages are initial cost, more electronics vulnerable to failure, and potentially higher repair costs.
It might be worth looking at the Everlast 250 EX... Great price point for the features, and it has a 5 year warranty and an excellent track record for customer service, even better than the Red and Blue guys! Jody has a video or two reviewing it, and there's a recent topic here discussing it.
Here's the topic:
http://forum.weldingtipsandtricks.com/v ... f=2&t=2931
Steve S
Mrkil
- Mrkil
-
Workhorse
-
Posts:
-
Joined:Wed Jan 30, 2013 10:04 pm
-
Location:Hamilton, Ontario, Canada
I have the Thermalarc 181i and have not been happy with the tig torch that comes with it.
When I first set it up i had trouble getting enough argon, causing a kind of sparkler action. It seems with the diffuser supplied would not let the end cap seal. Switching to a weldcraft diffuser sorted that out.
The other issues where that the tungsten when assembled was off centre (this was most obvious doing 1/8" open root work with a number 4 cup. It almost touched the side of the cup itself. Also the hand grip twists on the torch. Unfortunately this is a bit of a pain on 5g pipe for me because as I walk the cup the body starts turning causeing my wrist to start changing angles.
The nice thing is he lws where I got it has warrentied the torch. Hopefully the replacment is better.
- Otto Nobedder
-
Weldmonger
-
Posts:
-
Joined:Thu Jan 06, 2011 11:40 pm
-
Location:Near New Orleans
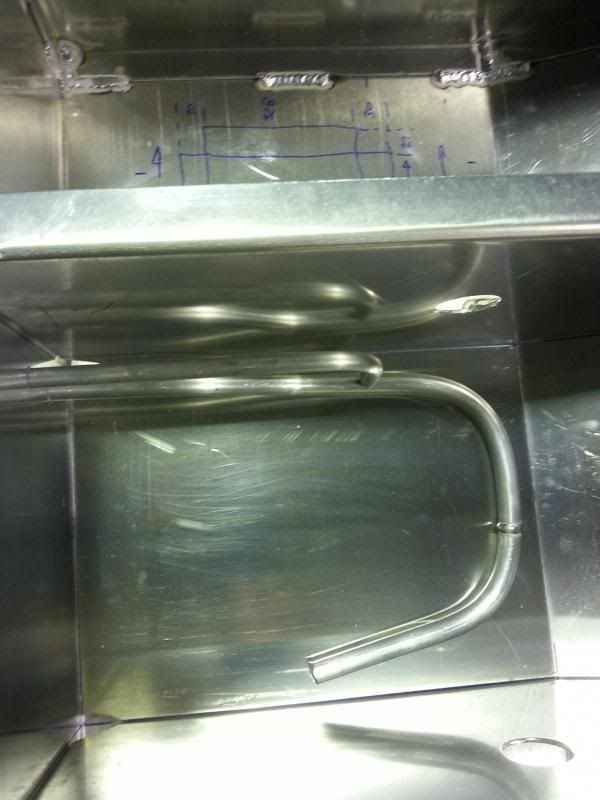
Welded this today:
Here's my buddy welding up the outer vessel we spent 6 hours fitting up (after removing for a repair to the inner vessel).
And here's my project, the inner vessel supports at the nose of the same project:
Here's a closer look:
Steve S
Here's my buddy welding up the outer vessel we spent 6 hours fitting up (after removing for a repair to the inner vessel).
- GEDC0788.JPG (198.37 KiB) Viewed 6615 times
- GEDC0792.JPG (185.2 KiB) Viewed 6615 times
- GEDC0794.JPG (207.73 KiB) Viewed 6615 times
- Otto Nobedder
-
Weldmonger
-
Posts:
-
Joined:Thu Jan 06, 2011 11:40 pm
-
Location:Near New Orleans
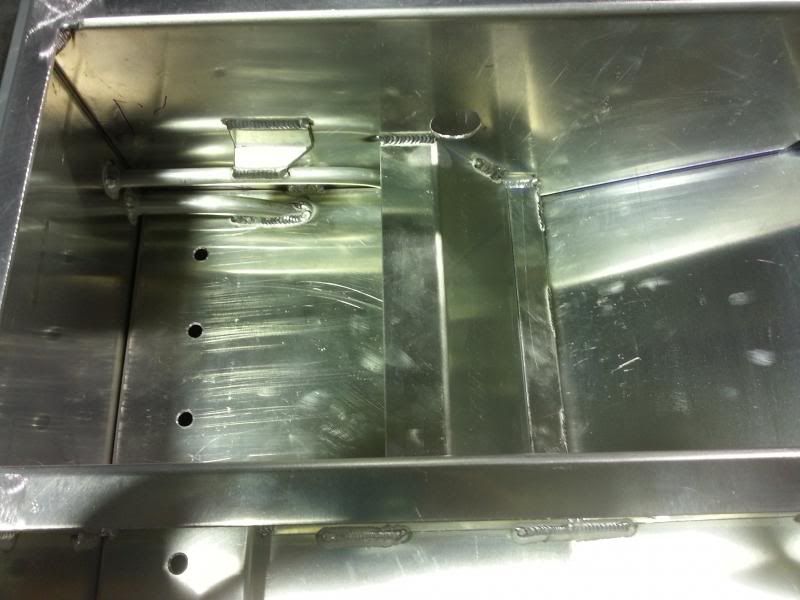
And today, I welded this... (same trailer)
And I ran out of 1/8" ER70S-2... so used two 3/32 for half the root and the entire cap.
It surprised me when I did the math. Two passes on that comes out to 10'-6" of weld. It was 3/16 carbon with a 1/8" backing bar, gap varying from 1/8" up to 3/8" from someone's sloppy cut & grind.
Had about five hours in it. Syncrowave 250DX set to 200A, and near full to full pedal the whole way. Had to stop and put the fan on it several times.
Steve S
- GEDC0803.JPG (202.97 KiB) Viewed 6600 times
- GEDC0797.JPG (197.21 KiB) Viewed 6600 times
Had about five hours in it. Syncrowave 250DX set to 200A, and near full to full pedal the whole way. Had to stop and put the fan on it several times.
Steve S
I like it Steve. Great solution rather than feeding like crazy. . Are you using a water cooled torch? I was welding an aluminium pulley @ work the other day and was running similar amperages and boy did the torch get warm.
This is the pulley. (aprox. 6" diameter) You can see the section that was broken off on top of the belt. I did a build up and re-machine to bring it back to life. Pre heat and 220 amps worked. No pics of the final product. Sorry I dropped the ball. Sometimes work is just too busy for pics.
This is the pulley. (aprox. 6" diameter) You can see the section that was broken off on top of the belt. I did a build up and re-machine to bring it back to life. Pre heat and 220 amps worked. No pics of the final product. Sorry I dropped the ball. Sometimes work is just too busy for pics.

awill4wd
- awill4wd
-
Active Member
-
Posts:
-
Joined:Thu Jan 31, 2013 3:57 am
-
Location:Berwick, Melbourne, Australia
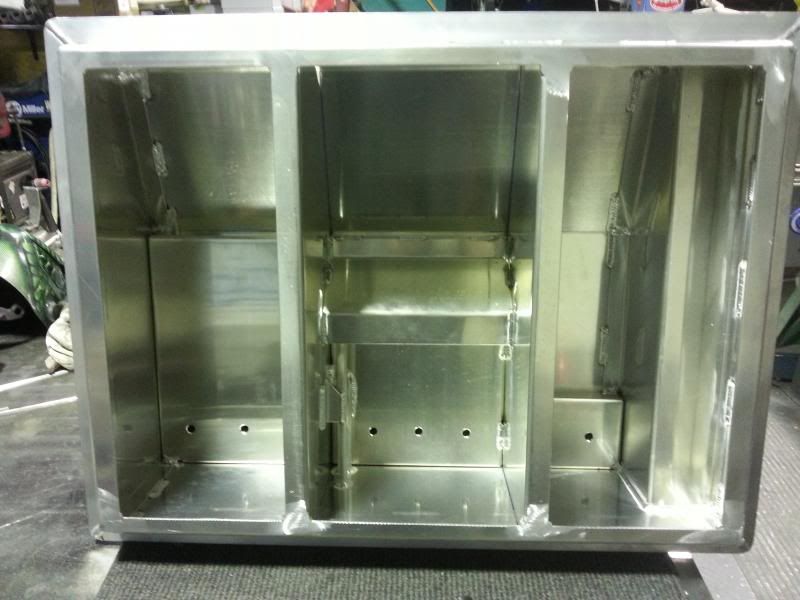
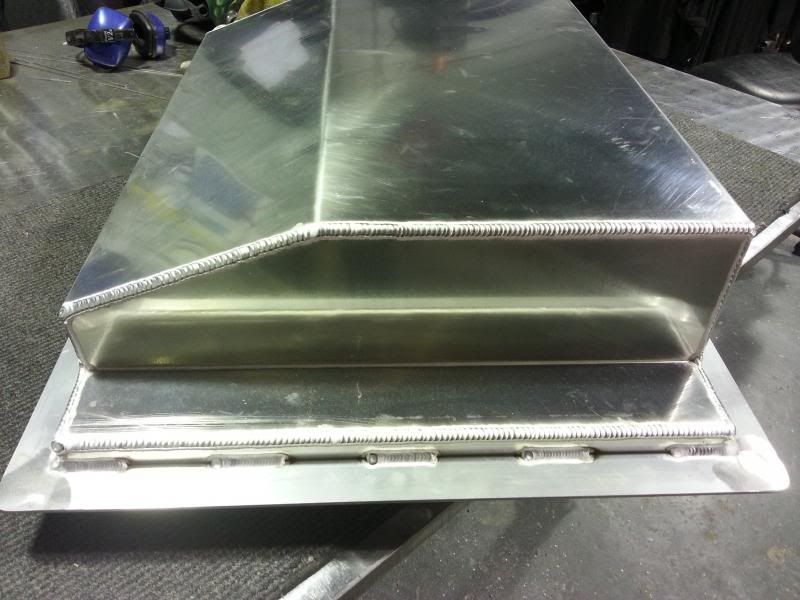
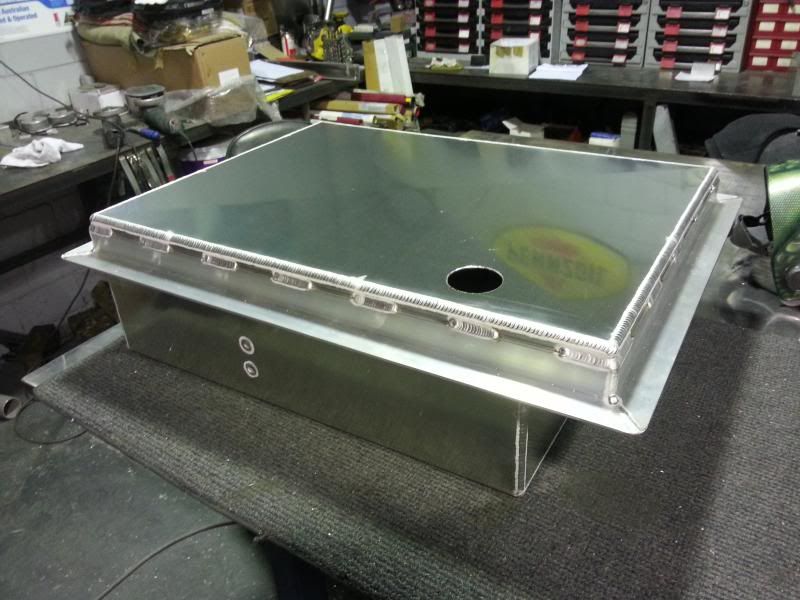
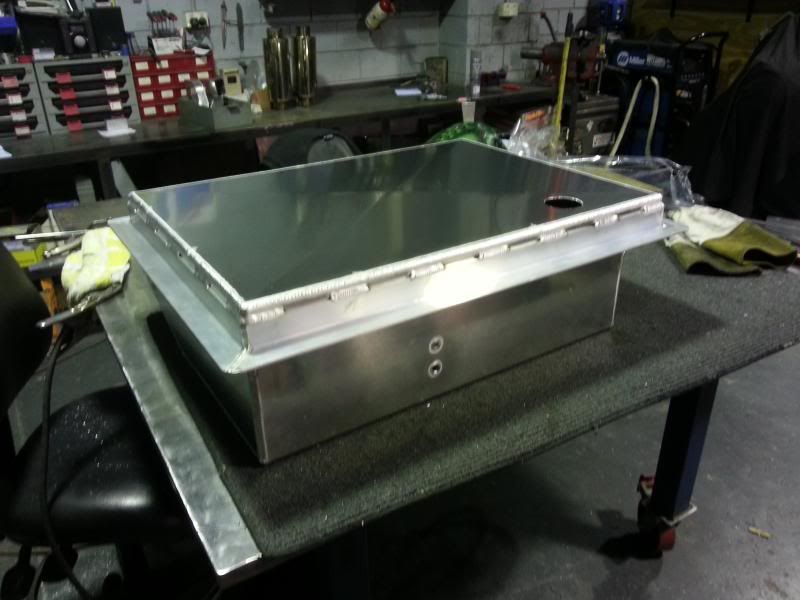
For my part time job after hours I fabricated and welded this Mustang fuel tank.
We've done a few of these now and this one is destined for an Eleanor copy which is why there is no filler tube welded to the top of the tank. (As it's mounted on the side and we don't know exactly where it will be yet)
The hole in the top is for a VDO sender unit and this tank will be set up for fuel injection.
The cutout on the left hand side of the tank is to allow the exhaust to pass in between the springs and the tank.
Folded baffles and endplates strengthen the tank immensely and I use what I call false floor baffling to control the last 30 ish mm of fuel particularly around the fuel pickup tube.
The partial baffle in the centre section allows fuel to spill in under braking and resist moving away while under acceleration.
Mounting angles are 38 X 38 X 4mm and are structural not architectural grade.
Cheers Andrew from Oz.
We are Tig welders, gravity doesn't worry us.
Miller Dynasty 350
OTC hybrid wave 300 amp inverter Tig at work (Now retired)
Kemppi MLS 2300 inverter, 230 amps of welding brilliance for home use
Miller Dynasty 350
OTC hybrid wave 300 amp inverter Tig at work (Now retired)
Kemppi MLS 2300 inverter, 230 amps of welding brilliance for home use
- Otto Nobedder
-
Weldmonger
-
Posts:
-
Joined:Thu Jan 06, 2011 11:40 pm
-
Location:Near New Orleans
@ awill4wd,
That is sharp! Nice, clean fabrication, and nice, consistent welds. Almost seems a waste of time to pressure test it, except to check those pesky external fittings...
@ blaz,
Yes, a water-cooled wp-20 (small torch). Sadly, we didn't have any 1/8" tungsten, though I have 1/8 gas lenses in my personal box... The 3/32 2% thoriated I was using degrades a bit above 160 amps, even in a water-cooled torch.
I do enough work above 150A, even on stainless, that the new shop-boss said he'd remedy that.
Steve S

Otto Nobedder.
Speaking of leak testing, I recall that you occasionally use the helium leak testing.
From your experience, could a helium leak test identify leaks that would have been found acceptable during a hydrotest?
Perhaps it is hard to compare ... considering the different pressures, molecular size of the different mediums, at varying temperatures, etc., but I was just curious.
Tanks.
Alexa
- Otto Nobedder
-
Weldmonger
-
Posts:
-
Joined:Thu Jan 06, 2011 11:40 pm
-
Location:Near New Orleans
Yes, Helium testing will find micropores/fissures that will pass hydro.Alexa wrote:Otto Nobedder.
Speaking of leak testing, I recall that you occasionally use the helium leak testing.
From your experience, could a helium leak test identify leaks that would have been found acceptable during a hydrotest?
Perhaps it is hard to compare ... considering the different pressures, molecular size of the different mediums, at varying temperatures, etc., but I was just curious.
Tanks.
Alexa
The reason is, true hydro uses water as the testing medium (Pneumatic is also common, with a soap-bubble test, and my answer applies here, too).
Water is a molecule. Two oxygen atoms tied to hydrogen. In air, Nitrogen is N2 (a molecule), oxygen is O2, and CO2 is present as well.
Helium is an atom. It does not form molecules (hence the definition "inert gas"). There is no single particle in nature smaller than a helium atom... Even hydrogen occurs as H2 in nature.
The welds I last posted on this topic have been through "pneumatic", at 7 psi, and eight leaks were found and fixed, all in the big circumference weld I showed my friend working on. Okay, not "in" his weld, but adjacent to it, where the original weld we cut existed. These have all been fixed. (The original weld was wider... we cut down the center and ground smooth.) I expect to find many leaks with helium that did not show up in the soap-bubble test, and believe the solution will be two more passes (18'-6" each) on either side of my friend's weld, to bury porosity from the original weld.
I'll post more pics as this evolves.
Steve S
- Otto Nobedder
-
Weldmonger
-
Posts:
-
Joined:Thu Jan 06, 2011 11:40 pm
-
Location:Near New Orleans
Alexa,
I should add, the service determines the test. If the service is methane (the smallest hydrocarbon), ethane, or butane, pneumatic proof is probably sufficient. If the service is steam, or a more complex molecule than, say, butane or ammonia, Hydro is likely sufficient.
I sometimes use helium because the service is hydrogen, sometimes because it is the most precise way to find extremely small leaks that have the potential to grow under load stress.
Steve S
- Otto Nobedder
-
Weldmonger
-
Posts:
-
Joined:Thu Jan 06, 2011 11:40 pm
-
Location:Near New Orleans
Using helium, I can detect leaks smaller than 3 cubic centimeters (atmospheric) per year (at the rate of helium!).
nice
When seconds count, the police are only minutes away...
Lincoln Squarewave 335, water cooled WP20 torch with pedal control
Millermatic 200 mig
Thermodynamics Cutmaster 52 Plasma
Old stick welder
Cutting torch, saws and grinders
Very little talent.
Lincoln Squarewave 335, water cooled WP20 torch with pedal control
Millermatic 200 mig
Thermodynamics Cutmaster 52 Plasma
Old stick welder
Cutting torch, saws and grinders
Very little talent.
Not today, but it's typical of weird projects that can appear on any day. These are noisemakers for an air cannon or something. The example they brought, was made on automated (semi-automated at the least) production equipment and that's what they wanted it to look like. Most of you fab'rs can relate to groups of tedious parts that there is not enough of to justify building fixtures for. Just to have a turret, even a manually operated one would be a huge help. Another, one size fits all project. 1/8" tungsten for fusion welding outside corners on thin wall. . .
I TIG weld aluminum in a strange style. The Hobart books in school, usually gave multiple options (torch angle, travel direction etc) for the same test, so it was back then that I developed these habits. These types of project runs are exactly why I weld aluminum the way I do. I know some of you seasoned welders will agree, that even the best welders are not perfect at every type of weld joint. At least ones that you don't do every day. It will be the 2nd to the last, or even last of say 4 identical fit ups that the weld comes out perfect, or as good as it's gonna get, anyway. Most people probably won't even notice, but to us it screams; "this is what the other three could look like!"

I did find a piece of 2" 40 PVC that this thin wall fit into, so I made an index tool to clock all three holes (some were two holes) on the sides with an ultra-fine sharpie with a great degree of consistency. I cut them with a broach on a vee block at the drill press. I found some aluminum washers at McMaster Carr that fit (what are the chances?) the tubing tightly for a press fit and a decent fit for the 3/8" NPT aluminum couplings.
ETA: The closest one in the photo was the last, and it is slightly better than the rest. Now if they would have given 16 more to do right now, they would all come out nice. But they won't. It will be 6 months/year. . .and we'll be back to square one like a newbie.
I TIG weld aluminum in a strange style. The Hobart books in school, usually gave multiple options (torch angle, travel direction etc) for the same test, so it was back then that I developed these habits. These types of project runs are exactly why I weld aluminum the way I do. I know some of you seasoned welders will agree, that even the best welders are not perfect at every type of weld joint. At least ones that you don't do every day. It will be the 2nd to the last, or even last of say 4 identical fit ups that the weld comes out perfect, or as good as it's gonna get, anyway. Most people probably won't even notice, but to us it screams; "this is what the other three could look like!"
I did find a piece of 2" 40 PVC that this thin wall fit into, so I made an index tool to clock all three holes (some were two holes) on the sides with an ultra-fine sharpie with a great degree of consistency. I cut them with a broach on a vee block at the drill press. I found some aluminum washers at McMaster Carr that fit (what are the chances?) the tubing tightly for a press fit and a decent fit for the 3/8" NPT aluminum couplings.
ETA: The closest one in the photo was the last, and it is slightly better than the rest. Now if they would have given 16 more to do right now, they would all come out nice. But they won't. It will be 6 months/year. . .and we'll be back to square one like a newbie.
Miller ABP 330, Syncrowave 250, Dynasty 300 DX.
Honorary member of the Fraternity of Faded Tee Shirts.
Honorary member of the Fraternity of Faded Tee Shirts.
Return to “Tig Welding - Tig Welding Aluminum - Tig Welding Techniques - Aluminum Tig Welding”
Jump to
- Introductions & How to Use the Forum
- ↳ Welcome!
- ↳ Member Introductions
- ↳ How to Use the Forum
- ↳ Moderator Applications
- Welding Discussion
- ↳ Metal Cutting
- ↳ Tig Welding - Tig Welding Aluminum - Tig Welding Techniques - Aluminum Tig Welding
- ↳ Mig and Flux Core - gas metal arc welding & flux cored arc welding
- ↳ Stick Welding/Arc Welding - Shielded Metal Arc Welding
- ↳ Welding Forum General Shop Talk
- ↳ Welding Certification - Stick/Arc Welding, Tig Welding, Mig Welding Certification tests - Welding Tests of all kinds
- ↳ Welding Projects - Welding project Ideas - Welding project plans
- ↳ Product Reviews
- ↳ Fuel Gas Heating
- Welding Tips & Tricks
- ↳ Video Discussion
- ↳ Wish List
- Announcements & Feedback
- ↳ Forum News
- ↳ Suggestions, Feedback and Support
- Welding Marketplace
- ↳ Welding Jobs - Industrial Welding Jobs - Pipe Welding Jobs - Tig Welding Jobs
- ↳ Classifieds - Buy, Sell, Trade Used Welding Equipment
- Welding Resources
- ↳ Tradeshows, Seminars and Events
- ↳ The Welding Library
- ↳ Education Opportunities