Tig welding tips, questions, equipment, applications, instructions, techniques, tig welding machines, troubleshooting tig welding process
User avatar
  • Posts:
  • Joined:
    Thu Jan 06, 2011 11:40 pm
  • Location:
    Near New Orleans

:lol:

Yeah, I know what you mean, and I noticed the "star pupil" was in front of the class.

You know as well as I, there's nothing "wrong" with the rest, but, oh, I can relate to that idea of how the next batch would look now that you've rounded the learning curve on it...

We are always our own worst critics.

Steve S
User avatar
  • Posts:
  • Joined:
    Thu Jan 06, 2011 11:40 pm
  • Location:
    Near New Orleans

My next weld, tomorrow, I had to actually grind in the mirror.

I tried to set up a platform I could lay on, but it didn't allow me any vision to the repair I'm making.

Here's a few pics:
GEDC0831.JPG
GEDC0831.JPG (204.42 KiB) Viewed 6073 times
This is general location, with the useless platform in place. The green tape with the arrow shows where the leak is, sort-of. It's up under, as in "stand on your head".

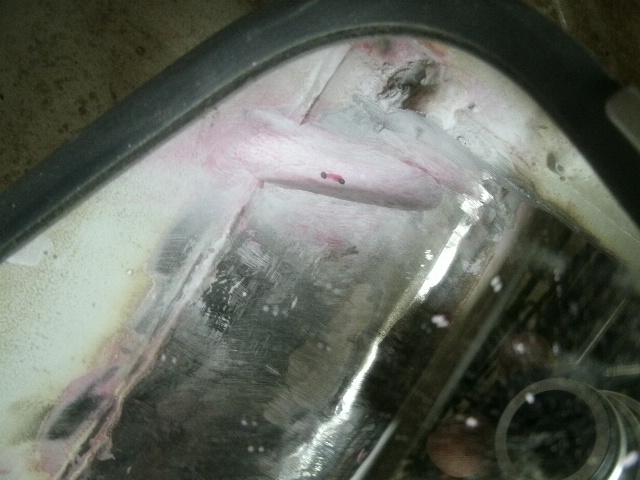
Here's the leak, shown in dye-penetrant, with the gusset it was under sectioned out:
GEDC0834.JPG
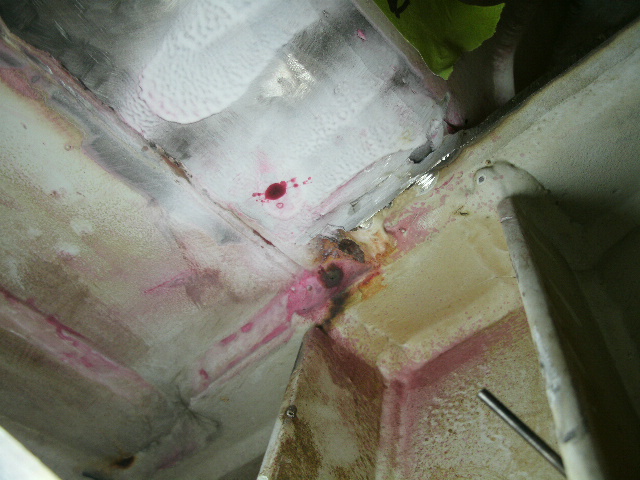
GEDC0834.JPG (190.35 KiB) Viewed 6073 times
And here it is, ground nearly through 1/2" of 304SS, reduced to it's origin:
GEDC0838.JPG
GEDC0838.JPG (172.53 KiB) Viewed 6073 times
Note the mirror... I had to grind it in the mirror, so there's no doubt I'll have to weld it the same way. Tomorrow should be interesting!

Steve S
blaz
  • Posts:
  • Joined:
    Thu Jan 31, 2013 11:08 pm

you should have been a dentist looking in the mirror all day. ;)

Here was my day yesterday. Remove motor and gearbox, remove shaft, weld shaft to build up and rough machine the shaft.

The 2 centers that bolt to my 1/4" table are fantastic! Should have made them sooner! :D

Image

Image

Image

The mess on the welding bench is NOT mine. I am tired of cleaning up other people's messes! :evil:
TamJeff
  • Posts:
  • Joined:
    Tue Dec 04, 2012 4:46 am

Nice work. The small, tedious jobs, are often more edge-of-the-seat than the large projects. I hated doing those parts. Too much setup time for such a small run. Can't wobble when they screw them on, etc. I bet Steve is glad the crack is not 2ft long. :)

Motor shafts can be tricky. I had to build up a shaft seal surface on some oddball 5hp A.O. Smith motor that had to be from the (think humongous and cast iron housing) 1940's. Looked as if it came off a Navy ship. It was all pitted and dirty and I did not want to weld one spot because the shaft was long and I just knew it would bend. So I start to heat it up and a hair line groove appears all the way around the shaft. Turns out that it was a sleeve. Ground thru one side, slid the old one off and ordered a new one. All I had to do was heat it red and drop it onto the shaft like brand new. Too easy!
Miller ABP 330, Syncrowave 250, Dynasty 300 DX.
Honorary member of the Fraternity of Faded Tee Shirts.
blaz
  • Posts:
  • Joined:
    Thu Jan 31, 2013 11:08 pm

Seal sleeves sure are fantastic.

Shaft build ups are a pain, but since I'm the one that has to machine it I have leaned many tricks.

THE SHAFT IS GOING TO BEND! :shock:

DON'T FILL IN THE KEYWAY! (bends drastically and relieves drastically when re machined)

Put a small tack on the end of the shaft before you start and make sure you can file it before you make the whole shaft glass hard.

If you weld to the end of the shaft and put on enough weld, it doesn't matter how much it bends as long as you know how to set it up to make everything true again. Straightening the shaft takes longer than welding to the end in most cases.
Alexa
  • Posts:
  • Joined:
    Mon Dec 31, 2012 10:07 am

Blaz.

Why "Put a small tack on the end of the shaft before you start and make sure you can file it before you make the whole shaft glass hard."?

Tanks.
Alexa
User avatar
  • Posts:
  • Joined:
    Thu Jan 06, 2011 11:40 pm
  • Location:
    Near New Orleans

Well, here's a crappy pic (best of four I took) of the repair weld. The root was the hardest, as the ground-thin metal opened up, even though I made the final grind-through with a 1/8" disk in a die-grinder.
GEDC0839.JPG
GEDC0839.JPG (186.21 KiB) Viewed 6048 times
Not real proud of it, but for the extremely awkward reach, left hand in the mirror, I can live with it. And it passed helium leak testing.

Then I had to replace a gusset I'd sectioned out to reach the leak. The back edge was a 1/4" fillet that really strained my patience, as I simply could not see the lap to the gusset as I welded it.
GEDC0842.JPG
GEDC0842.JPG (177.04 KiB) Viewed 6048 times
All in all, I'm satisfied with the way the day went. The boss was stunned that I'd welded it, pumped the trailer down under 200 microns, and leak-tested it before lunch.

Steve S
blaz
  • Posts:
  • Joined:
    Thu Jan 31, 2013 11:08 pm

Alexa wrote:Blaz.

Why "Put a small tack on the end of the shaft before you start and make sure you can file it before you make the whole shaft glass hard."?

Tanks.
Alexa

If the motor shaft is made of high carbon steel (unusual), the small tack will be hard. If the small tack is hard the whole shaft will be hard and brittle once welded. I can easily machine anything 30 rockwell C.
Alexa
  • Posts:
  • Joined:
    Mon Dec 31, 2012 10:07 am

Tanks.
Mrkil
  • Posts:
  • Joined:
    Wed Jan 30, 2013 10:04 pm
  • Location:
    Hamilton, Ontario, Canada

Nothing to fancy, but here is what I have been building since I started my new job on Thursday.
Image

I weld the ends on a jig and the head welder putsthe back together as wellas adding the wheels and then I do the final welds over his tacks and add the handles

It's all mild steel angle and flat bar. So far I've put together 25 out of a run of 110
Alexa
  • Posts:
  • Joined:
    Mon Dec 31, 2012 10:07 am

Mrkil.
Tanks for the update.
Alexa
awill4wd
  • Posts:
  • Joined:
    Thu Jan 31, 2013 3:57 am
  • Location:
    Berwick, Melbourne, Australia

It's been a bit of a long project but the pics below show an interesting water to air intercooling setup on a 588 cube twin turbo engine for a ski racing boat.
The intercooler uses 16 cylindrical Laminova intercooler cores.
I fabricated the intercooler and Darren at Trikfab where I work after hours has done the rest.
It looks pretty cool even if I do say so myself.
Regards Andrew.

Image

Image

Image
We are Tig welders, gravity doesn't worry us.
Miller Dynasty 350
OTC hybrid wave 300 amp inverter Tig at work (Now retired)
Kemppi MLS 2300 inverter, 230 amps of welding brilliance for home use
TamJeff
  • Posts:
  • Joined:
    Tue Dec 04, 2012 4:46 am

Beautiful work as usual.
Miller ABP 330, Syncrowave 250, Dynasty 300 DX.
Honorary member of the Fraternity of Faded Tee Shirts.
User avatar
  • Posts:
  • Joined:
    Thu Jan 06, 2011 11:40 pm
  • Location:
    Near New Orleans

That's sweet!

I love building shiny stuff... I don't get to do it as often as I'd like!

Steve S
User avatar
  • Posts:
  • Joined:
    Thu Jan 06, 2011 11:40 pm
  • Location:
    Near New Orleans

In comparison, here's the "fun" work I did today:

Five of these (two yet to go):
GEDC0856.JPG
GEDC0856.JPG (182.45 KiB) Viewed 5886 times
Inside this:
GEDC0855.JPG
GEDC0855.JPG (174.66 KiB) Viewed 5886 times
At 2:45 PM, I came out, and informed them I was done for the day, as it had reached 110* inside that vessel...

I'll do the other two tomorrow, along with a few miscellaneous repairs, when it's relatively cool in the morning and the fans have removed my welding heat...

Steve S
TamJeff
  • Posts:
  • Joined:
    Tue Dec 04, 2012 4:46 am

It gets over 100 in our shop in July/August. Get a structure of freshly welded aluminum in the area and nobody wants to hang out and chat. Winter time is a different story altogether.

You definitely don't seem to be short for projects at any given time. I stayed late and finished a bunch of odds and ends today so that I will have a skate day tomorrow. :)
Miller ABP 330, Syncrowave 250, Dynasty 300 DX.
Honorary member of the Fraternity of Faded Tee Shirts.
User avatar
  • Posts:
  • Joined:
    Thu Jan 06, 2011 11:40 pm
  • Location:
    Near New Orleans

LOL! I know...

I'd be loving this project in December or January...
User avatar
  • Posts:
  • Joined:
    Thu Jan 24, 2013 6:44 am

User avatar
  • Posts:
  • Joined:
    Thu Jan 06, 2011 11:40 pm
  • Location:
    Near New Orleans

Nice.

I saw three different signatures.

Is one of those yours?

Or are you just marketing your shop?
User avatar
  • Posts:
  • Joined:
    Thu Jan 24, 2013 6:44 am

No, none are mine. Those are customer bikes. Sorry, was it not appropriate to participate?
User avatar
  • Posts:
  • Joined:
    Thu Jan 06, 2011 11:40 pm
  • Location:
    Near New Orleans

Hey, your work is obviously welding-related.
User avatar
  • Posts:
  • Joined:
    Thu Jan 06, 2011 11:40 pm
  • Location:
    Near New Orleans

Most of us are actually the ones doing the welds.

The perspective of the person "selling" the welds is certainly welcome.

Steve S
User avatar
  • Posts:
  • Joined:
    Thu Jan 24, 2013 6:44 am

I did the welds.
awill4wd
  • Posts:
  • Joined:
    Thu Jan 31, 2013 3:57 am
  • Location:
    Berwick, Melbourne, Australia

zank wrote:I did the welds.
What material are you using for your frames Zank?
Regards Andrew from Oz.
We are Tig welders, gravity doesn't worry us.
Miller Dynasty 350
OTC hybrid wave 300 amp inverter Tig at work (Now retired)
Kemppi MLS 2300 inverter, 230 amps of welding brilliance for home use
User avatar
  • Posts:
  • Joined:
    Thu Jan 06, 2011 11:40 pm
  • Location:
    Near New Orleans

Awright, Zanc...

Are the welds in the pictures you posted yours? Did you perform them? And who's names are assigned to them?

Don't confuse us any more than we naturally are...
Post Reply