Tig welding tips, questions, equipment, applications, instructions, techniques, tig welding machines, troubleshooting tig welding process
SPOKESY
  • Posts:
  • Joined:
    Sun Feb 17, 2013 7:28 am

I'll start it off

Image

That's my work area where I do all of my pipe welding.

Hope we get some replies looking forward to pics :D .
steveyb
  • Posts:
  • Joined:
    Wed Mar 13, 2013 6:07 am
  • Location:
    Brisbane

**jealous**

I only have a small area downstairs till I get the shed built, and even then the shed will be small :(
SPOKESY
  • Posts:
  • Joined:
    Sun Feb 17, 2013 7:28 am

Well I hope your shed will be fine for purpose once you get it done.

Tbh I don't really use/need all that space, could cut the bench in half and that would be plenty. My only gripe with the bench is the fact that it has only a 4 inch vice which rarely, if ever comes in handy for pipework with it being too small.

Would be great to see pics of your shed once you get it done. Good luck with that.
TamJeff
  • Posts:
  • Joined:
    Tue Dec 04, 2012 4:46 am

That's some nice pipe work. Under the circumstances, or until you get another vise, you could make some offset pipe jaws for that vise that fasten to it where the inserts go? Could even make them articulating to where they hold pipes at different angles.
Miller ABP 330, Syncrowave 250, Dynasty 300 DX.
Honorary member of the Fraternity of Faded Tee Shirts.
AKmud
  • Posts:
  • Joined:
    Fri Jan 25, 2013 1:47 am
  • Location:
    Wasilla, Alaska

Welded this ladder rack up Friday, just waiting on the customer's truck for the final fit up -

Image

Put this rear rack on a Polaris Ranger 6x6 together for a customer on Sunday -

Image
ritzblitz
  • Posts:
  • Joined:
    Fri Mar 01, 2013 10:44 pm

Cool thread.

I don't have any pictures of the finished product, but here's one my friend secretly took when I was fixing an exhaust manifold for him.
The previous owner ran it with a busted engine mount. It had an annular crack which I tried fixing up. It was tough access but it will do... I can edit this when he glass beads and paints the part for a finished product picture.
This is the first 'job' I got to do with my new welder :)
Image
SPOKESY
  • Posts:
  • Joined:
    Sun Feb 17, 2013 7:28 am

@Tam

Thanks bud. Unfortunately all hours are assigned to jobs so do not really have the time, given the fact that it is not much of a hindrance. Just me being picky :roll:

@AK

Nice pics bud

@ritz

I hear exhausts are a pain in the backside?
ritzblitz
  • Posts:
  • Joined:
    Fri Mar 01, 2013 10:44 pm

Yeah man this one wasn't too fun because the crack went into a merge between primaries so access was terribly difficult. But I learned from the experience!
sunppeli
  • Posts:
  • Joined:
    Sun Feb 10, 2013 11:27 am

This is just a random practise box that I welded today. Made of 3mm alu.
Image
I'm starting to be a little happy but still tons to learn..

That might be a good box to be a water tank/cooler for a WC-torch if I ever buy one.
blaz
  • Posts:
  • Joined:
    Thu Jan 31, 2013 11:08 pm

Shaft build up because the bearing diameter was 0.002" undersize. Being in maintenance it seems as though I never seem to do "typical" welds. I have improved drastically after watching Jody's vids.

Image
TamJeff
  • Posts:
  • Joined:
    Tue Dec 04, 2012 4:46 am

A helicopter water rescue trainer for the local PD.

Image

Some other odds and ends.
Image
Miller ABP 330, Syncrowave 250, Dynasty 300 DX.
Honorary member of the Fraternity of Faded Tee Shirts.
awill4wd
  • Posts:
  • Joined:
    Thu Jan 31, 2013 3:57 am
  • Location:
    Berwick, Melbourne, Australia

For me, again something a bit different.
This is the gearbox casing of a 1930's Bugatti racecar.
This is a matching numbers chassis, engine, gearbox car to it's important the same gearbox is installed regardless of the time needed to repair the gearbox.
The guy we deal with specialises in servicing of these vintage racecars and this is from one of his customers who tried to reverse the car up a steep(ish) driveway.
This forced the gears apart which then grenaded in the casing.
Unfortunately, our guy we deal with hogged it out pretty savagely just to get everything pretty close to alignment so the gaps were as you see somewhat large.
I ended up fitting Aluminium rods bent to shape to fill the gaps but it still required lots of die grinding and welding to ensure good penetration.
The internals of the casing still require welding but there is some distortion on the casing that I have to run by our customer before I attack the inside of the case.
Not the best welding I've done but then castings are always a crap shoot and you don't know what you've got till you strike an arc.
This is still work in progress and I'll probably die grind some of the welds back and reweld them till I'm happy with them.
Regards Andrew from Oz.

Image

Image

Image

Image
We are Tig welders, gravity doesn't worry us.
Miller Dynasty 350
OTC hybrid wave 300 amp inverter Tig at work (Now retired)
Kemppi MLS 2300 inverter, 230 amps of welding brilliance for home use
Nils
  • Posts:
  • Joined:
    Fri Jan 11, 2013 7:46 pm

Awesome! What a cool job, and customer! Can you share your equipment type and its setup? I don't know sheet, but it seems like alignment would be dubious at best for such a critical application as, precise, gear meshing. Was there any kind of jigging or alignment tooling supplied by the customer to assure this? Would be interesting to see if this gearbox actually functions properly when re-assembled. No ding on you, but did the customer over-simplified his problem?

Welds look pretty darn good though. Love to hear more details on that part of it.

Thanks,
Nils
Last edited by Nils on Fri Mar 22, 2013 8:51 am, edited 1 time in total.
Everlast PowerTig 250EX, PowerTig 185 Micro, PowerArc 160STH, Miller Trailblazer 301G, Millermatic 140 Auto-Set
Mike
  • Posts:
  • Joined:
    Mon Dec 06, 2010 1:09 pm
  • Location:
    Andover, Ohio

Nice work.
M J Mauer Andover, Ohio

Linoln A/C 225
Everlast PA 200
User avatar
  • Posts:
  • Joined:
    Sun Feb 17, 2013 1:30 pm
  • Location:
    Colorado

Nice work Jeff. What will be used for a sling point on that basket?

Image

Maybe web strapping on the top four corners I guess.

Andrew, nothing like trying to put together a jig-saw puzzle without all the parts huh?

Nice work guys!
Go break something, then you can weld it back the right way.

Image
awill4wd
  • Posts:
  • Joined:
    Thu Jan 31, 2013 3:57 am
  • Location:
    Berwick, Melbourne, Australia

Nils wrote:Awesome job! Can you share your equipment and its setup? Thanks.
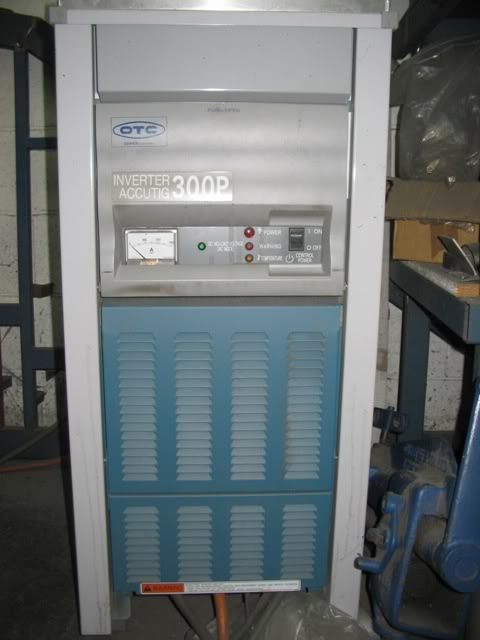
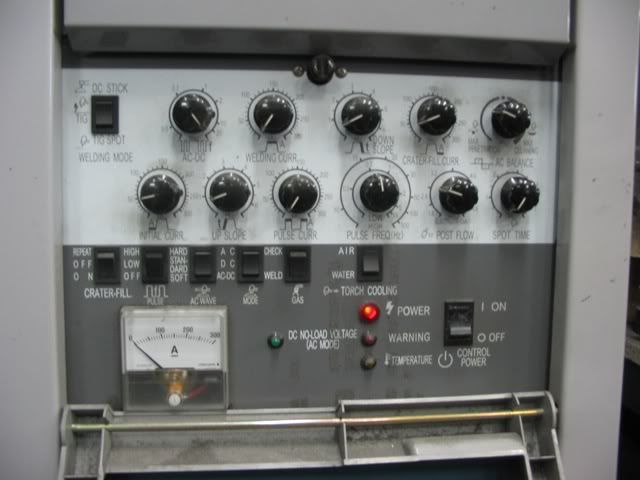
The machine I use primarily at work is my OTC AVP300 inverter 300 amp Tig welder from Japan.
I bought it new about 12 or so years ago and at the time it pretty well state of the art.

Image

Image

It's analogue in setup so it has lots of dials to play with and took a lot of learning as there was basically no info available at the time on inverter machines.
It's lacking some features now compared to the new inverters (mainly adjustable AC Hz frequency I miss) but even now it still has the best AC Balance adjustment of any machine I've used, and I've used a few.
It has hybrid wave, an early version of the Miller Dynasty's ability to change the EN/EP settings in AC waveforms but fixed and very basic.
It's got great pulse settings from less than 0.5 pps up to 500 pps.
It doesn't have a foot pedal which I'd like as my friends Dynasty 350 I use when welding for him after hours has the wireless foot pedal which I like lots.
I've got a Tweco water cooler attached and an 8 meter TigMaster Tig torch I hate as it's so stiff it's like arm wrestling a black Anaconda. I bought the torch in an emergency when I cooked my other one and it was the only one available when I needed it (immediately).
I love the look of the CK Worldwide FlexLoc torch and I think when I get some spare money together I'll get myself one of those.
For home use I've got one of these:

Image

Image

It's a Kemppi (made in Finland) MLS 2300 and it's verrrrrrrrrry nice.
It's got all the bells and whistles and I sometimes take it into work when I need to do really fine little welds as its adjustable AC Hz frequency up to 250 Hz on AC is worth its weight in gold at times :)
It basically does everything the Dynasty 200DX does (perhaps even a little more) and has another 30 amps as well.
Here in Oz we've basically been neglected by Miller and Lincoln and the Europeans have been very competitive both in product and pricing.
One thing I don't like about though and here the Europeans have been very sneaky is the fact the machines will only accept torches made by the machine manufacturers and not use Dinse fittings for the torches. The earth fittings are Dinse but the torches are not :evil: .
So that's basically what I use for my day to day stuff, they have served me well and no matter how much I tell myself I'd love a Dynasty 350 I just give myself a quick slap and remind myself I might like one but I don't need one. (Yet)
Cheers Andrew from Oz.
We are Tig welders, gravity doesn't worry us.
Miller Dynasty 350
OTC hybrid wave 300 amp inverter Tig at work (Now retired)
Kemppi MLS 2300 inverter, 230 amps of welding brilliance for home use
awill4wd
  • Posts:
  • Joined:
    Thu Jan 31, 2013 3:57 am
  • Location:
    Berwick, Melbourne, Australia

Nils wrote:Awesome! What a cool job, and customer! Can you share your equipment type and its setup? I don't know sheet, but it seems like alignment would be dubious at best for such a critical application as, precise, gear meshing. Was there any kind of jigging or alignment tooling supplied by the customer to assure this? Would be interesting to see if this gearbox actually functions properly when re-assembled. No ding on you, but did the customer over-simplified his problem?

Welds look pretty darn good though. Love to hear more details on that part of it.

Thanks,
Nils
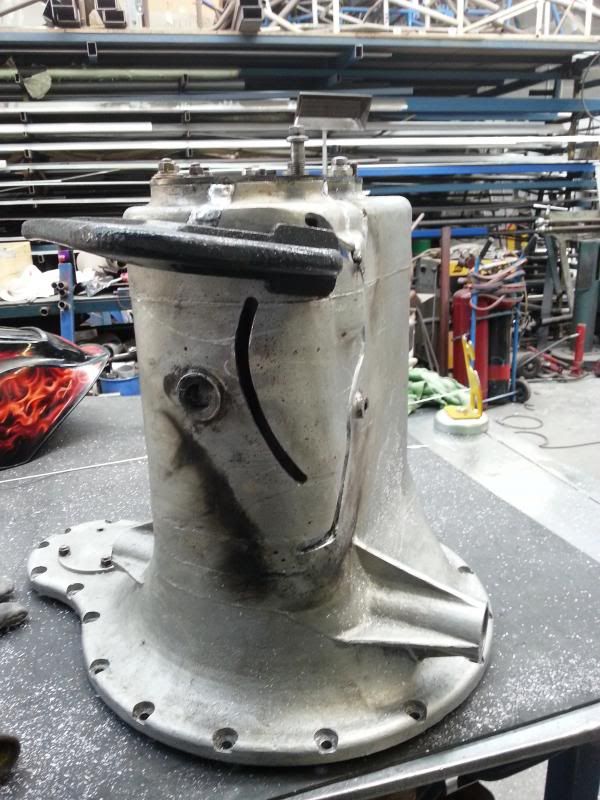
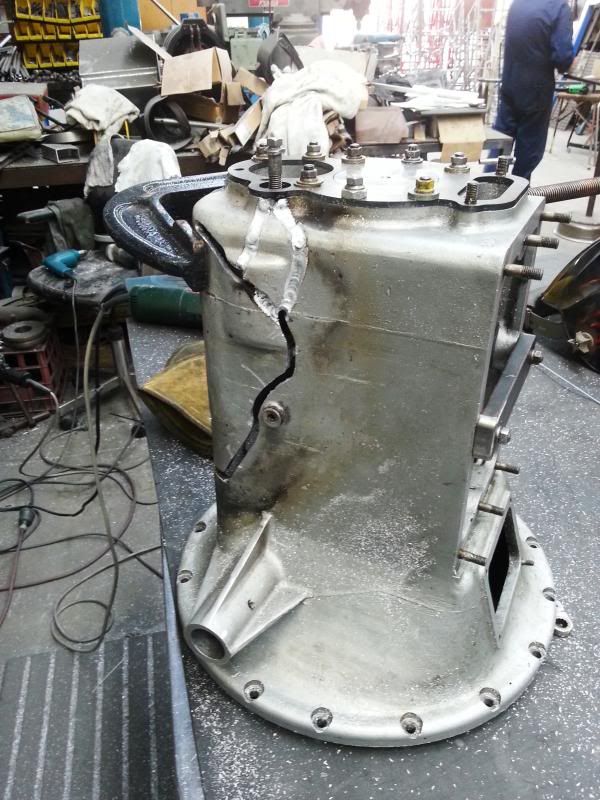
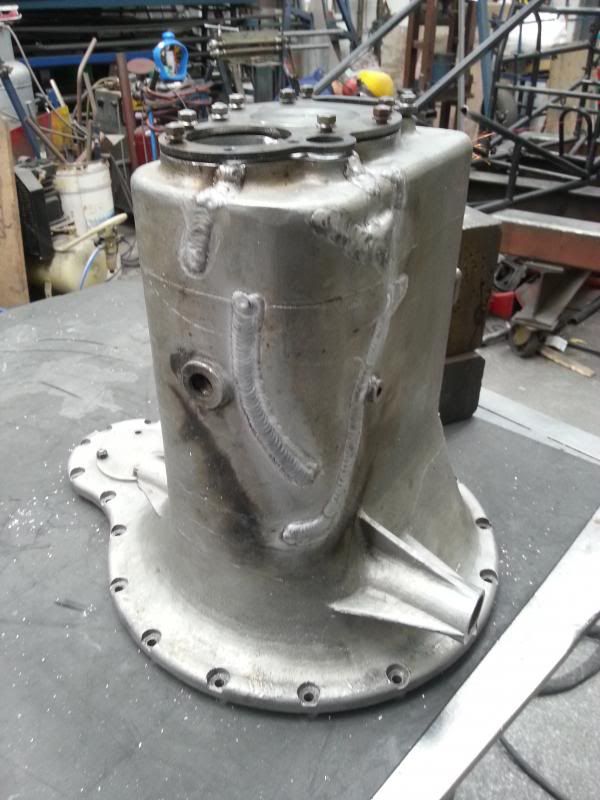
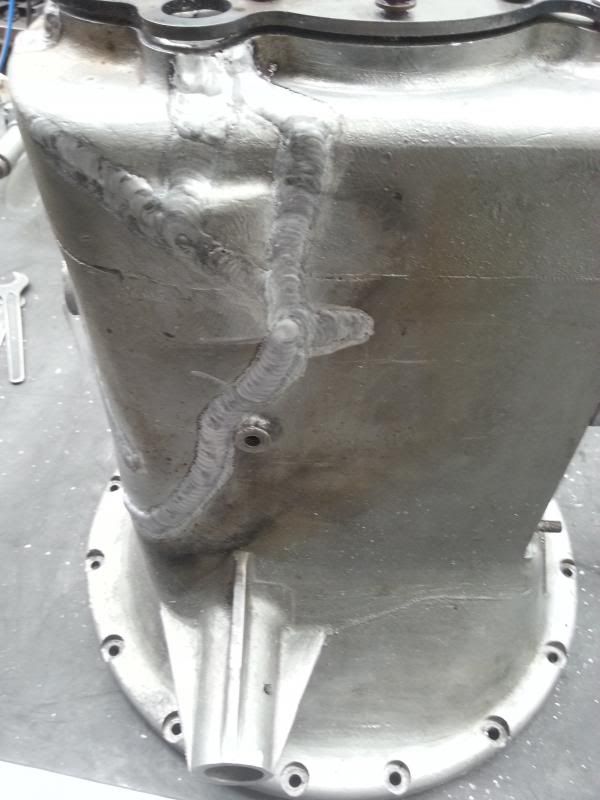
Nils, the photo's don't show it but there is a dummy shaft approx 71mm diameter running through the case aligning the bore from end to end.
The layshaft is an issue as it's basically unsupported and it has moved out of alignment so we'll have to run it by our customer to see which way he wants to go. He's a very good machinist so I'll be guided by him.
If welds need to be cut and rewelded then that's what we'll do, but it's important that only this gearbox goes back in the car.
cheers Andrew.
We are Tig welders, gravity doesn't worry us.
Miller Dynasty 350
OTC hybrid wave 300 amp inverter Tig at work (Now retired)
Kemppi MLS 2300 inverter, 230 amps of welding brilliance for home use
awill4wd
  • Posts:
  • Joined:
    Thu Jan 31, 2013 3:57 am
  • Location:
    Berwick, Melbourne, Australia

Fat Bob wrote: Andrew, nothing like trying to put together a jig-saw puzzle without all the parts huh?
Nice work guys!
I have to admit when I saw the size of the slots hogged out of the case it was a "take a deep breath" moment.
There's also bits the the pics don't show like empty spaces where bolts used to thread into so it's certainly a challenge.
Cheers Andrew from Oz.
We are Tig welders, gravity doesn't worry us.
Miller Dynasty 350
OTC hybrid wave 300 amp inverter Tig at work (Now retired)
Kemppi MLS 2300 inverter, 230 amps of welding brilliance for home use
Nils
  • Posts:
  • Joined:
    Fri Jan 11, 2013 7:46 pm

WOW! Very cool, Andrew! Thanks for all the info, enjoyed every word!
Everlast PowerTig 250EX, PowerTig 185 Micro, PowerArc 160STH, Miller Trailblazer 301G, Millermatic 140 Auto-Set
TamJeff
  • Posts:
  • Joined:
    Tue Dec 04, 2012 4:46 am

Fat Bob wrote:Nice work Jeff. What will be used for a sling point on that basket?

Maybe web strapping on the top four corners I guess.

Nice work guys!
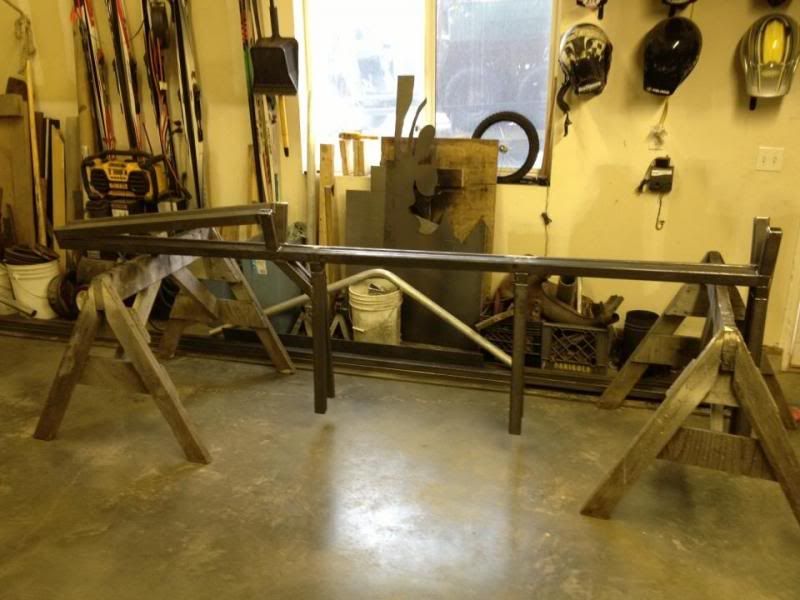
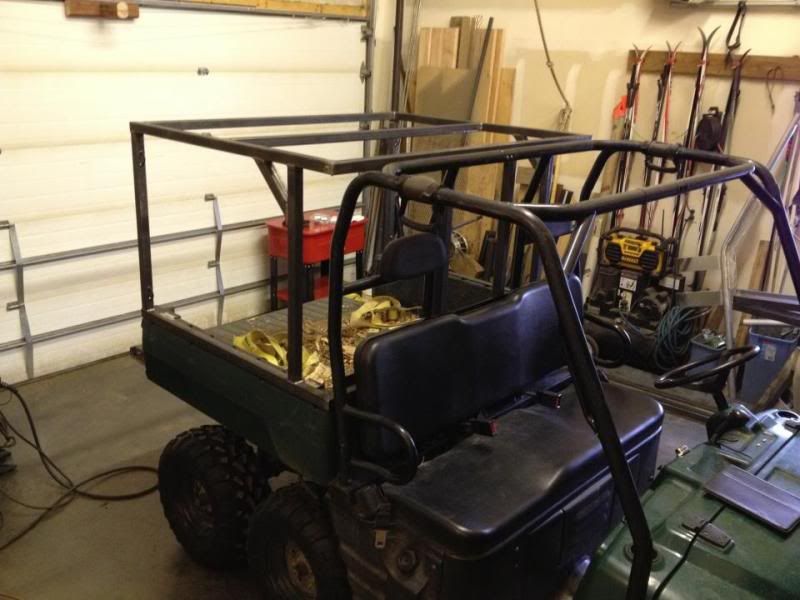
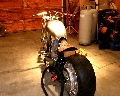
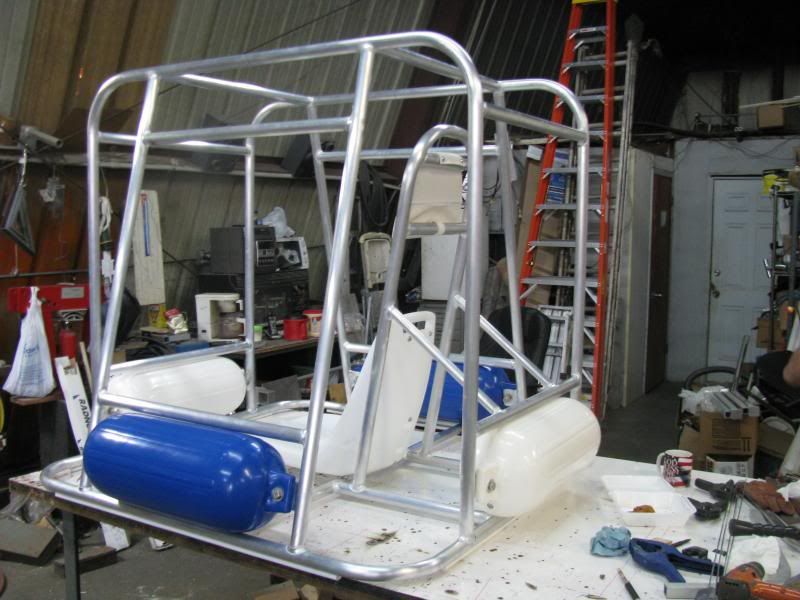
I'm not sure, Bob. He gave us some photos of him holding tape measure against the pipes, on center of all things. The original didn't have this much of a headrest, but this is what they asked for. I had 2 days to do it in after the materials had to be ordered plus deciphering the info from the photos. The last one they had strapping tied to the backrest somehow but you couldn't tell from the photos. For all I know, they could be screwed to the seat frame. They said it turned out a lot nicer than the original, to where you could tell by looking at the welds that a steel fab person had welded it, and that it had taken substantially longer to build. I modified the measurements, outside of the critical ones, to be able to use a singular layout as a control point throughout, with all subsequent parts superimposed within it.

I kept thinking throughout the build that some gearhead would find a way to stick a motor and wheels on it. :D
Miller ABP 330, Syncrowave 250, Dynasty 300 DX.
Honorary member of the Fraternity of Faded Tee Shirts.
TamJeff
  • Posts:
  • Joined:
    Tue Dec 04, 2012 4:46 am

Nice work on the transmission too. Nothing wrong with those welds. It isn't like you can just go from one end of a joint to the other with predictable travel etc. I have welded a lot of cast. The only way welds really come out any neater is if it's something superficial just to stop a leak or something like that. Broken items take a lot more focus on the mechanical function of the weld over the aesthetics anyway, and that looks great for what had to happen there. It would have taken a second pass, and nobody welding cast wants to heat it up more than necessary or more than one time if they can help it.
Miller ABP 330, Syncrowave 250, Dynasty 300 DX.
Honorary member of the Fraternity of Faded Tee Shirts.
Alexa
  • Posts:
  • Joined:
    Mon Dec 31, 2012 10:07 am

Awill4wd.

Concerning the Bugatti gearbox, I am assuming it was cracked in all the areas that you welded.

Why did you choose a large gap to weld?
Was sequence of which gaps to weld first, a factor?
Was the direction of welding for each gap a consideration?

I enjoyed your contribution.
Tanks.

Alexa
awill4wd
  • Posts:
  • Joined:
    Thu Jan 31, 2013 3:57 am
  • Location:
    Berwick, Melbourne, Australia

Alexa wrote:Awill4wd.
Concerning the Bugatti gearbox, I am assuming it was cracked in all the areas that you welded.
Why did you choose a large gap to weld?
Was sequence of which gaps to weld first, a factor?
Was the direction of welding for each gap a consideration?
I enjoyed your contribution.
Tanks.

Alexa
Alexa, I had no input into the size of the "cracks", this was done by our customer prior to him delivering it to our factory.
I wish I had some input as I could have advised him not to make the cutouts as large as they actually finished up.
I chose to weld at the end of the gearbox as the cracks there were smaller and I wanted to keep everything around the shaft bores are rigid as possible.
For the large cracks I spread the welding around going from crack to crack and trying to keep the heat as even as possible throughout the casing.
Regards Andrew from Oz.
We are Tig welders, gravity doesn't worry us.
Miller Dynasty 350
OTC hybrid wave 300 amp inverter Tig at work (Now retired)
Kemppi MLS 2300 inverter, 230 amps of welding brilliance for home use
AKmud
  • Posts:
  • Joined:
    Fri Jan 25, 2013 1:47 am
  • Location:
    Wasilla, Alaska

Finished a truck ladder/canoe rack for a customer today -

Image
Alexa
  • Posts:
  • Joined:
    Mon Dec 31, 2012 10:07 am

Awill42d.

When you deposited weld metal for the large 'cracks', did you butter (build of the sides of the joint) before welding the center of the joint?

Tanks for your patience.
Alexa
Post Reply