

Sorry for the confusion. The names are the customer's names. They like to see pictures during the build. Yes, I performed the welds. I'm a one man shop. The only thing I don't do is the paint.
Andrew, currently all steel. But I'm working pretty hard on titanium.
Tig welding tips, questions, equipment, applications, instructions, techniques, tig welding machines, troubleshooting tig welding process

- Otto Nobedder
-
Weldmonger

-
Posts:
-
Joined:Thu Jan 06, 2011 11:40 pm
-
Location:Near New Orleans
Ah, zank,
That makes much sense.
I think I already said it was nice work, but now that I understand it's all yours..
Nice!
Steve S
That makes much sense.
I think I already said it was nice work, but now that I understand it's all yours..
Nice!
Steve S
Otto Nobedder.
When you wrote that you saw three 'signatures', i thought you meant that you compared the three welds and noted that three different welders had done them. Darn ... I went back and started looking at those welds and tried to understand the differences that you had noticed. Then after following the string's comments, I was even more curious and perplexed. I went back again and 'started seeing' some differences myself. Finally I noticed the names below each photo.
Still grinning about it ... the power of suggestion.
Alexa
-----
Zank.
Compliments to your welding.
Tanks for the photos and the mystery writing.
Alexa
- Otto Nobedder
-
Weldmonger
-
Posts:
-
Joined:Thu Jan 06, 2011 11:40 pm
-
Location:Near New Orleans
LMAO,
Alexa, I can see myself in the same situation... hunting for differences among the welds... without realizing each picture had a different name attached to it...
After a while, you'll start to SEE differences, just because you expect them.
(Saw that on "Brain Games", on Discovery Channel)
Steve S
Alexa, I can see myself in the same situation... hunting for differences among the welds... without realizing each picture had a different name attached to it...
After a while, you'll start to SEE differences, just because you expect them.
(Saw that on "Brain Games", on Discovery Channel)
Steve S
Otto Nobedder.
About twenty-five years ago, my failure analysis instructor, drilled into us to not 'guess' the cause of the failure when starting to investigate. He keep telling us, if you start with a probable cause, you will almost always prove yourself right. He said even very good metallurgists make that error in evaluating failures.
The mind is a tricky beast ... considering that we use so little of our brains.
Alexa

- Otto Nobedder
-
Weldmonger
-
Posts:
-
Joined:Thu Jan 06, 2011 11:40 pm
-
Location:Near New Orleans
I always found that fun, turning someone's drawing into a real, tangible thing.
I see from the colors on the face nearest the camera, there's internal structure, too.
"I love it when a plan comes together".
Steve S
P.S. I envy you that welding table!
I see from the colors on the face nearest the camera, there's internal structure, too.
"I love it when a plan comes together".
Steve S
P.S. I envy you that welding table!
Mrkil
- Mrkil
-
Workhorse

-
Posts:
-
Joined:Wed Jan 30, 2013 10:04 pm
-
Location:Hamilton, Ontario, Canada
Yeah they have been throwing more and more challenging stuff at me each day. I like it since it makes the day fly past much faster.
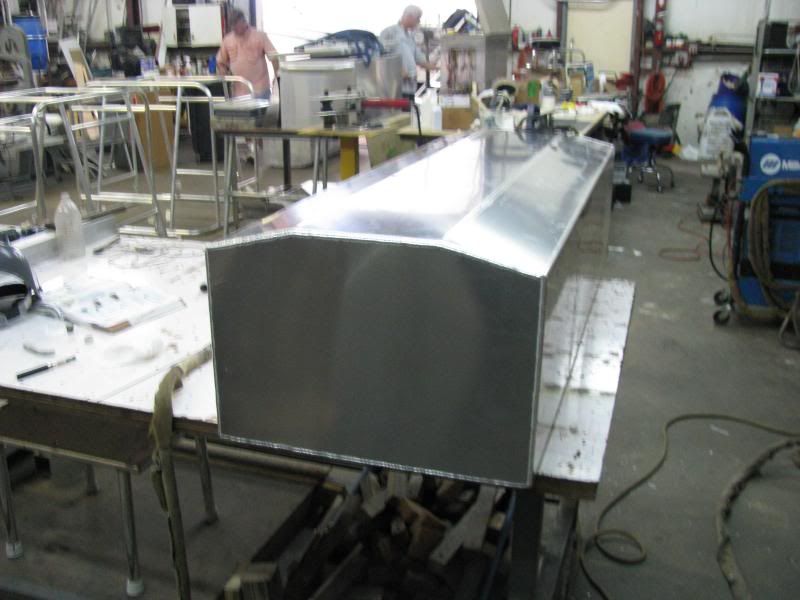
There is an air deflector in the center. To split the flow.
Today I was making stainless mesh filter covers that where 59"x63"
They have a stainless u shaped edge that is 22ga. I have to make sure it stayed square the whole time while welding the edge around the perimiter. Let me tell you how quickly the mesh melts with just a pinch to much heat.....
MrKil.
After my first day of quick tack welding that mesh without a mask, then looking at my face in the mirror, it was amazing how many new quint wrinkles I had around my eyes. Tanks for photo ... it flashed me back to a few years ago.
You are not only learning additional applications of welding, but quickly you will pick up a lot of tricks on distortion prevention too ... and distortion correction too.
Tanks again.
Alexa
I recall having to weld expanded aluminum on narrow angle frames for driveway gutters. I had never welded expanded metal before. All I had set up was AC TIG. The spool gun hadn't been used for years. Long story short, I got the spool gun working again.
Miller ABP 330, Syncrowave 250, Dynasty 300 DX.
Honorary member of the Fraternity of Faded Tee Shirts.
Honorary member of the Fraternity of Faded Tee Shirts.
I have been busy. This is only part of what I have done the past couple weeks.
Bend bend bend. ..fit fit. . .weld weld weld. . .tweak. . .weld s'more.
12 rear seats for polaris rangers, 2 different sizes.

Custom swim platform. Contour fit.
And here it is finished.
Looks like the installers better step it up. Two down.

And I fixed this folding tower. They went down the road with it still up. Hit a tree limb or something and racked the whole works about 6" cattywampus. I cut one seat pipe out and tweaked it back with two heavy duty ratchet straps, and then re-welded the pipe back in I took out. It goes back together without wrenches. All the allen bolts can be tightened almost all the way by hand. About 2 hrs total.
Bend bend bend. ..fit fit. . .weld weld weld. . .tweak. . .weld s'more.
12 rear seats for polaris rangers, 2 different sizes.
Custom swim platform. Contour fit.
And here it is finished.
Looks like the installers better step it up. Two down.
And I fixed this folding tower. They went down the road with it still up. Hit a tree limb or something and racked the whole works about 6" cattywampus. I cut one seat pipe out and tweaked it back with two heavy duty ratchet straps, and then re-welded the pipe back in I took out. It goes back together without wrenches. All the allen bolts can be tightened almost all the way by hand. About 2 hrs total.
Miller ABP 330, Syncrowave 250, Dynasty 300 DX.
Honorary member of the Fraternity of Faded Tee Shirts.
Honorary member of the Fraternity of Faded Tee Shirts.


countryboy1127
- countryboy1127
-
Workhorse
-
Posts:
-
Joined:Wed May 01, 2013 7:28 pm
not exactly what i welded today , but more like the last week . I picked up a job making a set of skimmers for shrimping . its my first paying job . not to hard just 45s and 90s
- Attachments
-
- 20130622_172453_resized.jpg (243.79 KiB) Viewed 7101 times
-
- 20130622_172446_resized.jpg (181.12 KiB) Viewed 7101 times
-
- 20130622_172439_resized.jpg (208.52 KiB) Viewed 7101 times
- Otto Nobedder
-
Weldmonger
-
Posts:
-
Joined:Thu Jan 06, 2011 11:40 pm
-
Location:Near New Orleans
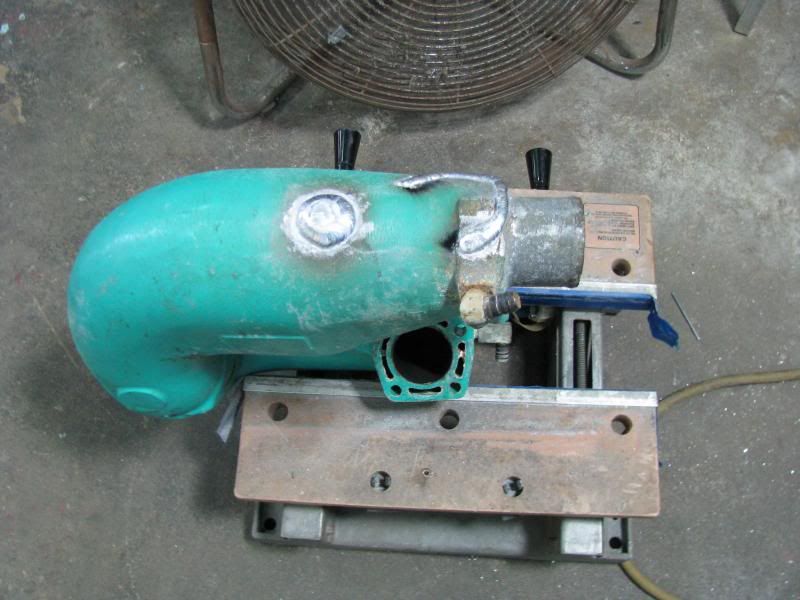
blaz,
What's that the motor mount for? I don't recognize it.
My gut reaction is, you're missing a heat-shield. Either the original, or one wasn't built for an aftermarket exhaust or turbo application.
Steve S
What's that the motor mount for? I don't recognize it.
My gut reaction is, you're missing a heat-shield. Either the original, or one wasn't built for an aftermarket exhaust or turbo application.
Steve S
The motor mount is for my 2005 blazer. It has a 4.3 liter V6. From what I have read it is a fairly common failure with only a few after market options that are better but not fail proof. I have 33" tires (stock was 28"). I also use low range a lot. The heat shield is there though it is right under the factory manifold. I did get a couple of things done today pics will follow later. Here are a couple of vids;Otto Nobedder wrote:blaz,
What's that the motor mount for? I don't recognize it.
My gut reaction is, you're missing a heat-shield. Either the original, or one wasn't built for an aftermarket exhaust or turbo application.
Steve S
http://www.youtube.com/watch?v=2_QIiBYmIOU
http://www.youtube.com/watch?v=jnTSr6JJ5Iw
- Otto Nobedder
-
Weldmonger
-
Posts:
-
Joined:Thu Jan 06, 2011 11:40 pm
-
Location:Near New Orleans
Bet it's a "Vortec" engine, huh?
Vortec must be a latin word meaning "expensive parts". No wonder you're fabbing your own.
Been there, done that (though not with motor mounts...)
Steve S
Vortec must be a latin word meaning "expensive parts". No wonder you're fabbing your own.
Been there, done that (though not with motor mounts...)
Steve S
Happens every single holiday. This time it's the boss's boat. Original tank from a 1985 Grady White replaced with this one. It needed to be finished by today so they can install it tomorrow because it leaves Thurs. It also has two baffles, which I had to weld flanges on because the spool gun machine is broken. Anyone who has tried to weld inside corners in the middle of 11 gauge sheet with TIG, will know where I am coming from with this, or why I would weld 1" flanges on the slosh baffles. Each baffle has 6, 1.5" holes, cut by me, a vee notch on the center bottom edge and the corners removed.
On such short notice, and since it will be hidden, there will be no dollhouse welds. 26 linear feet of weld. Tacked with 225 amps, welded full on with 185-190 amps, and the TIG finger. Camera batteries crapt out so maybe I can get more pictures tomorrow if it isn't installed already. It will be pressure tested tomorrow morning. All of the fittings have been welded on as well. Dig the masking tape corner clamps. :p
There's pieces of 2x2 angle pisitioning the outside corners until it's tacked.
Miller ABP 330, Syncrowave 250, Dynasty 300 DX.
Honorary member of the Fraternity of Faded Tee Shirts.
Honorary member of the Fraternity of Faded Tee Shirts.
- Otto Nobedder
-
Weldmonger
-
Posts:
-
Joined:Thu Jan 06, 2011 11:40 pm
-
Location:Near New Orleans
I like that phrase, "dollhouse welds". 
Masking tape makes a dandy corner clamp, too. The green seems to have the best tack and easiest peel, though if it gets warm, it takes a bit of laquer thinner or MEK to get the glue residue off...
Steve S
Masking tape makes a dandy corner clamp, too. The green seems to have the best tack and easiest peel, though if it gets warm, it takes a bit of laquer thinner or MEK to get the glue residue off...
Steve S
LOL. . .yep. Dollhouse welds. Seems that every time you have to do something for the boss or a friend, you gotta lay pinstripes but this time even he would have known it absurd in this time frame. They had it pressure tested and painted by the time I got there and it was installed and hooked up this evening. You can kind of see what I mean thru the paint, though. Robust, outside corner welds on 11 gauge.
Used to coat the bottom half of marine tanks with coal tar epoxy. Now it's bed liner paint which is some rugged stuff as well. Sanded the aluminum first with 60 grit Klingspor on the RO sander followed by an acetone treatment.
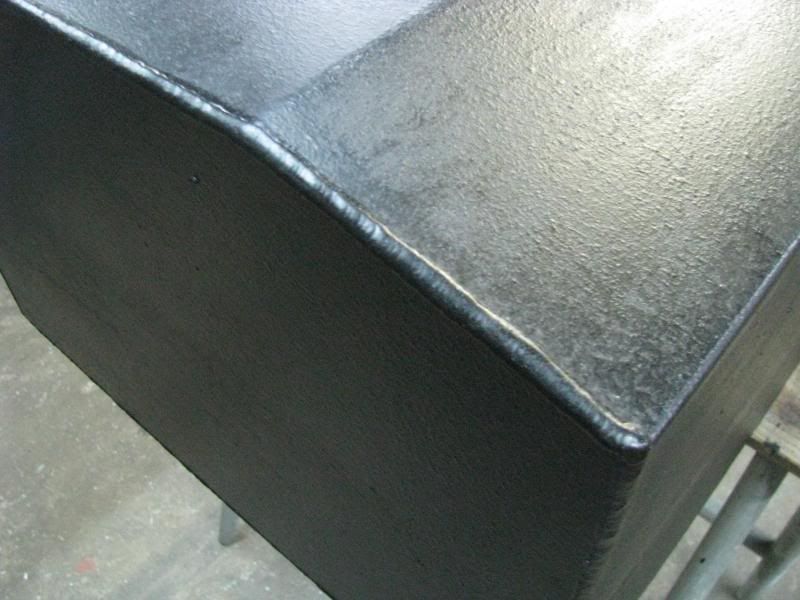
Used to coat the bottom half of marine tanks with coal tar epoxy. Now it's bed liner paint which is some rugged stuff as well. Sanded the aluminum first with 60 grit Klingspor on the RO sander followed by an acetone treatment.
Miller ABP 330, Syncrowave 250, Dynasty 300 DX.
Honorary member of the Fraternity of Faded Tee Shirts.
Honorary member of the Fraternity of Faded Tee Shirts.
This was waiting on my table this morning. Like a gift or something.
The trick with these things is isolating the contaminant on the inside (there's a ton. . .always) from the weld puddle. Basically, you have to form the puddle on clean metal up high, and let the capillary action sweat the aluminum instead of making a puddle with a torch down where it starts getting dirty, or wants to draw up contaminant. It's somewhat like silver soldering, visually. You can actually watch your molten filler soak into the cast. It's a fine line. Once you see it soak, get the torch downtown somewhere, or kill it on the previous bead. If you have to, or it starts out as a hole, start out with a bead just before the crack and build it up a little to give your arc somewhere else to start from and to return to if it starts getting away from you.
In other words, if you go for a traditional penetration weld using the arc, you will most certainly pull up salt or fuel residue or exhaust soot, whatever, into your puddle, and there is almost nothing you can do to stop it from there on out.
I don't care if it welds decently. I will grind the weld flush, make sure it is sound, and weld another cap over it if the part will stand the heat. The final pass will expose any porosity in the weld and will have cleaner metal to correct it with. It will also expose any overlap that's not blended in at the toe of the weld.

He wanted a hole plugged as well.
The trick with these things is isolating the contaminant on the inside (there's a ton. . .always) from the weld puddle. Basically, you have to form the puddle on clean metal up high, and let the capillary action sweat the aluminum instead of making a puddle with a torch down where it starts getting dirty, or wants to draw up contaminant. It's somewhat like silver soldering, visually. You can actually watch your molten filler soak into the cast. It's a fine line. Once you see it soak, get the torch downtown somewhere, or kill it on the previous bead. If you have to, or it starts out as a hole, start out with a bead just before the crack and build it up a little to give your arc somewhere else to start from and to return to if it starts getting away from you.
In other words, if you go for a traditional penetration weld using the arc, you will most certainly pull up salt or fuel residue or exhaust soot, whatever, into your puddle, and there is almost nothing you can do to stop it from there on out.
I don't care if it welds decently. I will grind the weld flush, make sure it is sound, and weld another cap over it if the part will stand the heat. The final pass will expose any porosity in the weld and will have cleaner metal to correct it with. It will also expose any overlap that's not blended in at the toe of the weld.
He wanted a hole plugged as well.
Miller ABP 330, Syncrowave 250, Dynasty 300 DX.
Honorary member of the Fraternity of Faded Tee Shirts.
Honorary member of the Fraternity of Faded Tee Shirts.
Return to “Tig Welding - Tig Welding Aluminum - Tig Welding Techniques - Aluminum Tig Welding”
Jump to
- Introductions & How to Use the Forum
- ↳ Welcome!
- ↳ Member Introductions
- ↳ How to Use the Forum
- ↳ Moderator Applications
- Welding Discussion
- ↳ Metal Cutting
- ↳ Tig Welding - Tig Welding Aluminum - Tig Welding Techniques - Aluminum Tig Welding
- ↳ Mig and Flux Core - gas metal arc welding & flux cored arc welding
- ↳ Stick Welding/Arc Welding - Shielded Metal Arc Welding
- ↳ Welding Forum General Shop Talk
- ↳ Welding Certification - Stick/Arc Welding, Tig Welding, Mig Welding Certification tests - Welding Tests of all kinds
- ↳ Welding Projects - Welding project Ideas - Welding project plans
- ↳ Product Reviews
- ↳ Fuel Gas Heating
- Welding Tips & Tricks
- ↳ Video Discussion
- ↳ Wish List
- Announcements & Feedback
- ↳ Forum News
- ↳ Suggestions, Feedback and Support
- Welding Marketplace
- ↳ Welding Jobs - Industrial Welding Jobs - Pipe Welding Jobs - Tig Welding Jobs
- ↳ Classifieds - Buy, Sell, Trade Used Welding Equipment
- Welding Resources
- ↳ Tradeshows, Seminars and Events
- ↳ The Welding Library
- ↳ Education Opportunities