Tig welding tips, questions, equipment, applications, instructions, techniques, tig welding machines, troubleshooting tig welding process
Ron66
  • Posts:
  • Joined:
    Sun Jul 13, 2014 8:44 pm

I recently picked up a small 50cc mini chopper. One of the exhaust studs was broken in the head. I removed the motor and tried to use a bolt extractor but the extractor snapped off in the bolt. I went a little extreme and cut the flange in the casting so half the bolt was exposed and knocked it out. Now I want to tig to build it back up so I can drill and tap a new hole. So now the questions...
1. Should I leave the motor together or take it apart? I'm inclined to leave it together since it will most likely warp less.
2. I'll need to manage heat. I've seen Jody do this in videos with a non contact thermometer. I have one. What should my target heats be? How hot should I let it get and how cool before I start welding again?
Any other advice would be helpful. I've welded lots of cast aluminum but never on a head. Thanks in advance!Image
User avatar
  • Posts:
  • Joined:
    Thu Jan 06, 2011 11:40 pm
  • Location:
    Near New Orleans

Too bad you didn't post "just" after breaking the bolt extractor (or, better, BEFORE you tried it). I could have offered you an easy solution.

That said, I agree, I'd build that with the head bolted on, for the reason you suggested. Find a stainless-steel bolt in the correct thread, and stuff it in the remaining threads, and build on top of it a little at a time. You'll still have to tap the threads, but you'll start "close" to what you need. You don't need to watch the head temperature closely as long as you're patient... Build a layer from the head out, stop, cool under a fan, have a beer, go again. Lather, Rinse, Repeat. When you are satified with the buildup around the bolt, carefully remove it with the metal hot.

You'll want to work the new threads with a "plug" tap, and then (likely) a "bottoming" tap, to restore the threads.

Steve S
User avatar
  • Posts:
  • Joined:
    Mon May 12, 2014 12:06 am
  • Location:
    Downey, CA

Having the head torqued to a heavy plate or cylinder is a must. I would think dissipating the heat as evenly and quickly would be best. As for the welding, many of the "experienced professional" welders could give the best advice on technique, gasses, etc. I would fully weld the area with aluminum only, then face the surface and use a drill guide to locate and re-drill the stud hole and then tap it. Look into Porsche 911 exhaust stud repair tools. One can fairly easily be made...
Image
Image

The one I have had for over 20-years has diagonal screws to align guide with port instead of the round alignment discs...

Different size drill bushings should be used for the pilot hole drill, tap drill and tap.
Glen
Miller Dynasty 200DX - Millermatic 350P - Hypertherm Powermax 45 - Hobart Handler 150
User avatar
  • Posts:
  • Joined:
    Thu Jan 24, 2013 10:13 pm
  • Location:
    Eddy, TX

Ron,
Here is the next question; what filler material are you planning on using?
-Jonathan
noddybrian
  • Posts:
  • Joined:
    Thu Jan 24, 2013 12:13 pm

All the advice given on actually welding the head appears good - will it work - probably - but it looks like the typical Chinese clone of a Honda step thru engine - off the importers here a brand new complete head including postage is around £20 - if you wanted to swap out your cam & valves it's about £12 & there are usually loads of them for spares / repair where they have have no spark etc - it would seem that just changing the head would be less time / money & has to work ? - if you just want the welding experience then that's still OK - good luck with it.
Ron66
  • Posts:
  • Joined:
    Sun Jul 13, 2014 8:44 pm

Otto Nobedder wrote:Too bad you didn't post "just" after breaking the bolt extractor (or, better, BEFORE you tried it). I could have offered you an easy solution.

That said, I agree, I'd build that with the head bolted on, for the reason you suggested. Find a stainless-steel bolt in the correct thread, and stuff it in the remaining threads, and build on top of it a little at a time. You'll still have to tap the threads, but you'll start "close" to what you need. You don't need to watch the head temperature closely as long as you're patient... Build a layer from the head out, stop, cool under a fan, have a beer, go again. Lather, Rinse, Repeat. When you are satified with the buildup around the bolt, carefully remove it with the metal hot.

You'll want to work the new threads with a "plug" tap, and then (likely) a "bottoming" tap, to restore the threads.

Steve S
I'm interested in what advice you would have given if I had posted before I hacked up my cylinder head?
Ron66
  • Posts:
  • Joined:
    Sun Jul 13, 2014 8:44 pm

GlenC wrote:Having the head torqued to a heavy plate or cylinder is a must. I would think dissipating the heat as evenly and quickly would be best. As for the welding, many of the "experienced professional" welders could give the best advice on technique, gasses, etc. I would fully weld the area with aluminum only, then face the surface and use a drill guide to locate and re-drill the stud hole and then tap it. Look into Porsche 911 exhaust stud repair tools. One can fairly easily be made...
Image
Image

The one I have had for over 20-years has diagonal screws to align guide with port instead of the round alignment discs...

Different size drill bushings should be used for the pilot hole drill, tap drill and tap.
I could easily make one of those on the mill at work! I may just use the exhaust itself though since it is only one pipe.
Ron66
  • Posts:
  • Joined:
    Sun Jul 13, 2014 8:44 pm

noddybrian wrote:All the advice given on actually welding the head appears good - will it work - probably - but it looks like the typical Chinese clone of a Honda step thru engine - off the importers here a brand new complete head including postage is around £20 - if you wanted to swap out your cam & valves it's about £12 & there are usually loads of them for spares / repair where they have have no spark etc - it would seem that just changing the head would be less time / money & has to work ? - if you just want the welding experience then that's still OK - good luck with it.
Best price I found was $65 US then I would also need to buy new gaskets, another $25 US and shipping would be another $20. I have welding rod and I do want the experience but mostly I'm cheap! I got this bike for free and already have $100 into it. I don't want this to become the most expensive free toy ever.
noddybrian
  • Posts:
  • Joined:
    Thu Jan 24, 2013 12:13 pm

Oh - well at those prices weld it up - you got nothing to lose & I would'nt worry too much on temperature - it's an external lug & I've had them hot enough to start melting the ally with an acetylene torch while getting out old studs - never had a problem - it's just that over here most of the engines that look like yours are import copies - they are so plentiful & cheap it's not worth wasting much time on them - I imagine this must be a genuine Honda & the parts prices are Honda - the clones & every part of them are usually dirt cheap - just type " pit bike engine " into Ebay - the only ones here that make money are the 140 / 160 cc race versions that are completely cnc machined from billet - good luck on the repair - remember it does'nt have to be pretty to hold a thread & you can shape / clean it up with a dynafile type tool - if your not confident welding get the part facing up - make the shape of the lug as a mould out of sheet copper & fill with lumiweld or similar low temp repair rod using a torch - should work fine here - you got a good surface area for it to adhere to & it drills / taps fine
User avatar
  • Posts:
  • Joined:
    Thu Jan 06, 2011 11:40 pm
  • Location:
    Near New Orleans

Ron66 wrote:
Otto Nobedder wrote:Too bad you didn't post "just" after breaking the bolt extractor (or, better, BEFORE you tried it). I could have offered you an easy solution....
I'm interested in what advice you would have given if I had posted before I hacked up my cylinder head?

For broken steel studs/bolts in aluminum, I'll build up a "ball" on the remains with my TIG. The bigger the better. This imparts heat to break corrosion or threadlocker holding the stud in. Then I'll drop a nut on, over the ball I've built up... The bigger the better, and fuse the nut to the ball i've built, very solidly. As soon as the heat's down (all color gone) I'll put a wrench on it, and start working it gently back and forth. This almost always breaks it loose and lets you get at least a turn, if not complete removal. If it begins to bind again, reheat the weld to cherry red, cool, and repeat. With patience, this very often works.

Steve S
Ron66
  • Posts:
  • Joined:
    Sun Jul 13, 2014 8:44 pm

I couldn't have done this. It top of the broken stud was about 1/4" down and it was only a 6mm stud.
brokeitagain
  • Posts:
  • Joined:
    Tue Feb 11, 2014 1:16 am

Ron66 wrote:I couldn't have done this. It top of the broken stud was about 1/4" down and it was only a 6mm stud.
I have done something like this, with mig, below flush in aluminum, not ideal, but effective every time I have attempted
RichardH
  • Posts:
  • Joined:
    Sun Jan 12, 2014 10:45 pm
  • Location:
    Chandler, Arizona, USA

brokeitagain wrote: I have done something like this, with mig, below flush in aluminum, not ideal, but effective every time I have attempted
Ditto. Just did this with TIG in an aluminum block, but no external torch. My kid broke off an EZ Out about 3/8" below flush. It took a few tries (kept breaking off further in), but was able to do a build-up and weld on a nut.
Grinding discs... still my #1 consumable!
User avatar
  • Posts:
  • Joined:
    Thu Jan 06, 2011 11:40 pm
  • Location:
    Near New Orleans

Yep.

Recessed does not matter. The heat will taper and round the threads "above", and get them out of the way.

I won't promise it will work every time, but it's always my first try. If it fails, I've still put a ton of heat in the siezed threads and removed any hardness in the bolt/stud, so trying a drill and "easy-out" has a better shot at working.

Steve S
Ron66
  • Posts:
  • Joined:
    Sun Jul 13, 2014 8:44 pm

Thanks for all of the great advice. Here is my progression of welding. Actually taking pictures helped me pace the welding so I wouldn't rush it.
Image
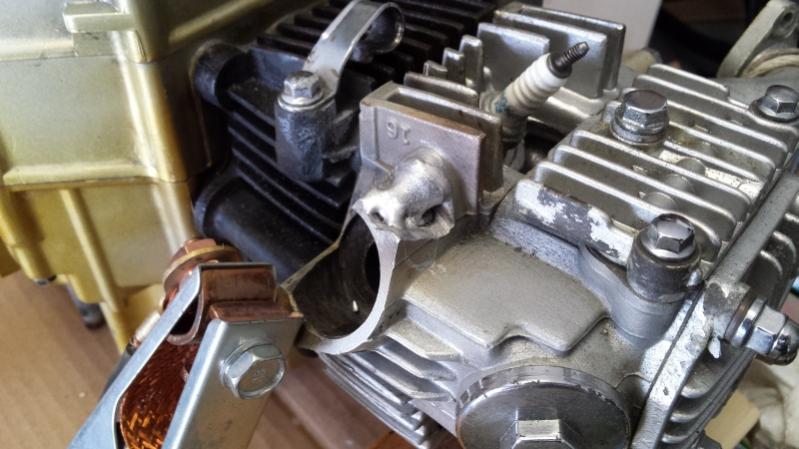
So a little rough at first but I turned up the cleaning (AC set to 75%) and got enough heat in it to make it flow
Image
I ground down the material I added a little to get rid of the crap that formed like a skin over the top. It was pretty hard, much harder than the material just under the skin.
Image
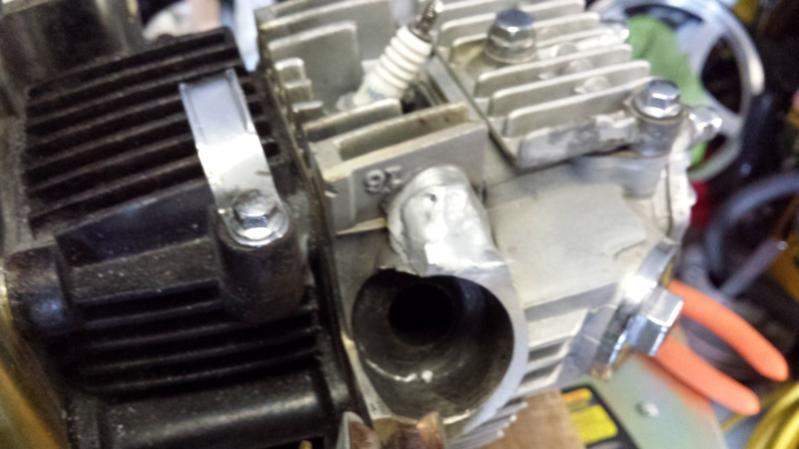
Another layer and a another session of grinding.
Image
Here's the almost finished product. I spent a little more time with a detail sander after this and it looked pretty good. I just need to make a drilling rig this week and I'm ready to drill and tap it!
Lessons learned:
Take your time. I used a IR thermometer and let it heat to 260F then cool to about 200 before I started again. I figured for an air cooled motor this is pretty close to normal operating temps.
I started using the pulser on but quickly realized that it was counterproductive when a lot of heat is needed.
I also noticed that I needed a lot more pre-flow time to keep the weld clean. I ended up at around 4 seconds.
Stick out is good when your in a tight spot.
Again, thanks for all of the advice!
User avatar
  • Posts:
  • Joined:
    Mon May 12, 2014 12:06 am
  • Location:
    Downey, CA

This could be an application for some DC TIG on Aluminum ????
Glen
Miller Dynasty 200DX - Millermatic 350P - Hypertherm Powermax 45 - Hobart Handler 150
Post Reply