Tig welding tips, questions, equipment, applications, instructions, techniques, tig welding machines, troubleshooting tig welding process
danielbuck
  • Posts:
  • Joined:
    Tue Jan 21, 2014 7:56 pm
  • Location:
    Gilroy, CA

Getting ready to make some more furniture, this time I want to TIG weld them instead of MIG. So, I'm practicing up to get my TIG welds looking nice and pretty! I really haven't had much time to TIG since I purchased it, almost everything I've done I just switched back to MIG to bang it out because I wasn't confident enough with TIG. It's time to get more confident with it, particularly on this thin metal, thicker metal I'm alot more confident with.

Material for these tests and furniture projects is 16 gauge (1/16"), tubing is usually 1" square, but occasionally 3/4" square or 1 1/4" square. Mostly mitered 90 degree joints, and T joints, with the occasional sheet metal welding.

My setup is an Everlast 200DX, 1/16" tungsten (2% lanthenated) 1/16" filler rod, and argon with a stubby gas lens and CK flex loc torch. Not using any pulse, just regular current with a foot pedal.


In any case, I'll be posting up all my practice stuff here, any tips or suggestions or encouragement is welcome :)

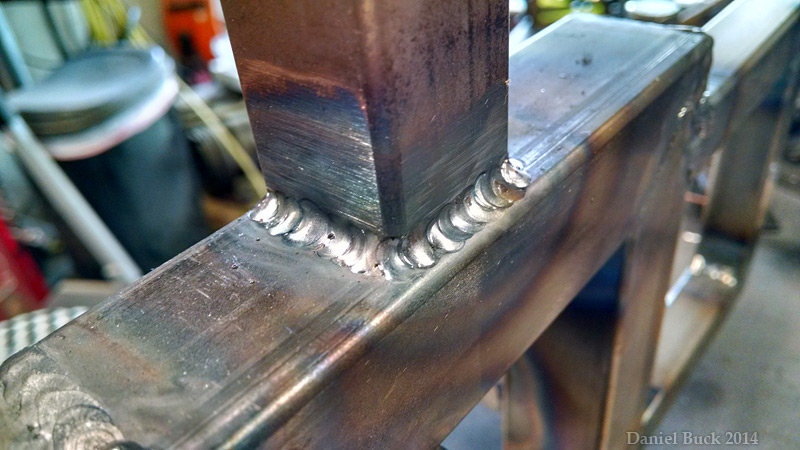
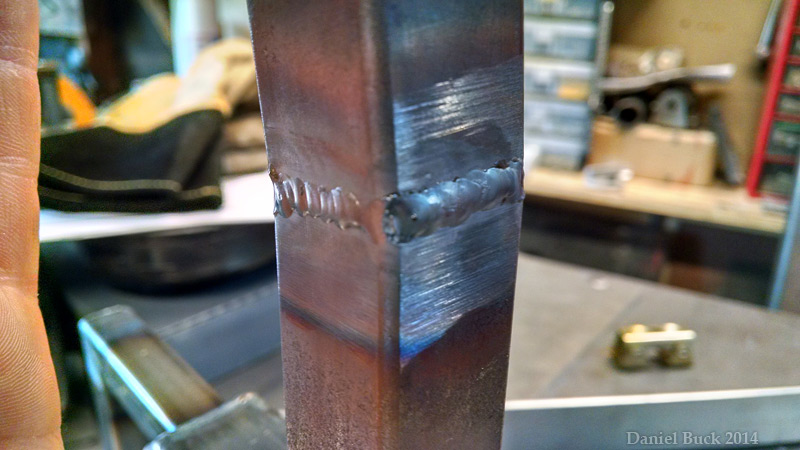
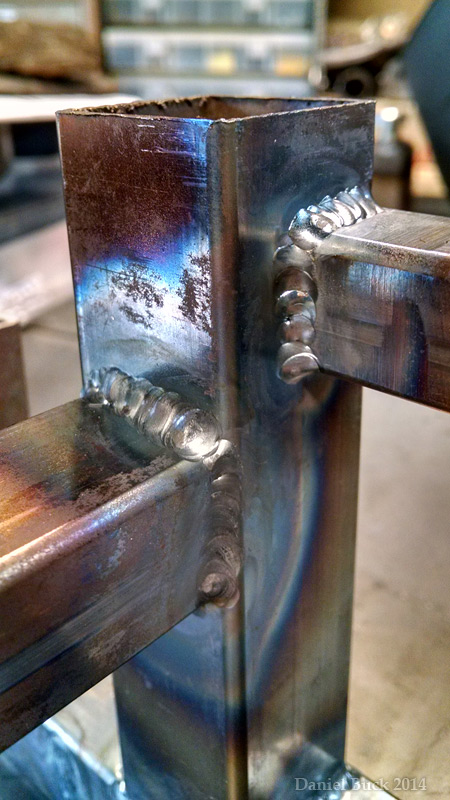
First two here is just joining a piece of tubing. I had the machine set a bit high here, it's nice and flat, but I think the amps were to high ( this was 120 amps roughly)

Image

Image

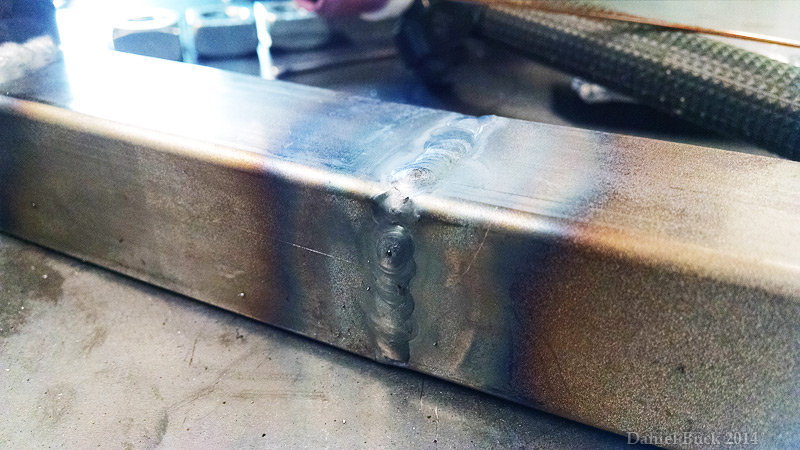
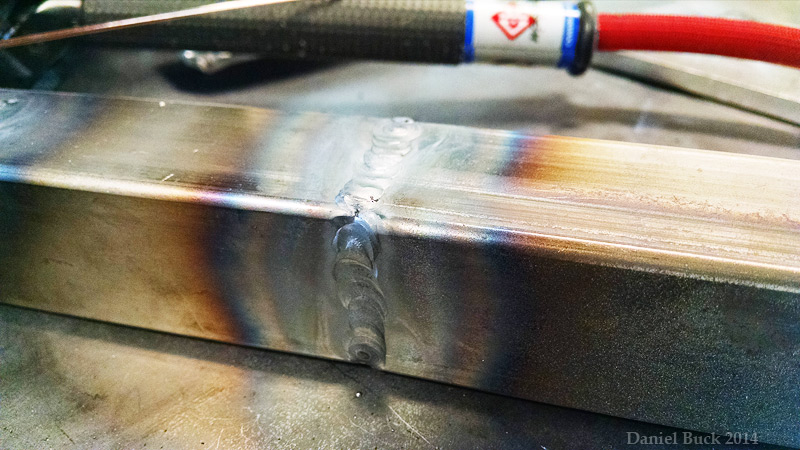
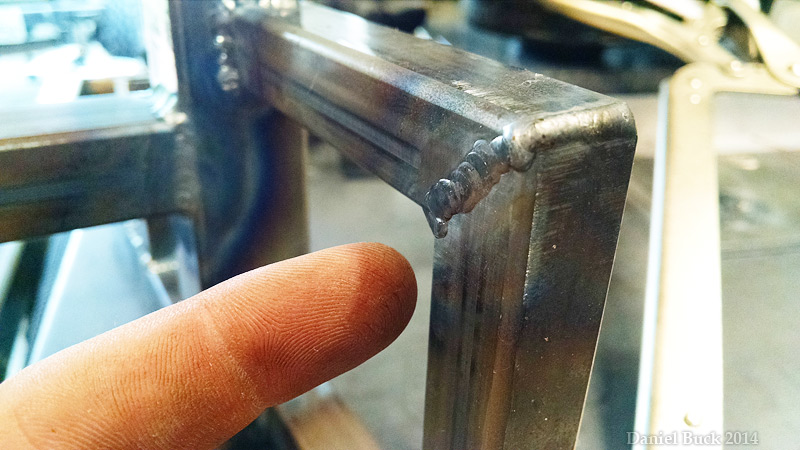
I then put the machine down to about 80 amps max, and started practicing some regular joints. Turning the machine down definitely helped keep a more distinct puddle, cooling quicker and not sinking down into the metal to much.

Image

Image


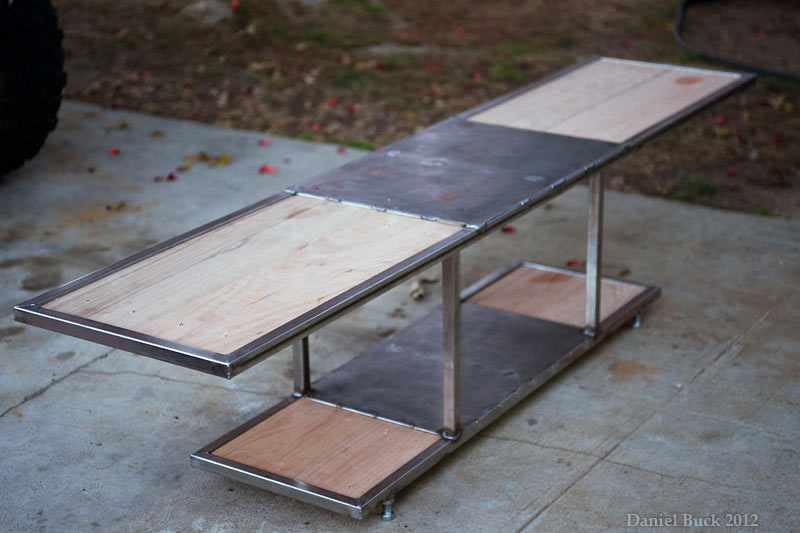
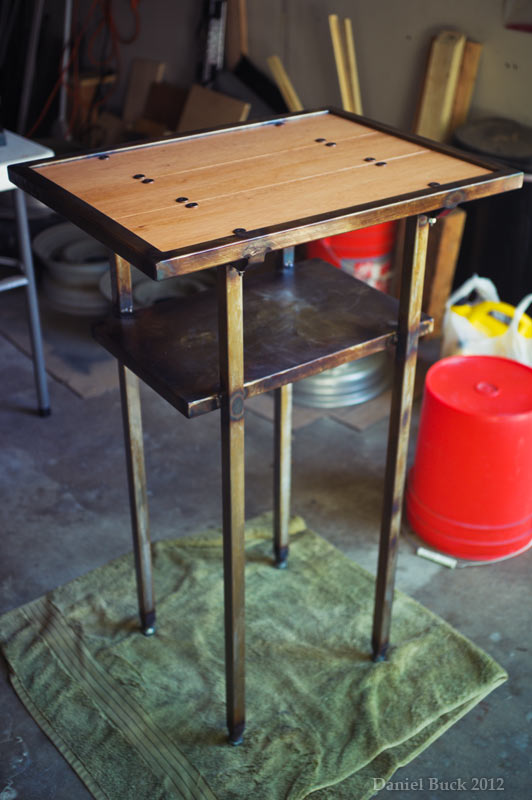
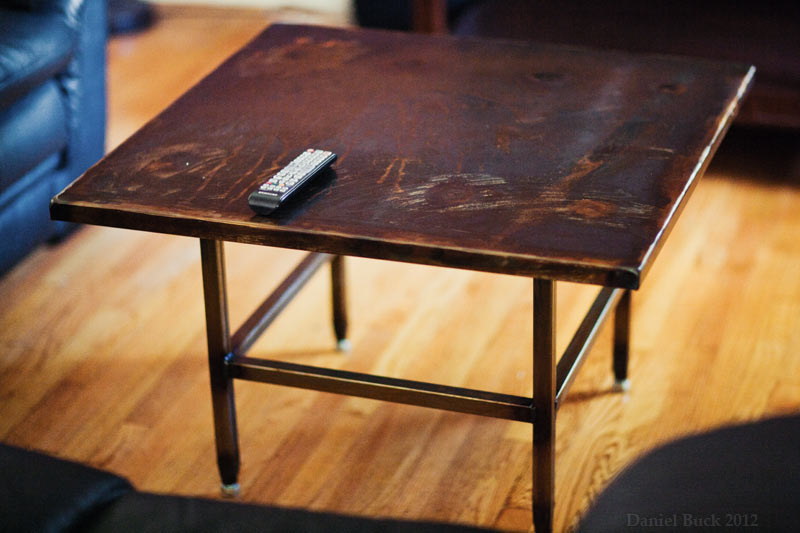
And for reference, this is the kind of furniture I'm making. Usually a mix of wood and metal, wood being the actual shelf surfaces.

Image

Image

Image
Last edited by danielbuck on Sun Aug 03, 2014 7:47 pm, edited 1 time in total.
User avatar

Love the furniture. Always wanted to mix wood and metal and make a few pieces myself.
It looks like you might need to tighten up the arc length a bit.

You are getting there. So keep practicing and best of luck

Jody
danielbuck
  • Posts:
  • Joined:
    Tue Jan 21, 2014 7:56 pm
  • Location:
    Gilroy, CA

Thanks Jody! :) Your youtube videos have been a big help, lots of things to work on and think about as I learn this. As soon as my DVD player arrives (I don't own one.... :? ) I'm going to watch your DVD that arrived with the stubby lens kit :mrgreen:

Yea, I'm pretty sure I need to get that tungsten in closer to the puddle, I guess I'm afraid to cause my hand isn't steady enough to keep from dipping it in there pretty often :lol: I'll work more on that, thanks!


Here's the last two joints for the evening, (I let the piece cool off before I did these, it was getting to hot since it's such a small test piece) the T joint there isn't looking to bad, might need a bit more filler, it's fairly concave, but there is no undercutting I think. The butt joint could use work! But at least I didn't blow through anywhere :D I left it vertical like this while welding, and angled the torch down a bit to hopefully help with the heat. Yes, it's crooked, it was scrap that wasn't cut at 90 :lol:

I'm starting to leave the piece in position, and work around it instead of always laying it flat so that the joint I'm working on is straight down. Practice with different hand/arm/torch possitions. Cause on some of the joints for the furniture, it's not going to be practical to move the piece around alot to have ideal access to every side of the tube flat down on the table.


Image

Image
jcw
  • jcw
  • Workhorse
    Workhorse
  • Posts:
  • Joined:
    Wed Jul 23, 2014 4:31 pm
  • Location:
    Chicago

Don't know if this will help but I find using slightly smaller filler rod than the wall thickness helps with using less amps and less heat for a smaller and sometimes more aesthetic bead. Of course, you run into the possibility of undercutting.
if fit up is perfect, I'd use .045. On my round tube same thickness, I've been using .035.
danielbuck
  • Posts:
  • Joined:
    Tue Jan 21, 2014 7:56 pm
  • Location:
    Gilroy, CA

jcw wrote:Don't know if this will help but I find using slightly smaller filler rod than the wall thickness helps with using less amps and less heat for a smaller and sometimes more aesthetic bead. Of course, you run into the possibility of undercutting.
if fit up is perfect, I'd use .045. On my round tube same thickness, I've been using .035.
I may have to try that, thanks! I think I may have a small roll of .045 MIG wire, would that work? (assuming I could straighten it out!)
User avatar
  • Posts:
  • Joined:
    Sat Jul 06, 2013 11:16 am
  • Location:
    Near Pittsburgh,Pennsylvania. Steel Buckle of the Rust Belt

You can straighten by putting in a drill and clamping the other end in a vise and twist it, or hold it with vise grips.

Len
Now go melt something.
Instagram @lenny_gforce

Len
jcw
  • jcw
  • Workhorse
    Workhorse
  • Posts:
  • Joined:
    Wed Jul 23, 2014 4:31 pm
  • Location:
    Chicago

Braehill wrote:You can straighten by putting in a drill and clamping the other end in a vise and twist it, or hold it with vise grips.

Len
I've done this with two strands and it works well but does it work with a single strand?

if it works out and you get tired of straightening mig wire (I did), I got some .045 and .035 from weldingsupply.com luckily they are local to me.
User avatar
  • Posts:
  • Joined:
    Sat Jul 06, 2013 11:16 am
  • Location:
    Near Pittsburgh,Pennsylvania. Steel Buckle of the Rust Belt

It works on both single and double.
Now go melt something.
Instagram @lenny_gforce

Len
danielbuck
  • Posts:
  • Joined:
    Tue Jan 21, 2014 7:56 pm
  • Location:
    Gilroy, CA

jcw wrote:
Braehill wrote:You can straighten by putting in a drill and clamping the other end in a vise and twist it, or hold it with vise grips.

Len
I've done this with two strands and it works well but does it work with a single strand?

if it works out and you get tired of straightening mig wire (I did), I got some .045 and .035 from weldingsupply.com luckily they are local to me.

Yea, I would definitely only do that just to see how I like the .045 or .035, if I like it, then I'll just order some rods. I don't get alot of garage time, I can't time straightening wire :lol:

Is mig solid wire the same thing as TIG rod? just in a spool instead of individual straight lengths?
GreinTime
  • Posts:
  • Joined:
    Fri Nov 01, 2013 11:20 am
  • Location:
    Pittsburgh, PA

Pretty much Daniel. They have different designations. Just make sure its solid wire and not flux core!

E-electrode R-rod 70-tensile strength in kpsi S#-silicone/additional metal content
#oneleggedproblems
-=Sam=-
danielbuck
  • Posts:
  • Joined:
    Tue Jan 21, 2014 7:56 pm
  • Location:
    Gilroy, CA

GreinTime wrote:Pretty much Daniel. They have different designations. Just make sure its solid wire and not flux core!

E-electrode R-rod 70-tensile strength in kpsi S#-silicone/additional metal content
haha, I wonder what would happen if you used flux core wire? I'm kind of tempted to try it just to see what kind of mess it makes :lol: :geek:
User avatar
  • Posts:
  • Joined:
    Sun Oct 27, 2013 10:57 pm
  • Location:
    Big Lake/Monticello MN, U.S.A.

GreinTime wrote:Pretty much Daniel. They have different designations. Just make sure its solid wire and not flux core!

E-electrode R-rod 70-tensile strength in kpsi S#-silicone/additional metal content
Missed one, the "S" stands for solid.

Flux core will have a "T" for tubular.
Dave J.

Beware of false knowledge; it is more dangerous than ignorance. ~George Bernard Shaw~

Syncro 350
Invertec v250-s
Thermal Arc 161 and 300
MM210
Dialarc
Tried being normal once, didn't take....I think it was a Tuesday.
GreinTime
  • Posts:
  • Joined:
    Fri Nov 01, 2013 11:20 am
  • Location:
    Pittsburgh, PA

Dammit. I knew that didn't look right lol
#oneleggedproblems
-=Sam=-
User avatar
  • Posts:
  • Joined:
    Sun Oct 27, 2013 10:57 pm
  • Location:
    Big Lake/Monticello MN, U.S.A.

Happens to every one at some point :)
Dave J.

Beware of false knowledge; it is more dangerous than ignorance. ~George Bernard Shaw~

Syncro 350
Invertec v250-s
Thermal Arc 161 and 300
MM210
Dialarc
Tried being normal once, didn't take....I think it was a Tuesday.
danielbuck
  • Posts:
  • Joined:
    Tue Jan 21, 2014 7:56 pm
  • Location:
    Gilroy, CA

this is the last time I ask you bunch of jokers for advice :lol:
Legion
  • Posts:
  • Joined:
    Mon Feb 03, 2014 9:35 pm

danielbuck wrote: Yea, I'm pretty sure I need to get that tungsten in closer to the puddle, I guess I'm afraid to cause my hand isn't steady enough to keep from dipping it in there pretty often :lol: I'll work more on that, thanks!
Daniel, there's a guy called Kevin Morin on weldingweb* who has made some posts in the past about using jigs to steady your hand. Inspired by the helpful images he put up, I used my pipe bender to bend up 3/4" pipe into various angles and shapes. An Irwin pipe clamp on the end clamped to the work piece means I can position the jig so I have great hand support for just about any weld. If not, I just bend up a new piece of pipe, takes 10 minutes. That means no floating in air and much less dipping.

For sheet stuff the TIG finger is great, but for tubing and frames the pipe jigs are well worth it. If you're going to be doing a lot of tube work you might look into it.

If you don't want to buy a bender, you can get a similar effect with multiple straight sections. That's what Kevin's images show, using three straight sections.

* hope it's OK to mention other forums, Jody.
danielbuck
  • Posts:
  • Joined:
    Tue Jan 21, 2014 7:56 pm
  • Location:
    Gilroy, CA

Legion wrote:
danielbuck wrote: Yea, I'm pretty sure I need to get that tungsten in closer to the puddle, I guess I'm afraid to cause my hand isn't steady enough to keep from dipping it in there pretty often :lol: I'll work more on that, thanks!
Daniel, there's a guy called Kevin Morin on weldingweb* who has made some posts in the past about using jigs to steady your hand. Inspired by the helpful images he put up, I used my pipe bender to bend up 3/4" pipe into various angles and shapes. An Irwin pipe clamp on the end clamped to the work piece means I can position the jig so I have great hand support for just about any weld. If not, I just bend up a new piece of pipe, takes 10 minutes. That means no floating in air and much less dipping.

For sheet stuff the TIG finger is great, but for tubing and frames the pipe jigs are well worth it. If you're going to be doing a lot of tube work you might look into it.

If you don't want to buy a bender, you can get a similar effect with multiple straight sections. That's what Kevin's images show, using three straight sections.

* hope it's OK to mention other forums, Jody.

I'll check that out, thanks! Sometimes (both for MIG, and now TIG) I'll put an extra welding clamp somewhere on the piece to give me something to lean against. I bet even a few straight pieces of tube with small knuckle joints on them would be worth looking into as well, it can be positioned pretty quickly, and could either clamp to the work piece, or to the table. MOST of my weld beads are 2" long or shorter, so I rarely ever have to worry about trying to keep in position for a foot long run. And at least now anyway, I only do one side of a joint at a time, I've never tried to continue around a corner and get another side without stopping. I'll work on that later :lol:

The TIG finger definitely helps. And I'm finding that playing with different hand possitions on the torch helps. At first I would always try to hold it like a pencil, not sure why, but I just had it in my mind that's the only way to hold it.
Legion
  • Posts:
  • Joined:
    Mon Feb 03, 2014 9:35 pm

Yeah, you could definitely fabricate your own jigs from square tube and offcuts and just clamp it to your job as required. I used round pipe because I already had the bender and the pipe clamps are cheap and I use them for big frame clamping jobs. I was making a framed thing not unlike your furniture and doing some freehand tigging with shaky hands dipping away and remembered reading Kevin's advice and went for it, fabbing up a few jigs as I needed at the time. I just thought "what if I clamped there, how would the pipe have to be bent to support my hand here". I do mitred corners often enough so I made some 45°s and for square joints some big Us, some 90°s. If I remember on the weekend I'll take a picture or two.
Post Reply