Tig welding tips, questions, equipment, applications, instructions, techniques, tig welding machines, troubleshooting tig welding process
Mic
  • Mic
  • New Member
    New Member
  • Posts:
  • Joined:
    Wed Aug 13, 2014 4:57 pm

Looking for some advice folks-
I went to do the first service on an Accord a got a while back and found that at some point in the past someone has sealed the sump bolt over with liquidmetal

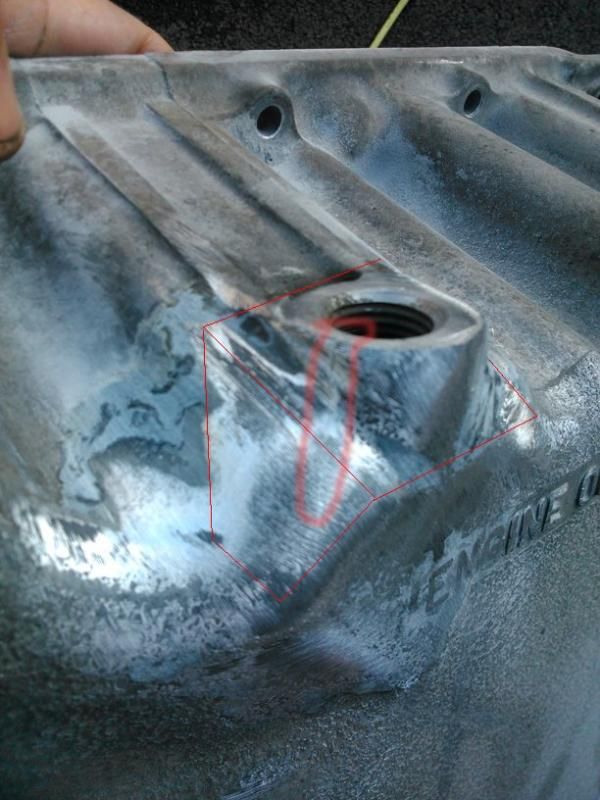
So off with the sump and I cleaned up some of the liquidmetal.
There is a very small hairline crack as per the picture.
Image

What would people recommend as the best course of action. Iv done some aluminium TIG welding before but never tried cast AL yet

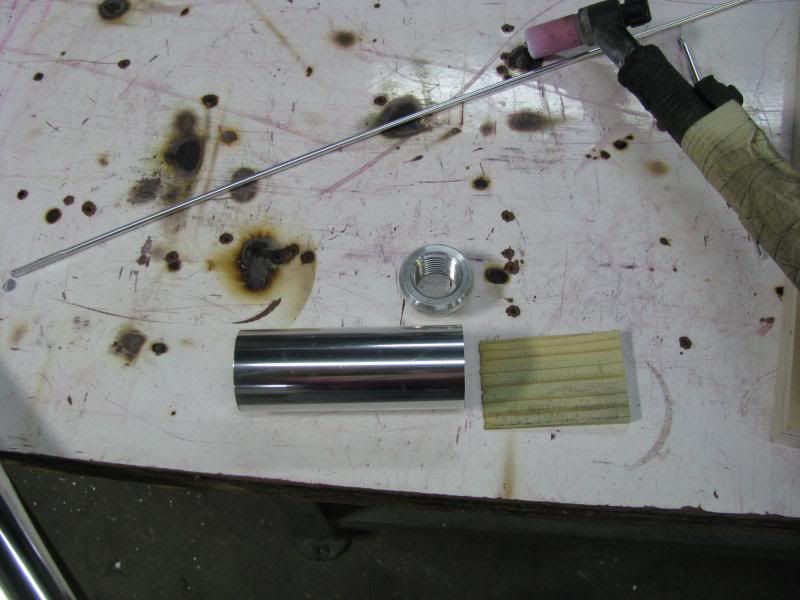
What I do have at my disposal is a 200 amp AC/DC TIG , a propane torch and also a gas garage space heater I could use to pre-heat the sump. Im going to pick up some rods better suited to cast aluminium tomorrow. Im aware cast aluminium welds terrible, but I need to give this a shot!


But how should I go about it

Drill a small hole at the end of the crack in order to stop it creeping any further (works on fiberglass but not sure if it would work on AL haha) then use a die grinder to cut down a small groove into the crack? Some preheat with the torch and try weld it up?

Any and all advice welcome


(I also work in a laser cutting company so I have access to maybe cutting a small plate to cover the cracked area to support it, but not sure if thats complete overkill!)
User avatar
  • Posts:
  • Joined:
    Thu Jan 06, 2011 11:40 pm
  • Location:
    Near New Orleans

I absolutely recommend stop-drilling the crack, else you may chase it to hell and back. Your bigger issue, is the purpose of the metal. That crack will be saturated with oil (cast is semi-porous), and difficult to clean enough for a good weld.

I'd stop-drill with about a 5/16" bit, then counterbore the hole for a good full-penetration weld. I'd also slice the crack "A-hole to appetite" with a 1/16" cutoff wheel, then bevel that cut to a groove. Preheat the area well, then weld with 5356 (the Japanese use good quality aluminum in their castings), then chase out any push-through in the threads with a die-grinder, and re-tap it.

Your mileage may vary, but this is how I would tackle it (with a mind to modifying the process if any one aspect of it doesn't go as planned).

Steve S
User avatar
  • Posts:
  • Joined:
    Mon Nov 04, 2013 7:51 am
  • Location:
    The Netherlands

I'd say go to a junkyard and find a pan that's intact for a few bucks and fit that :?:

Having said that, of course it's a good learning experience to repair this anyway. Cast ali oil pans are probably the most awful to weld properly because of the (oil) contamination in the material, so if you can get that working well it's an extra skill :idea:

Bye, Arno.
User avatar
  • Posts:
  • Joined:
    Tue Jul 01, 2014 4:34 am
  • Location:
    Skiatook, Oklahoma

Before welding, maybe use a torch and see if you can heat it enough to get all of the oil residue out.
There is a aluminum brazing rod, I don't know how well it would work on this, but may be better than welding.

Sent from my SM-G900R4 using Tapatalk
User avatar
  • Posts:
  • Joined:
    Wed Aug 06, 2014 12:48 am
  • Location:
    Melbourne, Australia

I've found pre-heating with propane can be a bit 'hit and miss'. The propane flame tends to contaminate the metal surface.You can possibly try heating from the opposite side.

Also, take a bit of effort to heat the entire item uniformly, not just localized in the weld area.

Oxy-Acetylene, if available, will give you cleaner pre-heat. If you have Oxy-Acetylene and don't have access to temperature measurement device (test crayons, infra-red etc), then a handy tip for pre-heating is the following:

1: Light-up the Acetylene with no Oxygen.
2: Use the (yellow) flame to deposit a black layer of carbon 'soot' on the metal surface.
3: Add oxygen to get a neutral flame,
4: Gently heat the surface until the black carbon disappears. That's your preheat temperature for aluminium.

Getting that oil pan clean might be your biggest challenge. Oil is likely to weep out of that crack when you apply heat. The grinding preparation suggested above by Steve is great advice to help get rid of that oil.

Also, maybe try to find a scrap piece of casting to practice on first?

Hope this helps.
EWM Phonenix 355 Pulse MIG set mainly for Aluminum, CIGWeld 300Amp AC/DC TIG, TRANSMIG S3C 300 Amp MIG, etc, etc
VooDoo
  • Posts:
  • Joined:
    Mon Nov 11, 2013 10:54 am
  • Location:
    Finland

made maaaany oilpan fixes.. Drill end off the crack, v-goove out with coarse carbide burr. Preheat to ~150celsius then last wipe with stainless brush, weld with 4047 filler.

Always worked for me.


Japan cast alum parts are allmost always nice stuff to weld.
TamJeff
  • Posts:
  • Joined:
    Tue Dec 04, 2012 4:46 am

I would cut that collar out and weld an aluminum bung in there instead. That will keep the weld from having to penetrate contaminated metal, and mixing a tapered thread plug with a previously cracked item that will be difficult to repair the inside as well. Being that an aluminum bung is not cast, it will help subdue the crack with from one side at least.

Actually, I would probably weld a plate or plates to fit over the cracked area and then install a bung into the plate.

A tapered plug, in the hands of a gorilla is likely what cracked it before when the cast was good. Without repairing the thread as well, at the very least it will probably still have an annoying leak that drips onto your driveway.

Here's a 1/2" NPT bung that has a flange on it. Either way, you will likely spend an hour on it with cleaning, grinding etc only to find you have opened up a sieve of porosity elsewhere around the repair. I would spend the hour on it creatively, instead of hopefully.
Image
Miller ABP 330, Syncrowave 250, Dynasty 300 DX.
Honorary member of the Fraternity of Faded Tee Shirts.
User avatar
  • Posts:
  • Joined:
    Wed Aug 06, 2014 12:48 am
  • Location:
    Melbourne, Australia

Re: @TamJeff - Great tip! That's a much better way to approach the repair. Thanks.
EWM Phonenix 355 Pulse MIG set mainly for Aluminum, CIGWeld 300Amp AC/DC TIG, TRANSMIG S3C 300 Amp MIG, etc, etc
TamJeff
  • Posts:
  • Joined:
    Tue Dec 04, 2012 4:46 am

If people find out you can repair cast, you will get more than you want. I have repaired more cast than I care to let on because, sure as all heck, there will be one on my work bench tomorrow just for mentioning the voodoo metal here on this forum.

At any rate, this is how I typically approach repairs of this type. Imagine the fine red line patterns either a bent piece, or two separate pieces of 11 gauge aluminum sheet stock. In the case of two pieces, the bend would be welded. If you also learn to anneal aluminum, you can form it to fit such areas with some really tidy fit ups that become a joy to weld compared to directly welding the damage itself. Cast, can make even the best welders look like cubs, while a well executed patch job can make even a mediocre one seem like an ace.
Image

If the corners of the patch are slightly rounded, all the better yet.
Miller ABP 330, Syncrowave 250, Dynasty 300 DX.
Honorary member of the Fraternity of Faded Tee Shirts.
Artie F. Emm
  • Posts:
  • Joined:
    Thu Jul 24, 2014 7:53 am

Had to stare at this a while to figure it out, but i think i got it now. The point of TamJeff's repair is that it's easier to weld the 11 guage repair material to the porous oily cast pan than it is to repair the crack in the porous oily cast pan, because the crack has affected the threads which will never again be right. Do I have that right?
Dave
aka "RTFM"
Mic
  • Mic
  • New Member
    New Member
  • Posts:
  • Joined:
    Wed Aug 13, 2014 4:57 pm

Thanks for the in depth description TamJeff, unfortunately I had already gone at it :lol:

I got talking to the guy who I was picking up my Tig Rods from and he has welded similar Honda sumps (Jap Type-R sumps)before and had success.
I used a carbide bit, took it down, did some serious scrubbing, cleaning and some heating to get as much oil out of the crack as I could. It welded ok, not pretty but enough to seal it up. Took it slow and little by little i got it covered up.

Id like to thank everyone for their advice on this and fingers crossed its now sorted
TamJeff
  • Posts:
  • Joined:
    Tue Dec 04, 2012 4:46 am

Mic wrote:Thanks for the in depth description TamJeff, unfortunately I had already gone at it :lol:

I got talking to the guy who I was picking up my Tig Rods from and he has welded similar Honda sumps (Jap Type-R sumps)before and had success.
I used a carbide bit, took it down, did some serious scrubbing, cleaning and some heating to get as much oil out of the crack as I could. It welded ok, not pretty but enough to seal it up. Took it slow and little by little i got it covered up.

Id like to thank everyone for their advice on this and fingers crossed its now sorted

I appreciate you showing it here and glad you got it repaired.
Miller ABP 330, Syncrowave 250, Dynasty 300 DX.
Honorary member of the Fraternity of Faded Tee Shirts.
TamJeff
  • Posts:
  • Joined:
    Tue Dec 04, 2012 4:46 am

Artie F. Emm wrote:Had to stare at this a while to figure it out, but i think i got it now. The point of TamJeff's repair is that it's easier to weld the 11 guage repair material to the porous oily cast pan than it is to repair the crack in the porous oily cast pan, because the crack has affected the threads which will never again be right. Do I have that right?
Yes, you have that right. The exterior of the cast outside of the crack is usually much easier to clean and weld. The band aid material also reinforces and subdues the crack from growing. The repairs often turn out interesting looking and the welds, pretty with no need for preheating. Less distortion and shrinkage in the cross section that is under tension born into it during the casting process. It actually will often make an otherwise dreaded repair, fun to do instead, especially for novices.
Miller ABP 330, Syncrowave 250, Dynasty 300 DX.
Honorary member of the Fraternity of Faded Tee Shirts.
User avatar
  • Posts:
  • Joined:
    Thu Jan 06, 2011 11:40 pm
  • Location:
    Near New Orleans

TamJeff wrote:
Artie F. Emm wrote:Had to stare at this a while to figure it out, but i think i got it now. The point of TamJeff's repair is that it's easier to weld the 11 guage repair material to the porous oily cast pan than it is to repair the crack in the porous oily cast pan, because the crack has affected the threads which will never again be right. Do I have that right?
Yes, you have that right. The exterior of the cast outside of the crack is usually much easier to clean and weld. The band aid material also reinforces and subdues the crack from growing. The repairs often turn out interesting looking and the welds, pretty with no need for preheating. Less distortion and shrinkage in the cross section that is under tension born into it during the casting process. It actually will often make an otherwise dreaded repair, fun to do instead, especially for novices.
I would add, with the (very effective) band-aid method TamJeff uses, there is still great value in stop-drilling the crack before patching it. Cracks never shrink. Somethimes they stay static. Usually, they grow.

Prevent a future problem, with five minutes drilling and cleaning...

Steve S
TamJeff
  • Posts:
  • Joined:
    Tue Dec 04, 2012 4:46 am

Otto Nobedder wrote:
I would add, with the (very effective) band-aid method TamJeff uses, there is still great value in stop-drilling the crack before patching it. Cracks never shrink. Somethimes they stay static. Usually, they grow.

Prevent a future problem, with five minutes drilling and cleaning...

Steve S
Agreed. I did mean to add that, or quote it initially, and it doesn't hurt to weld it first too, even if it turns out to be haphazard at best.

Good eye, Steve.
Miller ABP 330, Syncrowave 250, Dynasty 300 DX.
Honorary member of the Fraternity of Faded Tee Shirts.
Post Reply