
Hey guys.....I'm a beginner welder and I'm having some issues with an aluminum box I'm trying to make.
I've got some diamond plate polished aluminum sheet 18 gauge thick....used my brake to form a box and I'm trying to tig weld the open seams and corners.
I have a Miller Syncrowave 200 and Weldcraft WP17 torch with 7 cup, 1/16 2% thoriated tungsten electrode, 4043 filler rod 1/16" thick. Had my max current at 75-80, 100%Argon flow at 15cfh....my balance was at 7
When I practiced on scrap diamond plate I was getting excellent puddle control and laying down some sweet stacks of dimes. Got a nice cleaning zone around the edges and had no issues. However, when I try to weld the edges of the box together I totally suck. I end up melting each edge but can't get one puddle to coalesce. When I try to add filler rod it balls up and doesn't integrate easily into the joint. I tried going way ass down on my current but still can't get a puddle to form in the joint. It occurred to me last night that maybe I should put some backing under the seam since this metal is so thin and melts through easily. Any advice would be greatly appreciated....thank you....I forgot to mention that I cleaned the shit out of the aluminum with acetone
Tig welding tips, questions, equipment, applications, instructions, techniques, tig welding machines, troubleshooting tig welding process

I would be using 3/32 tungsten. As for cleaning either wire brush or scotch brite the hell out of it, then acetone the hell out of it. How's your fit up? You shouldn't have to back up the piece with a heat sink, I would back up with a purge but that's just me and not really necessary. What's your torch angle as you travel? 1/16 aluminum wire should melt fairly easily. Pictures would help.
tripevans,
I'm new to tig welding also. I started a small 16ga. 3003 gas tank a few days ago. In the beginning I couldn't make a good tack, so I started read every thing that I could about tig welding thin aluminum. In a nut shell, my amperage was too low, my torch angle was off, and my arc gap was too big. Fitment and cleanliness are very important. If a gap exists, it is very difficult to have both edges puddling at the same time. If the edges to be joined are not clean the oxide barrier is very difficult to deal with. Once you master the tacks, life is better. you have to break the surface tension on those newly formed molten aluminum worms or they just get fat and pull away. Remember that aluminum is a great heat sink and it take more amperage to make a puddle on a larger piece of material. The surrounding material just sucks the heat away.
Hang in there, the process will tell you what it doesn't like. I finally got the tank welded up, thank goodness it's for looks and not function. It will go on a little motorcycle styled sidewalk cruiser.I have a Miller Syncrowave 210. I used about 5X more gas and filler than anticipated.
The post may not help, but this in one newby's observation.
BobH.

- MinnesotaDave
-
Weldmonger

-
Posts:
-
Joined:Sun Oct 27, 2013 10:57 pm
-
Location:Big Lake/Monticello MN, U.S.A.
When you were practicing, did you practice the corner joint? Or running beads on a plate?tripevans wrote:Hey guys.....I'm a beginner welder and I'm having some issues with an aluminum box I'm trying to make.
I've got some diamond plate polished aluminum sheet 18 gauge thick....used my brake to form a box and I'm trying to tig weld the open seams and corners.
I have a Miller Syncrowave 200 and Weldcraft WP17 torch with 7 cup, 1/16 2% thoriated tungsten electrode, 4043 filler rod 1/16" thick. Had my max current at 75-80, 100%Argon flow at 15cfh....my balance was at 7
When I practiced on scrap diamond plate I was getting excellent puddle control and laying down some sweet stacks of dimes. Got a nice cleaning zone around the edges and had no issues. However, when I try to weld the edges of the box together I totally suck. I end up melting each edge but can't get one puddle to coalesce. When I try to add filler rod it balls up and doesn't integrate easily into the joint. I tried going way ass down on my current but still can't get a puddle to form in the joint. It occurred to me last night that maybe I should put some backing under the seam since this metal is so thin and melts through easily. Any advice would be greatly appreciated....thank you....I forgot to mention that I cleaned the shit out of the aluminum with acetone
When your filler does not melt into the puddle and balls up, it's a good indicator that you are not using enough amps to form a defined puddle to wick the filler in.
Or tried to put the rod in too early.
I've "speed tacked" 1/16" aluminum corner joints at 230 amps in 3/4 of a second - it's an extreme example but faster tacks are easier.
The thinner the aluminum (or steel) the tighter the joint must be to make it work.
At 18 gauge, it definitely should be touching with no gaps to make your life easier.
Aluminum that thin is tough for a beginner.
Dave J.
Beware of false knowledge; it is more dangerous than ignorance. ~George Bernard Shaw~
Syncro 350
Invertec v250-s
Thermal Arc 161 and 300
MM210
Dialarc
Tried being normal once, didn't take....I think it was a Tuesday.
Beware of false knowledge; it is more dangerous than ignorance. ~George Bernard Shaw~
Syncro 350
Invertec v250-s
Thermal Arc 161 and 300
MM210
Dialarc
Tried being normal once, didn't take....I think it was a Tuesday.
tripevans
you might want to try working with thicker materials if you
are new to aluminum welding. 18 gage aluminum is only around .040.
even if you butt inside to inside it is a thin surface to learn on.
just saying
craig
you might want to try working with thicker materials if you
are new to aluminum welding. 18 gage aluminum is only around .040.
even if you butt inside to inside it is a thin surface to learn on.
just saying
craig
htp invertig 221
syncrowave 250
miller 140 mig
hypertherm plasma
morse 14 metal devil
syncrowave 250
miller 140 mig
hypertherm plasma
morse 14 metal devil

- Make the edges touch.
- set the machine to ~130A.
- Use the equivalent of 65-75% EN (not sure what the settings on your machine mean, but do cross reference to make sure you are using the correct amount of percentage of EN). (The cleaner the aluminum, the more EN you can use which makes better use of the current setting for producing the tack weld we're looking for)
- Sharp 1/16" tungsten with a 3x-diameter taper. 2%La works best.
- Make sure the tungsten is pointed right at the middle of the joint 1-2mm away <---super important!!!, not towards one plate nor the other, otherwise you'll just end up with exactly where you were at before. You need to be congnizant of these kinds of things all the time since you're beginning with aluminum.
- Floor the Pedal. Not slowly. As fast as you can move your foot, literally.
- As soon as the arc starts, as in immediately, let off the foot pedal. The goal is: the fastest arc strike you can manage, but NOT ramping up slowly, an instant ON/OFF blast.
- You should see a nice clean circular tack about 3/32"-1/8" across (diameter) [2.4-3.2mm]
Both me and MnDave were toying with this kind of tacking, and it works great if you follow the correct steps. If you cannot manage "touching" fit-up, cut a 3-5mm snippet of Al tig rod of large enough diameter so that it "sits" in the gap that you shouldn't have in the first place(!)
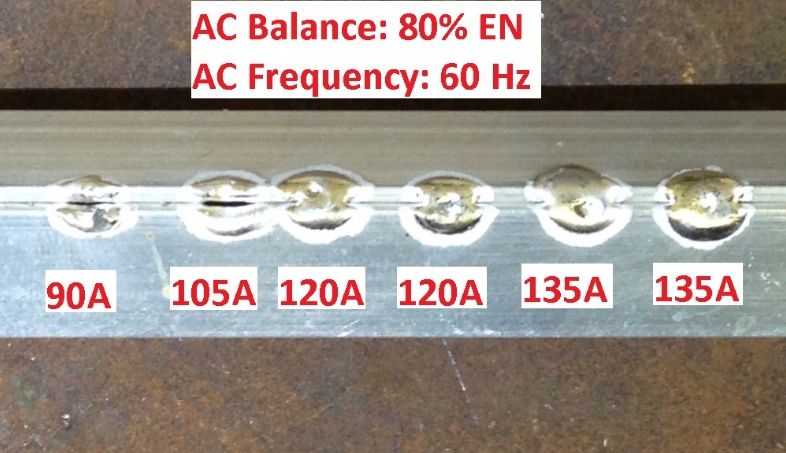
16ga, 1/2" angle channel. If the edges start pulling away like on the two left-most tacks, then you didn't use enough current. You can still save it by using a piece of 1/16" filler and jam it in the crevice, then bump up the amps about 30-40 more than what you previously used. Then go at it again according to the above steps.
- MinnesotaDave
-
Weldmonger
-
Posts:
-
Joined:Sun Oct 27, 2013 10:57 pm
-
Location:Big Lake/Monticello MN, U.S.A.
Oscar's are really nice.
Here is 1/16" thick alum, 230 amps, 3/4 of a second using a switch, no filler.
(No adjustments of any kind for balance or freq)
Using this beauty 
Here is 1/16" thick alum, 230 amps, 3/4 of a second using a switch, no filler.
(No adjustments of any kind for balance or freq)
- image.jpg (32.31 KiB) Viewed 2181 times
- image.jpg (52.81 KiB) Viewed 2181 times
Dave J.
Beware of false knowledge; it is more dangerous than ignorance. ~George Bernard Shaw~
Syncro 350
Invertec v250-s
Thermal Arc 161 and 300
MM210
Dialarc
Tried being normal once, didn't take....I think it was a Tuesday.
Beware of false knowledge; it is more dangerous than ignorance. ~George Bernard Shaw~
Syncro 350
Invertec v250-s
Thermal Arc 161 and 300
MM210
Dialarc
Tried being normal once, didn't take....I think it was a Tuesday.

Great welding machine, old but a nice stable arc. I have welded many corner joints and can give you a methods that work for me; The edges have to be clean and metal to metal fit, no gaps. ( your tacks look great, the ones that worked) and the recommended tungsten is pure tungsten (green ends) Although thoriated tungsten(red end) will work. When tacking, I use a higher amperage , and keep filler wire on the ready just in case the joint stars to open because of the expansion caused by the heat, if this occurs, add a dab of wire to the side of the molten metal instead of in front. After each tack, tap the edges together using a small hammer. Fusing tacks are better than tacks using filler wire because they won"t be so pronounced when you weld over them.
Hope you find something in my reply that you can use....................Ron
Hope you find something in my reply that you can use....................Ron
steeldr. wrote:Great welding machine, old but a nice stable arc. I have welded many corner joints and can give you a methods that work for me; The edges have to be clean and metal to metal fit, no gaps. ( your tacks look great, the ones that worked) and the recommended tungsten is pure tungsten (green ends) Although thoriated tungsten(red end) will work. When tacking, I use a higher amperage , and keep filler wire on the ready just in case the joint stars to open because of the expansion caused by the heat, if this occurs, add a dab of wire to the side of the molten metal instead of in front. After each tack, tap the edges together using a small hammer. Fusing tacks are better than tacks using filler wire because they won"t be so pronounced when you weld over them.
Hope you find something in my reply that you can use....................Ron
Couple things....
You haven't tried 2% Lanthanated, have you?
IF, the joint opens up, it is likely because of one of two things (or both): still not enough current, or incorrect joint prep as in, the edges are not close enough. Of course too much current is also a bad thing, in which case you'd be blowing a whole and the edges would melt away as the hole is created. Expansion will happen no matter what, but with a high enough amperage quick-blast, the edges melt together almost instantly, and since the arc is extinguised an instant later, it solidifies into a proper tack. Again, this is all 1000% dependent on getting proper joint prep where the edges touch, and honing in on the proper amperage and utilizing the correct arc length.
Amazing replies....Thank you sooo much for the awesome advice! Couldn't have done it without you. Took this pic of the 1st time I got it. Rough as hell but was 1st corner bead I got on this stuff. I found the most important factor to be quick arc start and amp up with pedal ease off quickly. Cleaning didn't seem to be as big a factor as that. I was able to lay some great welds on stuff I never cleaned...of course its a diamond plate polished so pretty clean already. 1/16" was the way to go and got 1-2 mm from joint....2% lanthanated very stable....I kept burning holes after a few cm. and at joint ends b/c of heat build-up....just gotta ease off pedal and get feel of it....you all got me going though....thanks a lot and have a great thanksgiving!!!! Will be back here often....just ordered some tig fingers
- Attachments
-
- 20141127_115940.jpg (35.76 KiB) Viewed 2092 times
The biggest thing is not to be scared of power! Many pros I know just set their machine to kill (full power) and control the weld with the puddle. I tend to do the same. The benefit, like Dave illustrated is the ability to have an instant weldable puddle then go... Also diamond plate is not really 18 gauge because each diamond adds thickness so each time you weld across a diamond tread your are in essence doubling the thickness of the aluminum.

- Superiorwelding
-
Weldmonger
-
Posts:
-
Joined:Thu Jan 24, 2013 10:13 pm
-
Location:Eddy, TX
tripevans,
For a beginner I believe you have a natural skill. Looks good to me. I would be interested in seeing your future projects.
A note on the full pedal. We have talked about this before but I feel it warrants talking about it again. I am a culpret of setting my machine a lot higher than I need. Normally it is because I want that extra amperage if I need it as was mentioned but also it is due to being lazy. For me there are several reasons I set the machine at a dedicated amperage. One would be the tacking as has been mentioned. Another would be prouction runs where I want a certain bead width, speed and by setting the amps I can just max the pedal out and be good. But the main reason is to have good control of my sweep. Setting the machine at max is fine but if you want good amperage control I recommend setting the machine 10-20 amps more than you need. Keep in mind, when you have the machine set at say 200 amps, a 1/4 of the foot pedal movement might move 50 amps while setting the machine at 100 gives you 25 amps of adjustment for the same movement. This would be especially important is you were doing very thin gauge SS or alum and need that fine control.
-Jonathan
Instagram- @superiorwelding/@learntotig
Twitter- @_JonathanLewis
https://www.learntotig.com
https://www.superiorweldandfab.com
https://www.youtube.com/+SuperiorWeldin ... ATHANLEWIS
Twitter- @_JonathanLewis
https://www.learntotig.com
https://www.superiorweldandfab.com
https://www.youtube.com/+SuperiorWeldin ... ATHANLEWIS
Return to “Tig Welding - Tig Welding Aluminum - Tig Welding Techniques - Aluminum Tig Welding”
Jump to
- Introductions & How to Use the Forum
- ↳ Welcome!
- ↳ Member Introductions
- ↳ How to Use the Forum
- ↳ Moderator Applications
- Welding Discussion
- ↳ Metal Cutting
- ↳ Tig Welding - Tig Welding Aluminum - Tig Welding Techniques - Aluminum Tig Welding
- ↳ Mig and Flux Core - gas metal arc welding & flux cored arc welding
- ↳ Stick Welding/Arc Welding - Shielded Metal Arc Welding
- ↳ Welding Forum General Shop Talk
- ↳ Welding Certification - Stick/Arc Welding, Tig Welding, Mig Welding Certification tests - Welding Tests of all kinds
- ↳ Welding Projects - Welding project Ideas - Welding project plans
- ↳ Product Reviews
- ↳ Fuel Gas Heating
- Welding Tips & Tricks
- ↳ Video Discussion
- ↳ Wish List
- Announcements & Feedback
- ↳ Forum News
- ↳ Suggestions, Feedback and Support
- Welding Marketplace
- ↳ Welding Jobs - Industrial Welding Jobs - Pipe Welding Jobs - Tig Welding Jobs
- ↳ Classifieds - Buy, Sell, Trade Used Welding Equipment
- Welding Resources
- ↳ Tradeshows, Seminars and Events
- ↳ The Welding Library
- ↳ Education Opportunities