Hello to everybody on this forum!! I'm Mac
i'm new here, all the way from Romania
i just started my tig welding and the videos on youtube helped a lot i might say.
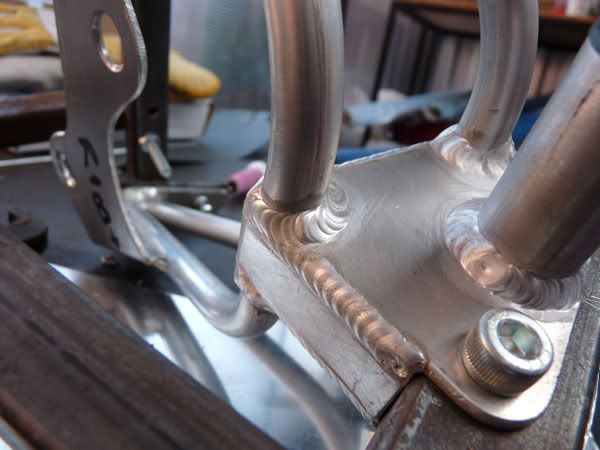
i have a problem welding a 1,5mm thick pipe on the 3mm alu plate
do you have any advice on how to do that?
the problem is the pipe that is thinner then the plate .so it melts
this is exactly what i must obtain, so if you have some tips about how to do it, i would be gratefull
my advice is to weld a bead on the plate first, then to turn your amperag down and connect that bead to the pipe by welding. this will give you tighter control in what you are doing, and the weld bead will melt quicker than if you had only the 2 peices. this is hrd to explain though, do you understand?
Angle your torch so the tungsten is pointing more at the thicker, continuous plate than the thinner, pipe edge. That should transfer more arc heat into the thicker, continuous section, to the point where if you do it just right, you'll have similar sized puddles on both sides, at about the same time. You need to also not be too tentative about it, and use enough current (IE: use full expected welding current) to get this to work. Otherwise with too weak an amount of current, the arc may just jump around erratically, and you'll have no directional control with your torch.
When you have your two puddles formed of similar size on each side of the welding gap, with split second timing and filler rod feeding hand accuracy, dab the end of your filler rod right between the two puddles. When its all going well, surface tension pulls the film of the two puddles tight into a single puddle, making them into one fused molten puddle. Then, move your torch a bit alog the weld bead, wait for the puddle to melt into a "C" shape, and when you see that "C" shape dab your filler into the middle to make surface tension pull the puddle tight into one round puddle again. Repeat, over and over again.
Last edited by jakeru on Sat Nov 13, 2010 4:56 pm, edited 1 time in total.
thanks a lot guys!
Monday i will give it a try
today i practiced some T welding am stacked a lot of dimes in order to do it right
also worked with the settings a lot in order to find the best settings for everything that i have to weld
i still have to get right welding the shape of L on the outside 90° angle, i'll try it again with less amperage in order not to melt the edge. Any advice for this one? (it's same as welding a box) don't seem to get it right for now
For the 3mm plate the amperage i use is 70A base current (BC)and 140 Pulse current (PC), PW 0,5 pulse width, 1.6mm or 2.4 tungsten and 6cup size
30% AC balance and AC freq 100Hz
this is my welder
I am a noob still and probably will always be since there is so much to learn please don't bash me too much. Could the frequency be turned up to put more focus on the torch? just a thought.
i can't make those welds
i cant make a nice weld around the small pipe like in the photo
it's more difficult than i thought
tomorrow i'll give it another try
racingparts wrote:i can't make those welds
i cant make a nice weld around the small pipe like in the photo
it's more difficult than i thought
tomorrow i'll give it another try
wow, so welding is not that easy afterall, i bet a monkey can do it tho...
dustelf wrote:no, it's far from perfect, you just don't know that.
Could you please enlighten us as to why these welds are "far from perfect" and possibly could kill someone? I'm trying to see what you're talking about but the only thing I'm seeing is the small crater left after the arc start in the bead. I thought the welds look really good then again I'm not a welding inspector either.
Alan
First that crater is at the end of the weld not at the start, it is called an end crater also.
You should know a weld can look "really" good and still not be good at the same time, don't have to be an welding inspector, and btw there are 2 end craters in that pic, one is better , but i had microfissures in craters looking better then that.
That part is going to be on a motorcycle, would you ride a bike whith parts welded by someone who learns Tig welding on youtube?
And then those are not his welds, he is trying to copy what you see in that foto.
jakeru wrote:When you have your two puddles formed of similar size on each side of the welding gap, with split second timing and filler rod feeding hand accuracy, dab the end of your filler rod right between the two puddles. When its all going well, surface tension pulls the film of the two puddles tight into a single puddle, making them into one fused molten puddle. Then, move your torch a bit alog the weld bead, wait for the puddle to melt into a "C" shape, and when you see that "C" shape dab your filler into the middle to make surface tension pull the puddle tight into one round puddle again. Repeat, over and over again.
This the best "How to start a fillet weld" description I've ever read. Hats off !
i'm starting to think that preheat is the only way to go
i'll give it a try, and lower the amps in order not to blow the pipe that melts instantly otherwise