
I have yet to get those shinny welds. All my welds are covered in what I believe is an oxide layer. I have tried working hotter and faster. Cooler and slower. A # 8 gas lens. More argon. I checked for leaks, and could not find any.
I am using a DC inverter, a 2% lanthanide 1/16 tungsten, 309l rod 1/16 and 3/32, welding on 304 stainless.
The welds look sound to me and do clean up, but I must be doing something wrong
Tig welding tips, questions, equipment, applications, instructions, techniques, tig welding machines, troubleshooting tig welding process
Going to the jumbo gas lens will make a difference but ultimately you need the base metal to be cool before it exits the shielding gas. I was doing some 1/8" 304 parts with just an inch of weld earlier this week and even with the metal clamped to big blocks of aluminum and running 40 cfh on a #18 lens, I needed almost 20 seconds of post flow to get completely colorless welds. One thing to keep in mind is that if you are just practicing, dunk your SS billet in a bucket of ice water between passes. And really, it hardly matters if you do that in a production piece since it will barely make a difference in strength on austenitic steels.
-Sandow
-Sandow
Red-hot iron, white-hot iron, cold-black iron; an iron taste, an iron smell, and a babel of iron sounds.
-Charles Dickens
-Charles Dickens

Your first problem is practicing SS welding hoping to get shiny colors on practice pieces that border on planck-length. You need large, flat pieces that have more surface area then smaller thicker parts of the same volume. Never weld directly over another practice piece unless that thing is dead cold. You're basically shooting yourself in foot with respect to your goals. Been there done that.


Stick a fork in it, it's cooked.
Looks like you shut off the argon while it was still glowing cherry red.
Sent from my SCH-I605 using Tapatalk
Looks like you shut off the argon while it was still glowing cherry red.
Sent from my SCH-I605 using Tapatalk
Ryan
Miller Dynasty 350 w/wireless pedal
Miller 350P with standard torch and XR-Aluma-Pro
Miller Multimatic 200 w/spool gun w/wireless pedal
Miller Spectrum 375 X-TREME
Smith torches
Optrel e684
Miller Digital Elite
Miller Weld-Mask
Miller Dynasty 350 w/wireless pedal
Miller 350P with standard torch and XR-Aluma-Pro
Miller Multimatic 200 w/spool gun w/wireless pedal
Miller Spectrum 375 X-TREME
Smith torches
Optrel e684
Miller Digital Elite
Miller Weld-Mask
Thanks for all your help. here is an update
1/2 inch thick 304 stainless
1/16 309 filler
100 amps
#8 gas lens 20cfh
From what was said about my beads looking cooked but still on top I started to think about torch placement.
I did another weld paying close attention to where the torch was in relation to the puddle and I noticed I greatly favor the back edge of the puddle. When I moved the arc to the leading edge of the puddle things changed dramatically. That is after I learned how to keep the filler off the tungsten again. First of all it looked less cooked still not shinny but better. Also the puddle narrowed and flattened, travel speed went way up and it started to get the stack of dimes look
- Attachments
-
- as welded and wirebrushed
- stainless.jpg (83.72 KiB) Viewed 2510 times
- big gear head
-
Ace

-
Posts:
-
Joined:Thu May 07, 2015 11:46 am
-
Location:KY.
Be sure that you are not pulling the end of the wire out of the argon between dips. Grind the surface of the metal until it is shiny before welding. It looks like you are welding on metal that is straight out of the mill and it probably has contamination on the surface.
Freddie
exnailpounder
- exnailpounder
-
Weldmonger

-
Posts:
-
Joined:Thu Dec 25, 2014 9:25 am
-
Location:near Chicago
Your welds are too cold. Tig weld beads are usually flatter than mig or stick.That is why you are cooking your base metal. I don't understand what you are seeking to accomplish here. For 1/2" stainless you should be using well over 200 amps. Trying to form a puddle on 1/2" with 100amps is why you're cooking it. You want your puddle to form immediately, not have to wait for it. And have a really short arc length, too long of an arc length puts in too much heat. Stainless doesn't conduct heat worth a damn so all that heat from too little amperage is building up and cooking it. It might seem like less amps would put in less heat but it adds more by not forming an immediate puddle. The rule of stainless is get in and get out and that requires enough amps to form an immediate puddle, weld a bit and stop and use some sort of heat sink to remove the heat from it before your next bead run. Stainless welded properly gets various colors, straw colored being the optimum and it doesn't turn out shiny unless you wire wheel it. Mild steel will get shiny beads. In your first post you said you were using 1/16" tungsten at 100 amps. Thats about the limit of that size tungsten. Go up to 3/32" tungsten and filler and turn up the amps. I wish I got to do more stainless because it welds like butter but you have to be aware of the heat buildup which is what you're getting.
Ifyoucantellmewhatthissaysiwillbuyyouabeer.
- DLewis0289
-
Ace
-
Posts:
-
Joined:Sun May 01, 2016 7:46 am
-
Location:Fort Myers Florida
You are starting to get there brother. Here is what I would do. You said your base metal is 1/2" stainless steel correct? That is pretty hefty, here is how I would practice to get you dialed in.
Step 1- Change out your tungsten to 1/8" (2% T is fine, pretty much general purpose)
Step 2- Make sure you are using straight up Argon 15-20 cfh is just fine
Step 3- Put away all of your filler rod in a drawer somewhere
Step 4- Around a 1/2" cup is fine, you don't need anything fancy
Step 5- Double check you are DCEN
Step 6- Crank that puppy up to 300 amps (just a starting point, 1/2" SS trust me)
Step 7- Now start making practice undercut "fusion passes", you can do little circles, little side to side just don't get crazy. This will help you with torch control, etc.
Step 8- When you start making pretty little rose/gold color undercut lines in the base material (tweaking amperage), go find that filler rod and start dropping it in the puddle. I wouldn't go anything less than 3/32 filler if it was me unless you can feed rod like a mad man.
AWS D1.1 / ASME IX / CWB / API / EWI / RWMA / BSEE
Scientists have substituted mathematics for experiments, and they wander off through equation after equation, and eventually build a structure which has no relation to reality." Nikola Tesla
Scientists have substituted mathematics for experiments, and they wander off through equation after equation, and eventually build a structure which has no relation to reality." Nikola Tesla
Thanks again for all your help.
From the comments, I seem to be a bit out of my machines capabilities so I tried something different. (max amps 160)
The piece is 3/4 by 1/8
wiped with acetone
ground with a wheel that has only seen stainless
wiped with acetone
125 amps
3/32 2% lanthanide tungsten
20 cfh
#8 gas lens
no filler rod
15 sec post flow
- Attachments
-
- thin.jpg (69.33 KiB) Viewed 1818 times
- big gear head
-
Ace
-
Posts:
-
Joined:Thu May 07, 2015 11:46 am
-
Location:KY.
Notice how the small part of your bead has some color to it and the fat part is gray. You are getting too hot. Try to do a smaller bead and move a little faster. Try to keep it the same width. You also broke your arc too quick which is why you have that crater at the end.
Last edited by big gear head on Mon May 02, 2016 11:53 am, edited 1 time in total.
Freddie
It isn't that your machine isn't capable, it is that you are shooting for the moon right out of the gate.
Buy this:
http://www.amazon.com/RMP-Ga-Stainless- ... =304+sheet
and this:
http://www.amazon.com/Aluminum-Rectangu ... 2470955011
Cut the SS into strips and clamp two together edge to edge onto the aluminum using some 1/8 stock to spread the load. Run DC at 60 amps with no ramp using the largest cup you have. It will melt almost immediately and you can fuse weld the seam at a pretty rapid pace. Try that out and then try running a bead with fill if you are happy with the fusing. Be sure the SS is cool to the touch before you light up on it a second time. If you can see it glowing at all, it will grey the instant it hits air. You need to hold post flow until it has at least stopped glowing and if you want colorless for a bit longer than that.
The core lesson is simple. If SS is hot and exposed to oxygen it will color. The faster you can pull heat from the weld, the less time it will need to be shielded. The aluminum backing will limit backside exposure while rapidly drawing heat from the SS.
Thicker SS will take a long damn time to cool adequately so even the 1/8" is going to be a second step when learning.
-Sandow
Red-hot iron, white-hot iron, cold-black iron; an iron taste, an iron smell, and a babel of iron sounds.
-Charles Dickens
-Charles Dickens
exnailpounder
- exnailpounder
-
Weldmonger
-
Posts:
-
Joined:Thu Dec 25, 2014 9:25 am
-
Location:near Chicago
That little dot that you show is exactly what you are looking for. Make a series of those and you have a bead. Hit the pedal...by the way,,,are you using a pedal? If not that explains a few things but you need to start a small dot/bead like you have, move an 1/8" and form another one...rinse and repeat. You also need to back off the pedal at the end of the weld and back up your torch and kind of smooth things out. You don't want a crater or a tit at the end of your bead. Remember to move along or you put in too much heat that can't disappate and your bead gets too wide and cooks the metal. Try just stringing 3 or 4 of those little dots in a row for starters and then add a few more as you get the hang of it. Also, 15 seconds of post flow is a waste. I set my machine at 6 seconds and have never changed it. Just use enough post flow to keep your tungsten shiny....any more is just wasting it but keep that post flow on the puddle when you stop the bead. It's also a big help to get in a good welding position so you can time your moves better. Keep us informed.
Ifyoucantellmewhatthissaysiwillbuyyouabeer.
On my air cooled torch I need a lot of post flow since the wire and torch head are heating the gas up before it blows onto the electrode. The water cooled torches I've used at my school don't need nearly as much post flow to keep the electrode from oxidizing. Would also help cooling the workpiece slightly I suppose.exnailpounder wrote: Also, 15 seconds of post flow is a waste. I set my machine at 6 seconds and have never changed it. Just use enough post flow to keep your tungsten shiny...
-Sandow
Red-hot iron, white-hot iron, cold-black iron; an iron taste, an iron smell, and a babel of iron sounds.
-Charles Dickens
-Charles Dickens
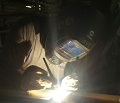
Tried again, same setting but with a 1/4 inch aluminum back up plate and moved fast.
Guess what, I got some color other than all grey, still not pretty but at least not all grey.
When I said I moved fast, I moved way faster than I ever thought to go.
I ordered the 16 gauge 304 stainless, i will give that a try when it comes in
Guess what, I got some color other than all grey, still not pretty but at least not all grey.
When I said I moved fast, I moved way faster than I ever thought to go.
I ordered the 16 gauge 304 stainless, i will give that a try when it comes in
- Attachments
-
- IMG_1137a.jpg (30.25 KiB) Viewed 1807 times
- DLewis0289
-
Ace
-
Posts:
-
Joined:Sun May 01, 2016 7:46 am
-
Location:Fort Myers Florida
You are on your way! Nothing left but practice now.
AWS D1.1 / ASME IX / CWB / API / EWI / RWMA / BSEE
Scientists have substituted mathematics for experiments, and they wander off through equation after equation, and eventually build a structure which has no relation to reality." Nikola Tesla
Scientists have substituted mathematics for experiments, and they wander off through equation after equation, and eventually build a structure which has no relation to reality." Nikola Tesla
exnailpounder
- exnailpounder
-
Weldmonger
-
Posts:
-
Joined:Thu Dec 25, 2014 9:25 am
-
Location:near Chicago
NOW you are getting the hang of it. Not bad. You kinda greyed it out by getting cerebral palsy a little ways into it but much better.  I hope you are taking this criticism in stride as we are all trying to help you. There is nothing new under the sun as far as welding goes so tried and true techniques always save the day. Filler metal cools your puddle so when you are ready to add filler, you have even more control of your heat input but save that for another day. Right now you should concentrate on moving your torch along in even increments and getting a good looking bead. It's all about seat time and proper technique so I bet in a few months you will be showing us weld porn. Good job! By the way, I hope you are watching Jody's videos. They are priceless in information and he doesn't leave out anything. His vids got me back in the Tig seat in weeks after a 15 year layoff. Don't get too caught up in making big long beads right now. The stainless guru's here will tell you to make shorter beads and get your base metal heat under control. As much as we all want to have that beautiful long stack o' dimes bead, stainless isn't your best choice for that because of it's poor conductive qualities. Get in and get out is the rule. One day you will want to move on to aluminum and a whole new can of worms will open up for you.
Ifyoucantellmewhatthissaysiwillbuyyouabeer.
- big gear head
-
Ace
-
Posts:
-
Joined:Thu May 07, 2015 11:46 am
-
Location:KY.
Adding filler to that will cool it more and help with the gray. See how you do with filler.
Freddie
Maybe start listening to it, we are trying to help. You are friggin cooking it.mpete53 wrote: I am getting the advice I asked for.
Ryan
Miller Dynasty 350 w/wireless pedal
Miller 350P with standard torch and XR-Aluma-Pro
Miller Multimatic 200 w/spool gun w/wireless pedal
Miller Spectrum 375 X-TREME
Smith torches
Optrel e684
Miller Digital Elite
Miller Weld-Mask
Miller Dynasty 350 w/wireless pedal
Miller 350P with standard torch and XR-Aluma-Pro
Miller Multimatic 200 w/spool gun w/wireless pedal
Miller Spectrum 375 X-TREME
Smith torches
Optrel e684
Miller Digital Elite
Miller Weld-Mask
Maybe I did not make myself clear
I am happy for all the advice I have been receiving.
I am trying to follow the advice.
I do not in any way mean any disrespect to those giving the advice.
I am sorry if I am a slow learner and am not progressing as fast as some may like (my self included)
I don't weld all day, I grab a hour here and there. I am not a welder by trade, but have done small jobs stick welding for many years. I always loved the look of a nicely done tig weld and now it could make such small, light gauge welds.
Why am I working with stainless? In a word BOATS. I have sailed all my life and there is always something to repair or a small bracket to make and I would like to use tig rather than stick welding.
Thanks again for your help
Mark

Hello Mark
Let me try to help you.
1. First try to get a perfectly silver puddle.
Clean the metal etc. as you did before. Flush the torch with argon, because moisture goes inside the hose/torch cable and it can take even minutes to clear it away.
After this, set couple of second to your preflow and then set postflow to maximum 15 or 25 sec or whatever it is in your machine. Then light an arc on clean metal, melt a puddle and end the arc and don't remove the cup until postflow is ended. Don't put too much amperes, because we are welding stainless and it won't need that much as carbon. I would just use 50 amps no matter how thick your plate is.
Also try to make quite small puddle a size of a water drop and don't use filler. Also don't keep as long tungsten as Jody. He is doing it for the video purposes.
If you manage to get silver "spot" weld... Congratulations you have no leaks!
I you have color on your weld...... You have a leak somewhere in your system. Perhaps in torch or inside the machine or even on regulator o-ring.... or your gas lense might be broken and creates vortex..... Or you might have even a bad bottle of argon. Sometimes there is bottles that contains moisture due to problems at filling station.
Here is a Jody's good example:
Did you made this far?
2. After getting a silver puddle it is time to focus on welding of stainless steels.
- Austenitics stainless (304,316 etc) steels needs less amperes than carbon steel, because they conducts heat poorly.
- Getting a perfect color of your weld is mainly "fashion" thing. Stainless weld can be gray and it's no problem at all.
- Keeping a filler rod inside the gas shield during welding is extremely important. Otherwise you oxidize the filler and those oxides gets in the weld, but won't melt completely.
- Try to get thinner beads. First practice withouth filler and then start adding filler when you feel comfortable. Try to use smaller rods first. This helps with the heat as you don't need to re-heat a junk of massive filler on the weld etc... Try different sizea and you will figure it out yourself.
-Markus-
PS:
Here is a orbital weld that shows a tiny bit of grey. Absolutely OK. People always tends to prefer silver and pink colors, because those are very nice looking. Truth is that in some cases it is impossible to get even pink color unless you don't want to waste argon and use trailing shield or something like that.
-Markus-
exnailpounder
- exnailpounder
-
Weldmonger
-
Posts:
-
Joined:Thu Dec 25, 2014 9:25 am
-
Location:near Chicago
You're doing fine. I didn't see anywhere in any of your posts that you disrespected anyone. You can practice on mild steel until you get better with your timing and adding filler. It welds almost the same but it disapates heat a little better but you can still cook it. It's cheaper and good to practice with. At least you didn't come here having never tig welded and want to master aluminum right away. You know how you get to Carnegie Hall right? Let us know how you are doing.mpete53 wrote:Maybe I did not make myself clear
I am happy for all the advice I have been receiving.
I am trying to follow the advice.
I do not in any way mean any disrespect to those giving the advice.
I am sorry if I am a slow learner and am not progressing as fast as some may like (my self included)
I don't weld all day, I grab a hour here and there. I am not a welder by trade, but have done small jobs stick welding for many years. I always loved the look of a nicely done tig weld and now it could make such small, light gauge welds.
Why am I working with stainless? In a word BOATS. I have sailed all my life and there is always something to repair or a small bracket to make and I would like to use tig rather than stick welding.
Thanks again for your help
Mark
Ifyoucantellmewhatthissaysiwillbuyyouabeer.
Return to “Tig Welding - Tig Welding Aluminum - Tig Welding Techniques - Aluminum Tig Welding”
Jump to
- Introductions & How to Use the Forum
- ↳ Welcome!
- ↳ Member Introductions
- ↳ How to Use the Forum
- ↳ Moderator Applications
- Welding Discussion
- ↳ Metal Cutting
- ↳ Tig Welding - Tig Welding Aluminum - Tig Welding Techniques - Aluminum Tig Welding
- ↳ Mig and Flux Core - gas metal arc welding & flux cored arc welding
- ↳ Stick Welding/Arc Welding - Shielded Metal Arc Welding
- ↳ Welding Forum General Shop Talk
- ↳ Welding Certification - Stick/Arc Welding, Tig Welding, Mig Welding Certification tests - Welding Tests of all kinds
- ↳ Welding Projects - Welding project Ideas - Welding project plans
- ↳ Product Reviews
- ↳ Fuel Gas Heating
- Welding Tips & Tricks
- ↳ Video Discussion
- ↳ Wish List
- Announcements & Feedback
- ↳ Forum News
- ↳ Suggestions, Feedback and Support
- Welding Marketplace
- ↳ Welding Jobs - Industrial Welding Jobs - Pipe Welding Jobs - Tig Welding Jobs
- ↳ Classifieds - Buy, Sell, Trade Used Welding Equipment
- Welding Resources
- ↳ Tradeshows, Seminars and Events
- ↳ The Welding Library
- ↳ Education Opportunities