mig and flux core tips and techniques, equipment, filler metal
gamble
  • Posts:
  • Joined:
    Mon Mar 07, 2011 1:10 pm

Building a coffee table. The top is all 1x1x1/8" steel. I have the frame made. I think I am going to use angle iron for the legs too and butt them to the bottom of the frame and blend it all so it's seamless. Should I weld it from the outside only to prevent it from pulling in?
Using a tweco 141i inverter mig, so I can't exactly blast a hot tack weld since it has a slow roll on feature or whatever it's called. Quick tacks are 6v or less :shock:

or is it stupid to use angle iron for legs?

so what are your suggestions? I plan on filling the center with wood, and still have no idea on how i want to do that part. May be glue them all together, and router the edge 1/8" so it's even height with the frame? And what type of coating. Not a clue what I want to do with it. I just really hope it turns out well
User avatar
  • Posts:
  • Joined:
    Thu Jan 06, 2011 11:40 pm
  • Location:
    Near New Orleans

Nothin' wrong with angle-iron for legs. I built a wood stove with angle iron legs and cut them to "level" and welded a 3"X3" pad on each one.

I could make a few suggestions, but this is such a great "learn it yourself" moment, I'll hold off a bit. You can't do anything to this you can't fix (and if you need a fix, I can help there, too.)

Just go for it. Leg one corner, guage the results (square? way off?) and adjust/report back.

You can definitely do this, and be proud of the results.

Steve S
gamble
  • Posts:
  • Joined:
    Mon Mar 07, 2011 1:10 pm

What if I weld the legs fully (outside) and quench it or splash it with water. Will it weaken it? It's not like a coffee table will see a lot of weight unless I stand on it, which I probably would to make sure it doesn't bend.
I can weld pretty well but metallurgy isn't my strong suit.
User avatar
  • Posts:
  • Joined:
    Tue Jan 07, 2014 9:06 pm
  • Location:
    Elizabeth, WV

I would let it cool on it's own. I don't like quenching welds. It may not be holding a lot of weight but it never hurts to just let it cool on it's own.
It's always best to build your own, especially when it comes to hitches!!!
Matt
User avatar
  • Posts:
  • Joined:
    Sat Jul 06, 2013 11:16 am
  • Location:
    Near Pittsburgh,Pennsylvania. Steel Buckle of the Rust Belt

Gamble,
You could use 1" square tubing for the legs as they offer a more rounded corner so if a child falls against it or you stub your toe. Notch the corner in order to cope the angle iron into it and weld it out and tweak it straight when you're finished. stagger your welds to counter the warping.

Len
Now go melt something.
Instagram @lenny_gforce

Len
User avatar
  • Posts:
  • Joined:
    Thu Jan 06, 2011 11:40 pm
  • Location:
    Near New Orleans

"Quenching" is only a problem when the metal still has color from the heat.

If you wait 30 seconds after you stop welding to quench it, you will not significantly affect the properties of the metal, and it'll be cool enough for the next step. I do this frequently.

Steve S
gamble
  • Posts:
  • Joined:
    Mon Mar 07, 2011 1:10 pm

Thanks guys. I'll see what I can do. I don't want to do square for the legs
At least not on this project.
So I'm about 1 hour into cutting the frame, welding and grinding. Still have to go back and do touch ups. It looks square, but it's about 3/32 off. So I guess not too bad since I don't have a jig or fixture or clamps.
The bottom board is only 1/8" short, but it's what I got from the scrap pile at work so it will do. I lined up all the widths of wood and marked them and started to rip pallets apart. Those boards crack EASILY. So some glue and brads. (most of them popped through the back that I didn't realize until the end so I cut and sanded them)
Cutting the pallet boards and all that took a lot longer than expected. Probably spent an easy 2 hours on it.

Did some very light sanding and this is what she looks like now. I honestly thought it looked like crap until I cut it square and put the metal frame around it. Now I don't want it to be a coffee table. I kind of want to just hang it on the wall. I think it looks cool, but I don't think the MRS would have that. So I'll finish it as a coffee table. I did take a flap disc to the frame of it so it's shiny but didn't take a pic.
So as she sits now
Image

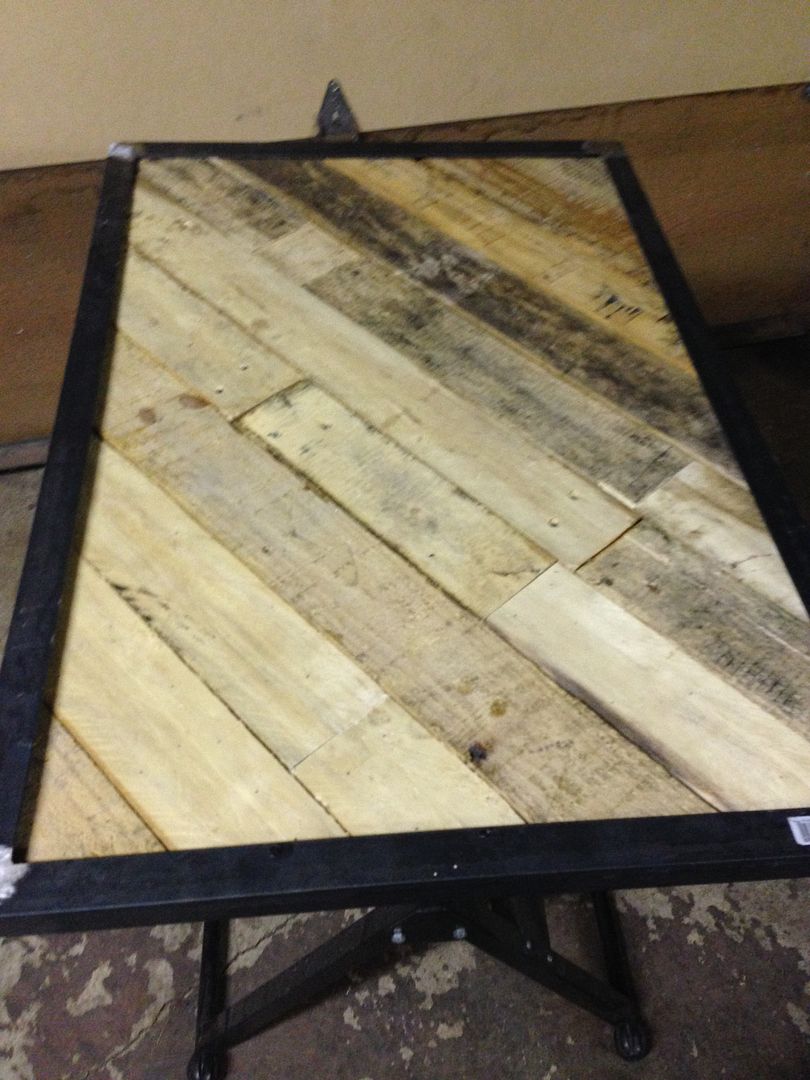
Going to bring it to my dads house where he has all the wood working tools and see if I can router a 1/16th or 1/8" edge so it sits flush with the angle iron. Then to buy some more angle and weld the legs on, but I'm going to weld them to the base of the frame and grind it so it looks like one solid piece. Hope this turns out well!

What should I finish the wood with? I know nothing about stains and polys.
User avatar
  • Posts:
  • Joined:
    Tue Jul 01, 2014 4:34 am
  • Location:
    Skiatook, Oklahoma

I love stain. Image
Not the best pic.
This was a gun stock color stain. I think 2 coats of stain. (Maybe just one) and like 2 or 3 coats of clear poly.
I routered the top edge.

Sent from my SM-G900R4 using Tapatalk
noddybrian
  • Posts:
  • Joined:
    Thu Jan 24, 2013 12:13 pm

Top " Redneck " award there - I like it !- not seen a sanded / stained / varnished cable drum indoors before - usually the table of choice in high class bars - but if "the other half" does'nt mind - then why not - people are always going on about recycling - this time it makes sense ! nice one.
danielbuck
  • Posts:
  • Joined:
    Tue Jan 21, 2014 7:56 pm
  • Location:
    Gilroy, CA

even took a router to the edge of the table, nice! I approve :lol: 8-)
gamble
  • Posts:
  • Joined:
    Mon Mar 07, 2011 1:10 pm

Playing with it tonight and I can't get these legs straight. I did 3 tack and tried welding and splashing water on it to cool it off. Tried the 3 pound hammer to get it lined up, no luck. The leg is perfectly straight one way just off 1/8" the other way. Well on the 2 legs I am currently working on now.
I tried to heat it up with a little map gas and give it a few wacks. Didn't budge. Any ideas on how I can square it up? I only welded it from the outside and I know it would pull more if I welded it on the inside so I am hoping not to.

Image

Image
User avatar
  • Posts:
  • Joined:
    Tue Jul 01, 2014 4:34 am
  • Location:
    Skiatook, Oklahoma

I'm just a newb, but I would think splashing with water would cause more warpage.

Sent from my SM-G900R4 using Tapatalk
User avatar
  • Posts:
  • Joined:
    Thu Jan 06, 2011 11:40 pm
  • Location:
    Near New Orleans

"splashing water", in the right place at the right time, will square everything up nicely.

That's the trick... "right place at right time".
gamble
  • Posts:
  • Joined:
    Mon Mar 07, 2011 1:10 pm

79jasper wrote:I'm just a newb, but I would think splashing with water would cause more warpage.

Sent from my SM-G900R4 using Tapatalk
As it it's cooling it starts pulling. So if you cool it faster it has less time to pull.
Otto Nobedder wrote:"splashing water", in the right place at the right time, will square everything up nicely.

That's the trick... "right place at right time".
Right! :lol: Any recommendations? Should I heat one side of the angle and hit it with water or hammer? I can't image reheating it up and hitting it with water will make it move any more. But I don't know.
I was tempted to grab some flat stock weld to one of the corner and have someone pry on the other legs until they line up and then tack it in place.
I don't know. I like doing this furniture stuff but man this keeping things square is a pain. It looks so easy but I will have a few hours into squaring. lol
It is a learning experience for sure!
User avatar
  • Posts:
  • Joined:
    Thu Jan 06, 2011 11:40 pm
  • Location:
    Near New Orleans

I move sch. XXS stainless pipe with the heat/quench method. Years ago in a fab shop, I used this method to put significant camber in very heavy I-beams for a decorative curve.

I've developed an instinct from years of practice that helps me when I need to bend something, but you can experiment with this project without doing any real harm.

Based on the second picture, with the speed square on the joint, I'd heat the long leg (opposite the square) to DULL red for about 1.25" above the weld, with the red tapering toward the inside corner but not reaching it, then hard-quench it with the garden hose, and see how much it moved.

This is a guestimate, as an "instinct-based" assesment is a hands-on thing.

It's worth a shot thought.

Steve S
User avatar
  • Posts:
  • Joined:
    Thu Sep 12, 2013 7:47 am

I'm missing something here. I often weld frames and fab other stuff that has to be square.

Measure accurately, cut accurately, set up with levels and squares on a flat, level work table, manage the heat by tacking and welding in the right sequence. When you are welding sheet that is very thin, stitch and cool, etc. It takes practice, but doesn't everything?

When you've made this table, try making and installing drawers for tradesmen's utes and trucks and vans. They'll give you plenty of feedback if the drawers don't run true (and that means "glide along"), stick, slop about, or don't carry the weight of their tools. We're way past "square", here.

Or air conditioning stands, pre-drilled for the unit and the wall, and wall mounted where everything is plumb, level, square, and you ain't got any adjustment whatsoever. Just getting the centres for the unit holes is "an ask", starting with pre-drilled steel arms. The air-con tradie drops a level on it for square and plumb -- but not until he's installed it.

Good luck with your coffee table, but make more stuff like this. The harder it is, the more you should make.

Good on you.
Post Reply