Looks really slick.
A bit of advice if I may. Loose the spare wheel bolt. I had a freak accident long time ago. Slipped off the draw bars in the rain and came down on my back. Just missed the spare wheel bolt. If I had come down on it I would have lost a kidney. First chance I cut it off and off every trailer in my family and acquaintence since. No one uses it anyway.
mig and flux core tips and techniques, equipment, filler metal


yep great idea. I never use that spare wheel anyway. I did however make 1 huge mistake that I now realise haha quite funny and stupid. My bike won't fit with all the sides up. Not that I need it but I made the sides shorter as it was less work to just weld on to the cross members there and not have to put in something at the front of the plate. If it bothers me that much I can always just add a section for the front wheel to slip in to.

- Otto Nobedder
-
Weldmonger

-
Posts:
-
Joined:Thu Jan 06, 2011 11:40 pm
-
Location:Near New Orleans
There's nothing wrong with carrying a spare, but I'd have the bolt "under", so the spare is suspended. In that frame, the hitch should hit the dirt before the spare does, if you put it back a ways.
Steve S
Steve S
- Braehill
-
Weldmonger
-
Posts:
-
Joined:Sat Jul 06, 2013 11:16 am
-
Location:Near Pittsburgh,Pennsylvania. Steel Buckle of the Rust Belt
As a crazy note on having a spare mounted on a trailer, your spare will dry rot and even blow out sitting in the hot sun. We have a emergency response trailer at work that has had 2 spares blow out sitting in the yard since 1996, so park it in the shade and cover the spare. Or you can do like we do now and just throw the spare in the back of the truck when we need to use the trailer.
Len
Len
Now go melt something.
Instagram @lenny_gforce
Len
Instagram @lenny_gforce
Len
Braehill wrote:As a crazy note on having a spare mounted on a trailer, your spare will dry rot and even blow out sitting in the hot sun. We have a emergency response trailer at work that has had 2 spares blow out sitting in the yard since 1996, so park it in the shade and cover the spare. Or you can do like we do now and just throw the spare in the back of the truck when we need to use the trailer.
Len
well that raises another concern I have with the tires. I haven't changed the tires since I bought it. There is plenty of tread but I can't say how the rubber is actually holding up as it's been about 14 or 15 years now. Perhaps I will get them changed
- Otto Nobedder
-
Weldmonger
-
Posts:
-
Joined:Thu Jan 06, 2011 11:40 pm
-
Location:Near New Orleans
Seven years is a typical lifespan for a tire.
UV and other exposures cause them to become brittle.
Steve S
UV and other exposures cause them to become brittle.
Steve S
[quote="79jasper"]^ didn't your daddy ever tell you "don't horse around on the trailers?"
Not a horse in sight. Didn't think I was being stoopid either but I still smashed my finger tip. I was home at the time (not wearing work footwear) but wearing comfy leather slip on shoes loading a filing cabinet on the trailer (diamond plate).
Trailer draw bars wet + diamond plate + not wearing my grippy work boots = finger repair by orthopedic surgery
Later on, I rolled my ankle in the same shoes = two weeks in crutches.
Shoes in dumpster.
Never had injuries before or since.
Flat out like a lizard drinkin'
I learned to not play around on service body (tool box) truck beds. Was 5 or so.
About 6 stitches. A few inches to the right, and I wouldn't be able to have kids. Let alone even try.
Sent from my SM-T537R4 using Tapatalk
About 6 stitches. A few inches to the right, and I wouldn't be able to have kids. Let alone even try.
Sent from my SM-T537R4 using Tapatalk
Brother in law needed help getting his crankshaft bolt off his car, he broke an impact and 2 breaker bars on it. So I made him a bulletproof breaker bar/cheater. Worked great broke the bolt with a small push.
- Attachments
-
- 20150217_193046.jpg (42.74 KiB) Viewed 1685 times
-
- 20150217_193106.jpg (46.69 KiB) Viewed 1685 times
GeekWithWelder
- GeekWithWelder
-
New Member

-
Posts:
-
Joined:Fri Feb 20, 2015 3:11 pm
Neat trick on the breaker bar.
Protip: if you don't have time or inclination to fab this, use a 1/2" breaker bar, a pipe for leverage against the ground, and after determining which way it needs to spin, set it in place and crank the car.
Engines make GREAT breaker bars.
Protip: if you don't have time or inclination to fab this, use a 1/2" breaker bar, a pipe for leverage against the ground, and after determining which way it needs to spin, set it in place and crank the car.
Engines make GREAT breaker bars.

- Superiorwelding
-
Weldmonger
-
Posts:
-
Joined:Thu Jan 24, 2013 10:13 pm
-
Location:Eddy, TX
Show,
That is a breaker bar and a half!! Just be careful not to snap the bolts off with that much leverage! Looks great though.
-Jonathan
That is a breaker bar and a half!! Just be careful not to snap the bolts off with that much leverage! Looks great though.
-Jonathan
Instagram- @superiorwelding/@learntotig
Twitter- @_JonathanLewis
https://www.learntotig.com
https://www.superiorweldandfab.com
https://www.youtube.com/+SuperiorWeldin ... ATHANLEWIS
Twitter- @_JonathanLewis
https://www.learntotig.com
https://www.superiorweldandfab.com
https://www.youtube.com/+SuperiorWeldin ... ATHANLEWIS

- MinnesotaDave
-
Weldmonger
-
Posts:
-
Joined:Sun Oct 27, 2013 10:57 pm
-
Location:Big Lake/Monticello MN, U.S.A.
I did that accidentally on an 80's ford inline 6 - worked great - then I put the bolt back where it belonged...GeekWithWelder wrote:Neat trick on the breaker bar.
Protip: if you don't have time or inclination to fab this, use a 1/2" breaker bar, a pipe for leverage against the ground, and after determining which way it needs to spin, set it in place and crank the car.
Engines make GREAT breaker bars.
Good thing it removed the bolt instead of tightening and breaking it.
Dave J.
Beware of false knowledge; it is more dangerous than ignorance. ~George Bernard Shaw~
Syncro 350
Invertec v250-s
Thermal Arc 161 and 300
MM210
Dialarc
Tried being normal once, didn't take....I think it was a Tuesday.
Beware of false knowledge; it is more dangerous than ignorance. ~George Bernard Shaw~
Syncro 350
Invertec v250-s
Thermal Arc 161 and 300
MM210
Dialarc
Tried being normal once, didn't take....I think it was a Tuesday.
GeekWithWelder wrote:Neat trick on the breaker bar.
Protip: if you don't have time or inclination to fab this, use a 1/2" breaker bar, a pipe for leverage against the ground, and after determining which way it needs to spin, set it in place and crank the car.
Engines make GREAT breaker bars.
They were going to try that, however in one of their attempts with the impact wrench they were using it cause the upper cam pully to jump some teeth on the very worn out belt they were trying to fix. I advised them against cranking the engine so they didnt bend any valves.
danielbuck
- danielbuck
-
Guide

-
Posts:
-
Joined:Tue Jan 21, 2014 7:56 pm
-
Location:Gilroy, CA
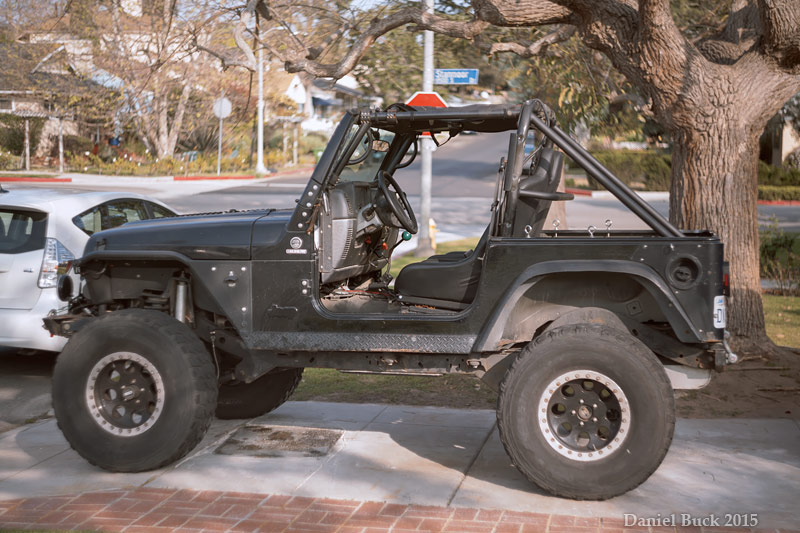
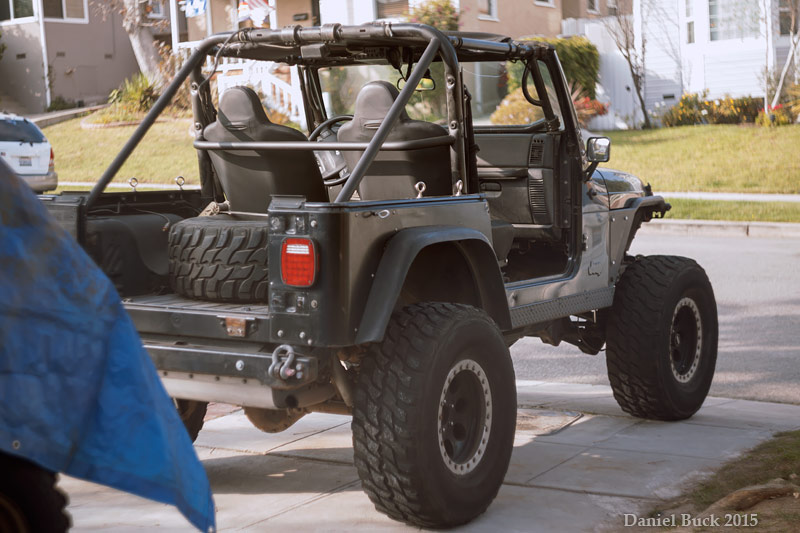
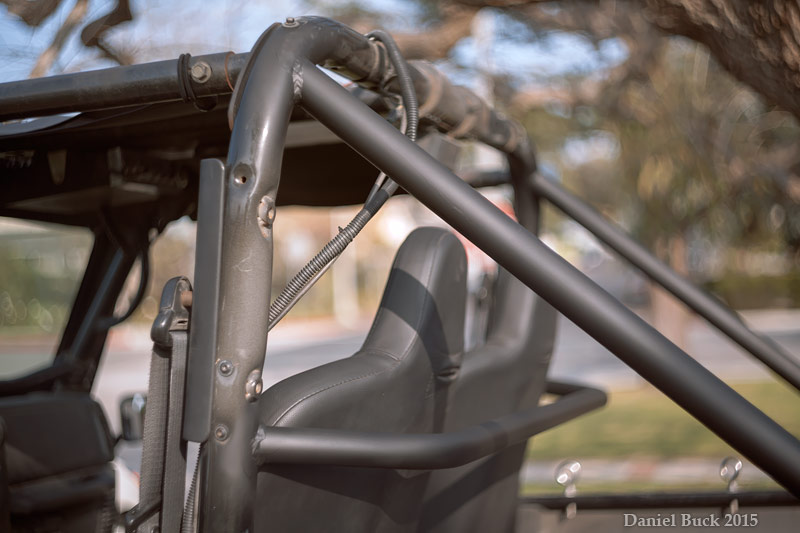
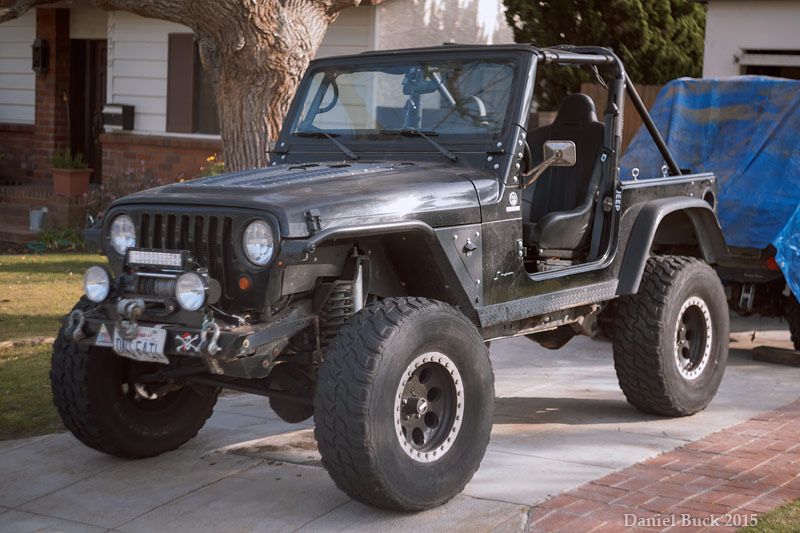
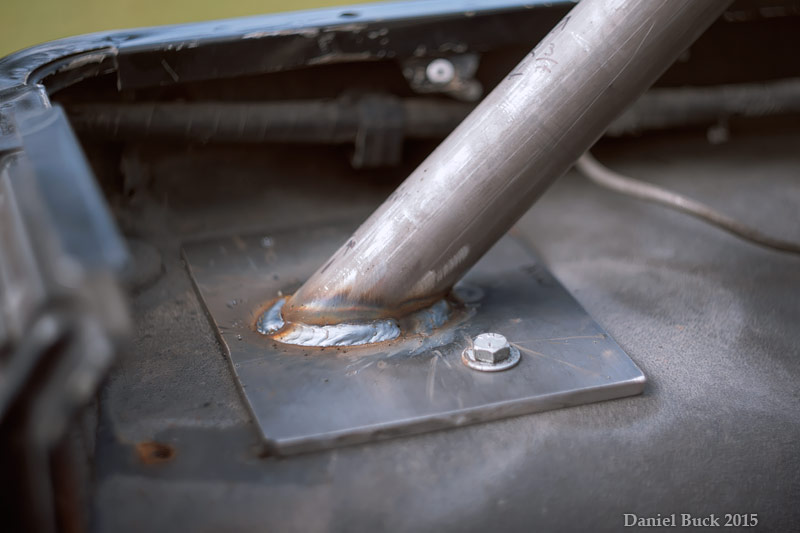
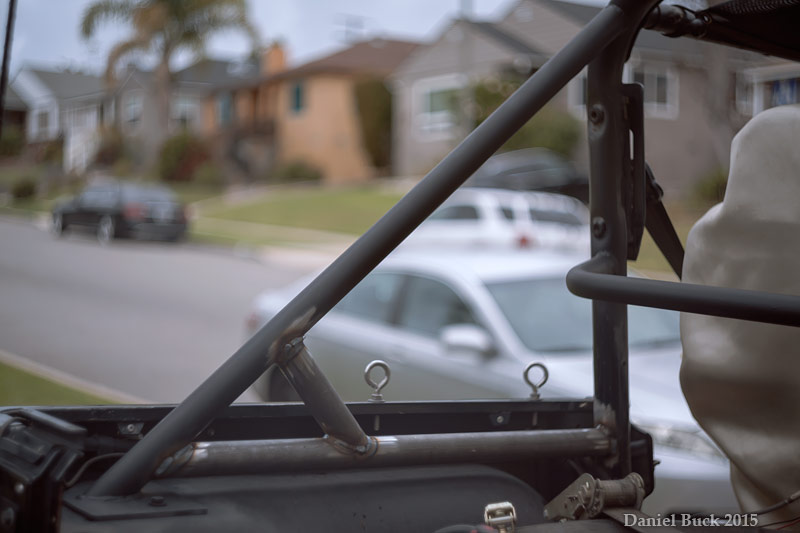
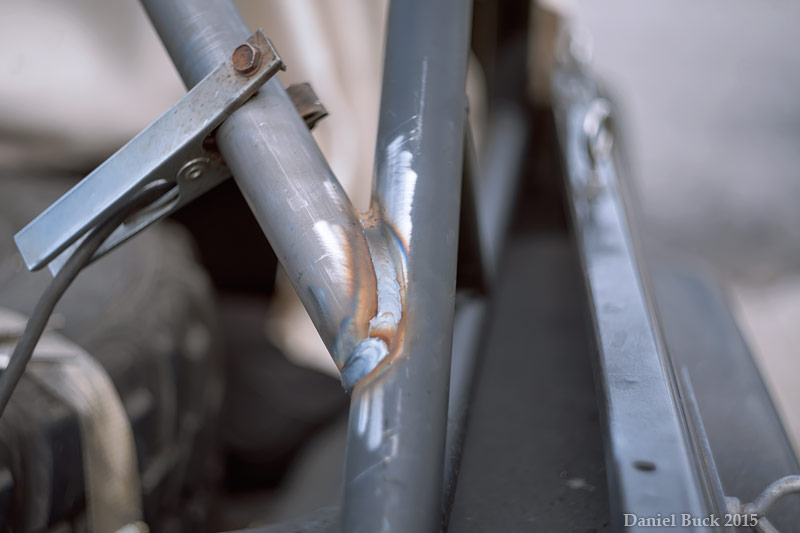
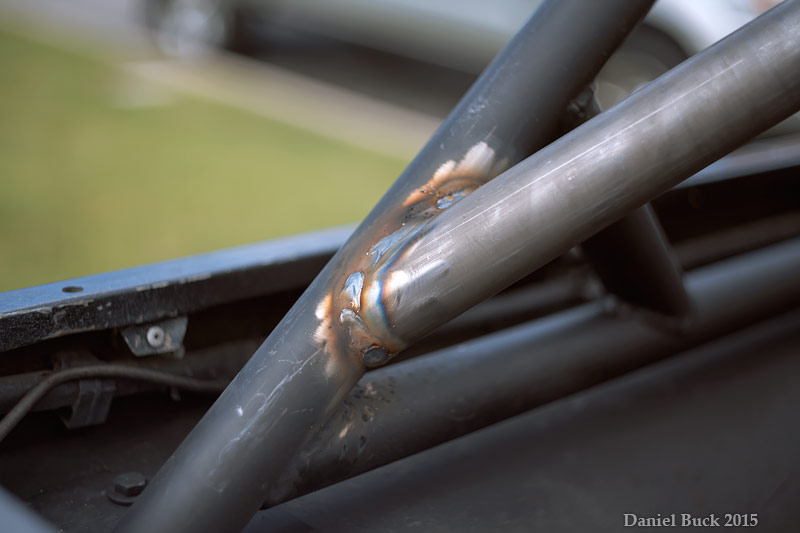
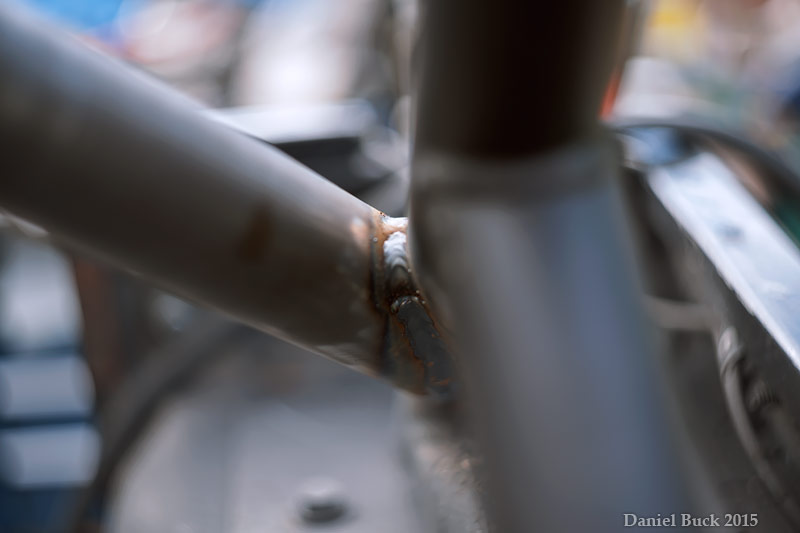
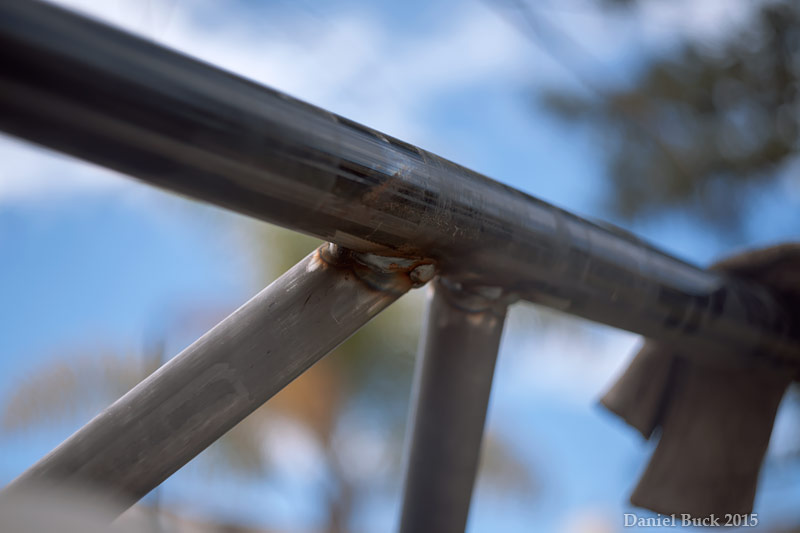
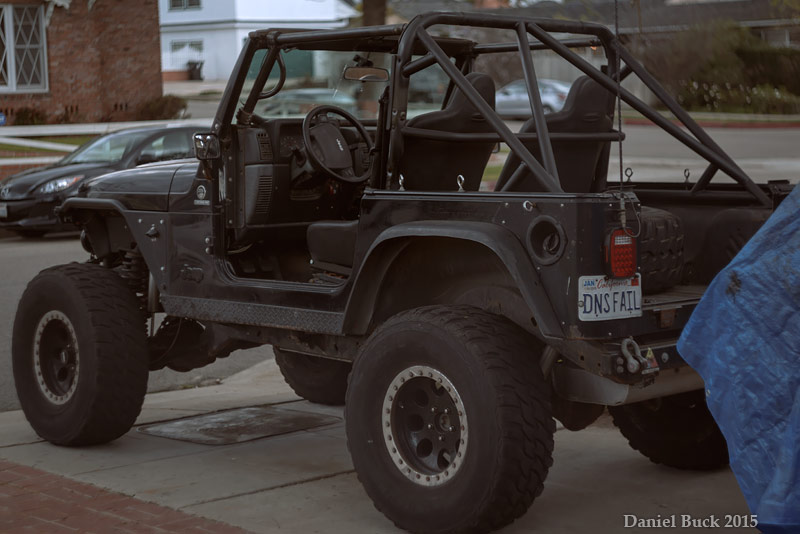
I'm replacing the bolt-in roll cage parts on my TJ with fully welded DOM tubing, and running the tubes to the frame. Today I got the C pillar (the area behind the bar that is above the seats) cut and welded in place, as well as the harness bar that wraps behind the seats where the 5 point harness will eventually go. Tomorrow I'll add gussets to all of the intersections, next week I'll continue moving forward
danielbuck
- danielbuck
-
Guide
-
Posts:
-
Joined:Tue Jan 21, 2014 7:56 pm
-
Location:Gilroy, CA
- Superiorwelding
-
Weldmonger
-
Posts:
-
Joined:Thu Jan 24, 2013 10:13 pm
-
Location:Eddy, TX
Daniel,
Nice work there! I would like to build a full chassis off road buggy. I need to fine a rich guy (or girl) and build them one. Keep up the good work!
-Jonathan
Nice work there! I would like to build a full chassis off road buggy. I need to fine a rich guy (or girl) and build them one. Keep up the good work!
-Jonathan
Instagram- @superiorwelding/@learntotig
Twitter- @_JonathanLewis
https://www.learntotig.com
https://www.superiorweldandfab.com
https://www.youtube.com/+SuperiorWeldin ... ATHANLEWIS
Twitter- @_JonathanLewis
https://www.learntotig.com
https://www.superiorweldandfab.com
https://www.youtube.com/+SuperiorWeldin ... ATHANLEWIS
- Superiorwelding
-
Weldmonger
-
Posts:
-
Joined:Thu Jan 24, 2013 10:13 pm
-
Location:Eddy, TX
It has been a while again since I have posted here. We have been working on this testing frame for the past few months to test the capacities of the machine I posted pics of on pages 7 and 8 of this thread. Basically the Pipe Inserter will sit on top of this frame structure and push 30" seamless pipe against 4 hydraulic cylinders to measure the force it can produce. We claim to be able to hit 1.2 million pounds of thrust in both the push and pull of the Pipe Inserter. This will verify our claim as well as having a independent testing company fly in for the test.
The I beams are W36x330 and all plate material is A500. It has actually been a fun project but we are all ready to see the test. Now we have to disassemble the Inserter and reassemble it on the frame. It will be a couple months before the actual test and I will try to get pics up of the whole thing assembled.
-Jonathan
- Attachments
-
- image.jpg (93.93 KiB) Viewed 1564 times
-
- image.jpg (85.4 KiB) Viewed 1564 times
-
- image.jpg (90.95 KiB) Viewed 1564 times
Instagram- @superiorwelding/@learntotig
Twitter- @_JonathanLewis
https://www.learntotig.com
https://www.superiorweldandfab.com
https://www.youtube.com/+SuperiorWeldin ... ATHANLEWIS
Twitter- @_JonathanLewis
https://www.learntotig.com
https://www.superiorweldandfab.com
https://www.youtube.com/+SuperiorWeldin ... ATHANLEWIS

- weldin mike 27
-
Weldmonger
-
Posts:
-
Joined:Fri Apr 01, 2011 10:59 pm
-
Location:Australia; Victoria
That's a fantastic looking doohickie.. To the point, I hope you have cleaned your shop, or that is a special part of it, because I never saw any shop that clean, not even new ones.
- Otto Nobedder
-
Weldmonger
-
Posts:
-
Joined:Thu Jan 06, 2011 11:40 pm
-
Location:Near New Orleans
For the uninitiated, that spec, "W36x330", means that friggin' beam is 36" tall, and weighs 330 pounds for each foot of length.
Serious meat.
(And the "W" means the thickness of the flanges tapers from the web to the edge, with the top surface square to the web.)
Steve S
Serious meat.
(And the "W" means the thickness of the flanges tapers from the web to the edge, with the top surface square to the web.)
Steve S
- Braehill
-
Weldmonger
-
Posts:
-
Joined:Sat Jul 06, 2013 11:16 am
-
Location:Near Pittsburgh,Pennsylvania. Steel Buckle of the Rust Belt
I wish I could of got a video of the weld repair we did today. It was an old (vintage 1966) Carbon steel pipe that had a 312 stainless 6" schedule 40 elbow welded to it about 10 years ago. This was the second time this weld has failed and the whole pipe will get replaced in April. This pipe has wet CO and Hydrogen running through it at 360* and it attacks the weld from the inside out.
We boiled sh!t out of this weld and I'm very surprised that this thing passed a pressure test. It took us four hours to build scaffolding to get to where this weld was. It looked like a game of Mouse Trap on steroids. That picture of the forklift being held up by another forklift with a ladder probably looked safer than what we had to work off of.
About half way through my day, I found that somebody had shut off my explosimeter, and me normally being very calm and cool, my co-workers got to see a whole new level of pissed off when I found it off. I promised to beat them to death if they ever touched my meter again while I'm welding something. That's twice in less than a week that I got threatened with anger management classes. I'm really losing my tolerance for stupid.
Sorry no pictures in the plant, I can weld but the camera is not explosive proof, I find that a little funny.
Len
Now go melt something.
Instagram @lenny_gforce
Len
Instagram @lenny_gforce
Len
- Braehill
-
Weldmonger
-
Posts:
-
Joined:Sat Jul 06, 2013 11:16 am
-
Location:Near Pittsburgh,Pennsylvania. Steel Buckle of the Rust Belt
Worst part was, I scared them all off and had to clean up all the tools myself and break down the Mouse Trap. 
Len
Len
Now go melt something.
Instagram @lenny_gforce
Len
Instagram @lenny_gforce
Len
Return to “Mig and Flux Core - gas metal arc welding & flux cored arc welding”
Jump to
- Introductions & How to Use the Forum
- ↳ Welcome!
- ↳ Member Introductions
- ↳ How to Use the Forum
- ↳ Moderator Applications
- Welding Discussion
- ↳ Metal Cutting
- ↳ Tig Welding - Tig Welding Aluminum - Tig Welding Techniques - Aluminum Tig Welding
- ↳ Mig and Flux Core - gas metal arc welding & flux cored arc welding
- ↳ Stick Welding/Arc Welding - Shielded Metal Arc Welding
- ↳ Welding Forum General Shop Talk
- ↳ Welding Certification - Stick/Arc Welding, Tig Welding, Mig Welding Certification tests - Welding Tests of all kinds
- ↳ Welding Projects - Welding project Ideas - Welding project plans
- ↳ Product Reviews
- ↳ Fuel Gas Heating
- Welding Tips & Tricks
- ↳ Video Discussion
- ↳ Wish List
- Announcements & Feedback
- ↳ Forum News
- ↳ Suggestions, Feedback and Support
- Welding Marketplace
- ↳ Welding Jobs - Industrial Welding Jobs - Pipe Welding Jobs - Tig Welding Jobs
- ↳ Classifieds - Buy, Sell, Trade Used Welding Equipment
- Welding Resources
- ↳ Tradeshows, Seminars and Events
- ↳ The Welding Library
- ↳ Education Opportunities