mig and flux core tips and techniques, equipment, filler metal

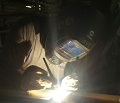
i was looking at some videos and came across one called mig like tig. i have been doing this type of welding for some time now infact it's the only way i weld now unless it's a rush job .welding this way i have found that i can have a fan blowing on me or i can weld outside with moderate winds blowing and not get pin holes in the weld.i will try to upload some pics on my welds as soon as i can.
- Attachments
-
- 20160203_152823.jpg (43.23 KiB) Viewed 1485 times
Farmwelding
- Farmwelding
-
Weldmonger

-
Posts:
-
Joined:Thu Mar 10, 2016 11:37 pm
-
Location:Wisconsin
Nice weld. At first glance it looked like a tig weld to me. What is it a part for?
A student now but really want to weld everyday. Want to learn everything about everything. Want to become a knower of all and master of none.
Instagram: @farmwelding
Nick
Instagram: @farmwelding
Nick
AdVirMachina
- AdVirMachina
-
New Member

-
Posts:
-
Joined:Thu Feb 27, 2014 10:42 pm

- MinnesotaDave
-
Weldmonger
-
Posts:
-
Joined:Sun Oct 27, 2013 10:57 pm
-
Location:Big Lake/Monticello MN, U.S.A.
Out of curiousity, what specifically is the technique you are referring to that counters wind effects and such?
Dave J.
Beware of false knowledge; it is more dangerous than ignorance. ~George Bernard Shaw~
Syncro 350
Invertec v250-s
Thermal Arc 161 and 300
MM210
Dialarc
Tried being normal once, didn't take....I think it was a Tuesday.
Beware of false knowledge; it is more dangerous than ignorance. ~George Bernard Shaw~
Syncro 350
Invertec v250-s
Thermal Arc 161 and 300
MM210
Dialarc
Tried being normal once, didn't take....I think it was a Tuesday.
- DLewis0289
-
Ace

-
Posts:
-
Joined:Sun May 01, 2016 7:46 am
-
Location:Fort Myers Florida
The old timers used to call that squirt welding (squirt used to be old slang for sub arc also). Orange circle, stop, move, wait for orange just to go out, pull trigger again. Keep the orange circles the same size and move the same distance, it looks like that, similar philosophy like bumping anodized. Looks really nice until you pull a macro. I will do it for cosmetic reasons (just did it on a fire pit table I built.) but never on anything critical service.
AWS D1.1 / ASME IX / CWB / API / EWI / RWMA / BSEE
Scientists have substituted mathematics for experiments, and they wander off through equation after equation, and eventually build a structure which has no relation to reality." Nikola Tesla
Scientists have substituted mathematics for experiments, and they wander off through equation after equation, and eventually build a structure which has no relation to reality." Nikola Tesla
- DLewis0289
-
Ace
-
Posts:
-
Joined:Sun May 01, 2016 7:46 am
-
Location:Fort Myers Florida
Here is an example of how I trigger sometimes. I just grabbed a quick scrap and ran vertical up. The guy had his machine set .035 hard wire, 28V with 75/25 so I just used it. It still has the ripple effect but I did not let it cool all the way before I pulled the trigger again. If you want really pronounced "dimes" with raised profiles you literally have to let the molten puddle completely extinguish before you "precisely lay another spot weld a 1/3 down on another spot weld".
If you could write a procedure I suppose you could try "manual pulse" operation and see if it would fly. I do know they make pulse MIG welders now but I have never had a chance to use one, am curious if anyone else has.
This is a great for square tubing, looks phenomenal as long as you have the time and it is not critical service.
- Before Cleaning
- IMG_3263 (2).jpg (109.49 KiB) Viewed 1280 times
- After brushing
- IMG_3264 (2).jpg (122.25 KiB) Viewed 1280 times
AWS D1.1 / ASME IX / CWB / API / EWI / RWMA / BSEE
Scientists have substituted mathematics for experiments, and they wander off through equation after equation, and eventually build a structure which has no relation to reality." Nikola Tesla
Scientists have substituted mathematics for experiments, and they wander off through equation after equation, and eventually build a structure which has no relation to reality." Nikola Tesla
You have to keep weld puddle wet at all times.never let it cool in between burst.and yes this is only to be done on caps.I never string off and fill welds with this procedure.now when welding school 40 pipe you can string it an then run a filler an cap all in one doing this.after 30 plus years I have never had a weld fail.
DLewis0289 wrote:Here is an example of how I trigger sometimes. I just grabbed a quick scrap and ran vertical up. The guy had his machine set .035 hard wire, 28V with 75/25 so I just used it. It still has the ripple effect but I did not let it cool all the way before I pulled the trigger again. If you want really pronounced "dimes" with raised profiles you literally have to let the molten puddle completely extinguish before you "precisely lay another spot weld a 1/3 down on another spot weld".
If you could write a procedure I suppose you could try "manual pulse" operation and see if it would fly. I do know they make pulse MIG welders now but I have never had a chance to use one, am curious if anyone else has.
This is a great for square tubing, looks phenomenal as long as you have the time and it is not critical service.
IMG_3263 (2).jpgIMG_3264 (2).jpg
If you were colder I think it would look more like you want. 16-20v is where I see most guys weld. I never see anyone weld above 22. So I am curious as to which is better.
you have to weld really hot and never let the puddle cool. i run my machine so hot that if you try to keep trigger pressed and run a full pass you will burn through the metal.if you run a cold machine the weld will fail.i run the vlots at about 25 anh higher depening in metal thickness .you don't want the wire to ever touch the puddle . when your doing it right it will look just like tig welding the puddle will amediatly wet in and penetrate . right when you release the trigger move a tiny bit and press it again do not let puddle cool you want a nice molten puddle.i will try to make a video of me welding it's kinda hard to do when i'm the only guy in the shop and i only have one shield. i use this method on boat hull repair alot too i'll tell you this every job i done they call me back because of the nice welds other welders would go out and burn stick rods or mig on the inserts and with the thin metal they end up with titties hanging down but if you master this procedure you can run nice stack of dimes on any thickness metal and people will love it. it's not something you can just set a machine and produce a weld with it will take a little bit of time to get the hang of it mainly because of the heat and the time in between trigger pressing.after you get the hang of it you'll see that you will have barely any slag to chip because it will form a very thin layer no touching up starts and stops because every puddle is a start and stop. no more stopping to change position because you will learn to move as you go. when i do hull and bulkhead welds i will make a puddle and move the gun a bit farword then let off the trigger then backup and squeaze the trigger again it sorta puts a stringer at the same time as a cap you might think that this method will take longer than a regular weld but it doesn't i welded one side of a hull while a guy welded the other and i finished before him doing it the regular way you have to spray anti splatter then string it off then come back with wire wheel then spray antisplatter again then cap it then clean up starts and stops. my way is you spray antisplatter then you string it and cap it in one pass then wire wheel it and your done.
here are some other welds on a mud mixing tank i'm redoing. you can see in the closeups there is no undercut also none if any grinding touchups.
https://imageshack.com/i/pnUXhe8kj
https://imageshack.com/i/pomOThmjj
https://imageshack.com/i/pnd8zFeSj
https://imageshack.com/i/pnLVV3y6j
https://imageshack.com/i/pnIIavc0j
https://imageshack.com/i/pnUXhe8kj
https://imageshack.com/i/pomOThmjj
https://imageshack.com/i/pnd8zFeSj
https://imageshack.com/i/pnLVV3y6j
https://imageshack.com/i/pnIIavc0j
Tommy2069 wrote:you have to weld really hot and never let the puddle cool. i run my machine so hot that if you try to keep trigger pressed and run a full pass you will burn through the metal.if you run a cold machine the weld will fail.i run the vlots at about 25 anh higher depening in metal thickness .you don't want the wire to ever touch the puddle . when your doing it right it will look just like tig welding the puddle will amediatly wet in and penetrate . right when you release the trigger move a tiny bit and press it again do not let puddle cool you want a nice molten puddle.i will try to make a video of me welding it's kinda hard to do when i'm the only guy in the shop and i only have one shield. i use this method on boat hull repair alot too i'll tell you this every job i done they call me back because of the nice welds other welders would go out and burn stick rods or mig on the inserts and with the thin metal they end up with titties hanging down but if you master this procedure you can run nice stack of dimes on any thickness metal and people will love it. it's not something you can just set a machine and produce a weld with it will take a little bit of time to get the hang of it mainly because of the heat and the time in between trigger pressing.after you get the hang of it you'll see that you will have barely any slag to chip because it will form a very thin layer no touching up starts and stops because every puddle is a start and stop. no more stopping to change position because you will learn to move as you go. when i do hull and bulkhead welds i will make a puddle and move the gun a bit farword then let off the trigger then backup and squeaze the trigger again it sorta puts a stringer at the same time as a cap you might think that this method will take longer than a regular weld but it doesn't i welded one side of a hull while a guy welded the other and i finished before him doing it the regular way you have to spray anti splatter then string it off then come back with wire wheel then spray antisplatter again then cap it then clean up starts and stops. my way is you spray antisplatter then you string it and cap it in one pass then wire wheel it and your done.
We hold the trigger till finished welding. We use xray so I know the welds are good. Just different ways to do it I guess. Yeah id love to see you trigger the weld.
Last edited by Bsmith on Sun Jun 19, 2016 4:08 pm, edited 1 time in total.
- DLewis0289
-
Ace
-
Posts:
-
Joined:Sun May 01, 2016 7:46 am
-
Location:Fort Myers Florida
Very nice!Tommy2069 wrote:here are some other welds on a mud mixing tank i'm redoing. you can see in the closeups there is no undercut also none if any grinding touchups.
https://imageshack.com/i/pnUXhe8kj
https://imageshack.com/i/pomOThmjj
https://imageshack.com/i/pnd8zFeSj
https://imageshack.com/i/pnLVV3y6j
https://imageshack.com/i/pnIIavc0j
AWS D1.1 / ASME IX / CWB / API / EWI / RWMA / BSEE
Scientists have substituted mathematics for experiments, and they wander off through equation after equation, and eventually build a structure which has no relation to reality." Nikola Tesla
Scientists have substituted mathematics for experiments, and they wander off through equation after equation, and eventually build a structure which has no relation to reality." Nikola Tesla
Return to “Mig and Flux Core - gas metal arc welding & flux cored arc welding”
Jump to
- Introductions & How to Use the Forum
- ↳ Welcome!
- ↳ Member Introductions
- ↳ How to Use the Forum
- ↳ Moderator Applications
- Welding Discussion
- ↳ Metal Cutting
- ↳ Tig Welding - Tig Welding Aluminum - Tig Welding Techniques - Aluminum Tig Welding
- ↳ Mig and Flux Core - gas metal arc welding & flux cored arc welding
- ↳ Stick Welding/Arc Welding - Shielded Metal Arc Welding
- ↳ Welding Forum General Shop Talk
- ↳ Welding Certification - Stick/Arc Welding, Tig Welding, Mig Welding Certification tests - Welding Tests of all kinds
- ↳ Welding Projects - Welding project Ideas - Welding project plans
- ↳ Product Reviews
- ↳ Fuel Gas Heating
- Welding Tips & Tricks
- ↳ Video Discussion
- ↳ Wish List
- Announcements & Feedback
- ↳ Forum News
- ↳ Suggestions, Feedback and Support
- Welding Marketplace
- ↳ Welding Jobs - Industrial Welding Jobs - Pipe Welding Jobs - Tig Welding Jobs
- ↳ Classifieds - Buy, Sell, Trade Used Welding Equipment
- Welding Resources
- ↳ Tradeshows, Seminars and Events
- ↳ The Welding Library
- ↳ Education Opportunities