What welding projects are you working on? Are you proud of something you built?
How about posting some pics so other welders can get some ideas?
User avatar
  • Posts:
  • Joined:
    Mon May 21, 2018 9:47 pm
  • Location:
    Phoenix, AZ

My wife asked me to build a table like this one:
PD_2165_ALT1.jpg
PD_2165_ALT1.jpg (14.46 KiB) Viewed 1533 times
It is 48'x24' and 36" high. Would build the legs from 2x2" stainless steel tube and the foot rest would be 2x1 while the brackets are 3x1. The top frame will be either angle or 3x2 tube, and will add with a 1” wood top surface from walnut.

Sizes aside, how can I order a specific finish -- namely polished, not necessarily buffed but without swirl marks or weld seams. As I was looking to order the material, one cannot choose the finish, for example at onlinemetals.com. She wants a nice furniture finish, but don't necessarily want to finish it myself; will do it if no other option, and if it is possible at all. I have several sanders from woodworking with grits as high as 320-400, with surfaces from aluminum oxide, plastic mesh, or a type of foam (Festool Flies).

Any advice re: suppliers and grade of polish to request? Thank you .
Last edited by koenbro on Wed Nov 28, 2018 7:02 am, edited 1 time in total.
HTP Invertig 221H w/ Arctic Chill cooler and CK20 torch
Lincoln MP210 -- SOLD
Optrel Crystal 2.0
User avatar
  • Posts:
  • Joined:
    Fri Apr 01, 2011 10:59 pm
  • Location:
    Australia; Victoria

I found recently that a fine grit on a random orbital sander gives a good looking finish. If it comes with a grain pattern a scotch brite pad does a good job of replacing any grain patterns where the joins are..... Ask me how I know.
cj737
  • Posts:
  • Joined:
    Thu Sep 29, 2016 8:59 am

Stainless typically comes in either a mill finish (flat stock), a #4 finish (sheet is matte/brushed) or possibly a #8 (bright, EXPENSIVE). If you ring up onlinemetals (or email them) you can ask what specific finish their rectangular tubing comes in. Rectangular tubing from them is probably available in #4. That will save you heaps of time, but bust your wallet.

If it comes in a mill finish, you're in for some enormous work. I literally just finished (pardon the pun) a small job for an architect's office bathrooms. One component was 2-1/2x0.25x48 for a backsplash. Only available in mill finish. The amount of work to hand sand off the mill scale, then run successive grits on my linear polisher to achieve a #8 took hours per piece (2 pieces).

Stainless is very soft. I would discourage you from an orbital sander, but a palm can work. I'd start with 120 grit. Then 180, 320, then 400. I would then move to wet sanding or successive ScothBrite pads (Red, then Green, then Grey). This might get you to a #4+ finish without obvious scratches and swirls. Any way you look at it, you're for some serious work sanding 4 sides on those pieces. I even experimented with fly-cutting one piece on my mill to see if the end product was more easily achieved. It was a trade off in time and not worth it.

You can also reach out to MetalSupermarkets.com They have franchise locations and any of them can ship the product to you if one is not nearby.
cj737
  • Posts:
  • Joined:
    Thu Sep 29, 2016 8:59 am

Some other things you should understand welding stainless (since your intro post explained you're new to TIG)-

That structure, whether stainless, carbon or aluminum, needs venting holes in the intersecting tubes when you weld it. For instance, if you weld the stretcher tube to the leg, fully weld the seam on both ends, the heat and gas accumulated inside the tube has no escape. It will blow out the last bit of your weld. Instead, drill a small hole in each intersection so as you close one tube, the gas evacuates into the next tube. Leave the legs open at the top with even a small hole drilled in the top plate to close the leg. Make sense?

Welding stainless will make the pieces move. A LOT. Every bead you weld, will distort the intersecting angle. Keeping things square will be your biggest challenge. You need to be very patient. Weld a bit, let it cool, check/adjust your squares, weld some more. Repeat.

That structure will be very heavy too. Handling it while welding will be a nuisance and you're apt to scratch it up. So extra hands after you get portions assembled to rotate it around are very helpful.

If you order the material from OnlineMetals, it will likely need to be cut by you. Cutting stainless is not fun. Use coolant/cutting fluid, and not WD-40. Cutting oil for drilling holes, and cutting the ends is really necessary. Avoid using a file on the ends. This introduces carbon steel into the stainless and that will rust. Use a flap disc to blend edges.

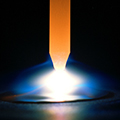
If your fit is good and tight, you can weld without filler. You need a large cup (#12 is my recommendation) and a gas lens. Sharpen the point. Use pulse on your machine if it is available. Rule of thumb is 80% of the amps for carbon steel when welding stainless. (If you're welding 1/8" carbon, run 125 amps. For stainless, run 100 amps or less). Stainless welds will crack easily if you don't use sufficient gas coverage during post flow. Run gas until the tungsten and weld are silver. Too much color in your welds means too much heat. Welding travel speed is 2x faster than you think you can ;) Get a puddle, and haul butt!

I would suggest you choose cold rolled steel for that project. Price, ease, and weldability will make your outcome much more successful until you bend the TIG learning curve. And it can look just as beautiful. In fact, I'd use cold rolled and silicon bronze filler for a handmade, industrial look. Easier to weld with SilBr and plenty strong for the application.

Hope this is received as intended, helpful and constructive. Good luck!
bruce991
  • Posts:
  • Joined:
    Tue Jan 05, 2016 10:31 pm
  • Location:
    Central Michigan

All good advice. I worked in food industry and exclusively SS. In addition to advice given your material if sheet will have a cover adhered to the polished or finished side. Resist removing it until all done or you easily scratch it. As stated a 2 by 2 piece of square tube with a piece welded perpendicular will distort a whole lot. Go at it very slow let cool one section or side then opposite side cool and so on. Manage the movement.
User avatar
  • Posts:
  • Joined:
    Mon May 21, 2018 9:47 pm
  • Location:
    Phoenix, AZ

cj737 wrote:Some other things you should understand welding stainless (since your intro post explained you're new to TIG)
[...]
Hope this is received as intended, helpful and constructive. Good luck!
That was VERY helpful. Thank you, I am grateful for you sharing this wealth of knowledge. Hope I can contribute meaningful advice like this later, once I gain experience.

Thinking more about it, I concluded that I am not ready to do that table. A workbench for the garage: yes. Furniture grade stuff in the kitchen which is the center of our house: no. Aside from the limited skills, I priced out the metals, at about $500 with shipping, casters + threaded inserts at $130, while the 1" (or 4/4 as woodworkers call it) top would easily be a few more hundreds even if I buy narrow boards and Domino them together (I am experienced with woodworking). I'd hate to mess up midway with some distorted (or distorting) weld. So I told my wife it's probably better to buy it.
HTP Invertig 221H w/ Arctic Chill cooler and CK20 torch
Lincoln MP210 -- SOLD
Optrel Crystal 2.0
cj737
  • Posts:
  • Joined:
    Thu Sep 29, 2016 8:59 am

Look, you have to start SOMEWHERE with your welding projects. So don't shy away today from a project that you can always "exchange" the metal later. That is partly why I suggested cold rolled or hot rolled. Weld it up. In 2-3 years, your skills will have matured to a point where you feel confident to do it over. Besides, paint and a grinder hide LOTS of "learning" :D

I've got TONS of things in my house and shop that I welded "early on". I look upon some of them as time capsules. Some, with embarrassment. The things I am embarrassed by, I redo. The others are timestamps that I learn from. There's no humiliation in learning and trying. Heck, I don't know anyone that was great at welding their first year. Or second.

Start with cheaper metal and less elegant design. Cut your teeth. The wood top you can reuse and transplant so whatever money you spend on that, is not lost. The base, you can re-use in the shop for another project later. Or use it for practice cutting with an oxygen torch ;)
bruce991
  • Posts:
  • Joined:
    Tue Jan 05, 2016 10:31 pm
  • Location:
    Central Michigan

I built my own dining table with square steel tubing (cheap) and a hardwood oak top purchased custom online then once frame made neighbor does powder coating for that. Then I bought self leveling epoxy for the top of the table. You may want to consider that option.
Table with runner.JPG
Table with runner.JPG (51.23 KiB) Viewed 1370 times
User avatar
  • Posts:
  • Joined:
    Mon May 21, 2018 9:47 pm
  • Location:
    Phoenix, AZ

bruce991 wrote:You may want to consider that option.
Table with runner.JPG
Sorry man, the client is very specific ;-)


Sent from my iPhone using Tapatalk
HTP Invertig 221H w/ Arctic Chill cooler and CK20 torch
Lincoln MP210 -- SOLD
Optrel Crystal 2.0
Post Reply