What welding projects are you working on? Are you proud of something you built?
How about posting some pics so other welders can get some ideas?
av8or1

So I took a lunch break today to head out to the local steel supplier that I use, then a stop by the local welding supply store. Put simply, my workshop has become (and been) too cluttered. And for a while now if I am honest. Just too many spare parts, some of them large, like hoods, fenders, etc. And so if you can't go outward, you go upward. With that thought rummaging around in my gray matter for some time, I finally decided to get-to-work on creating a storage rack. The idea is to build something rather rudimentary; nothing intricate or exotic. The goal being to have the ability to store some things up-in-the-air a bit. I can then place things beneath that rack too, thus effectively doubling the storage. I have a secondary use in mind for the rack, but more on that in a bit.

So here is a good example of the issue:
cluttered space.jpg
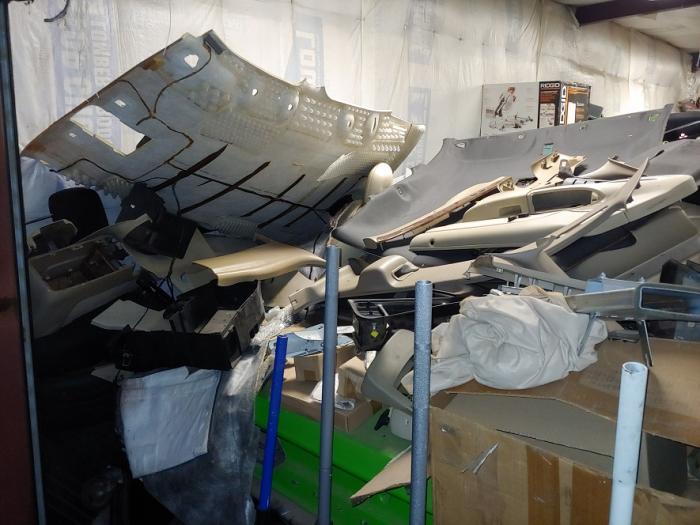
cluttered space.jpg (55.58 KiB) Viewed 4273 times
Just lots of stuff placed up against the wall with nothing above that. Most of what you see there are the interior parts that I've removed from the wife-eee's Crown Victoria, which is the car that I am essentially building from scratch. Thus most of that will come out of there eventually. However that area could still do with a better storage solution.

Due to the relative simplicity of the build, I haven't bothered sketching up a diagram of this rack. That's not good practice though, so I'll likely put pencil-to-paper within the next few days. I'll post pictures of those plans afterwards, just in the event that anyone is morbidly curious...

That said, the general idea is to use 2" x 2" x 1/8" tubing throughout with the following dimensions:

12' span (width)
5' 2" height (floor to the top of the support members, doesn't include the thickness of the diamond plate)
33" depth (front-to-back, based entirely off of the available space at that location in my particular workshop)

I plan on having 6 vertical support members due to the rather lengthy span, with gusseting at each of those verticals. On the bottom are some 900-lb rated casters from Caster City with side wheel locks. And I'll do the usual diamond plate cut-to-length on the top, with 7 cross members for support underneath that plate.

All-in I'll have a little less than $800, assuming that I leave the design as-is and don't add anything to it. I am considering a backing of some sort for the upper part of the rack, that way you aren't leaning things against the wall, but I dunno. TBD.

I digress. So I picked up the material from the supplier:
materials 1.jpg
materials 1.jpg (241.71 KiB) Viewed 4273 times
And this time I elected to do all of the cutting myself to save a bit on cost but mostly time. They currently have an approximate lead time of 1 week for cutting. Bleech. No. Didn't want to wait that long. This build will require just over 80' of tubing IIRC, and this particular tubing comes to the supplier in 12' sticks. For that reason I opted to just purchase 7 of those 12-footers, a 10' strip of 2" x 1/8" flat bar (to cover the open ends of the tubing and then have lots of extra on-hand for future projects) and a full sheet of 4' x 8' diamond plate. Since there was no cutting involved I was able to pick it up the next day.

This is getting rather long. More in the next post.
Last edited by av8or1 on Fri Sep 25, 2020 10:03 am, edited 2 times in total.
av8or1

So that was the materials side of things. Now for the welding. I decided that I'd just 7018 this build, since the rack is unlikely to hold anything insanely heavy. Thus no need for 6010 is my point, and given the relative thinness of the 2" x 2" x 1/8" tubing, a good 7018 pass should be more than sufficient.

That said, I didn't want to use any of my current supply of 1/8" Excalibur 7018 rods. This was the primary reason I stopped by the welding supply store today actually. I wanted to pick up some 3/32" 7018 rods instead. I think that those will serve me better in this particular application. They didn't have any of the usual 10-lb cans in stock of the 3/32" however. So I just brought home two 5-pounders. No big deal.

Funny but I decided that I would put the new plasma table to good use, even though I wouldn't be doing any plasma cutting just yet. I will do that for the diamond plate, yes, but that'll be last dontchaknow. First was to cut the tubing to length. I set the chop saw on the plasma table and went to work:
cutting 1.jpg
cutting 1.jpg (81.62 KiB) Viewed 4269 times
Since the table is slightly higher than the flatbed, I needed to use some of the material to level the work piece(s) but hey, that's rudimentary stuff in the fabrication world, right?
cutting 2.jpg
cutting 2.jpg (231.24 KiB) Viewed 4269 times
I had heard of fellas just cutting stuff right out of the back of the truck before, but must admit to never having done it myself. I've always brought it inside and put it on a work bench or the ground or whatever else. Gotta give this approach credit ... it works well and saves the hassle of carting all this mess inside prior to even beginning any work!

Anyway I finished the majority of the cutting tonight, but that is as far as I could get. Unfortunately the summer nights are disappearing and darkness is befalling us earlier and earlier. Since I have so little room in the workshop, that means that most of the fab work I do is conducted outside. Thus the seasons have a direct impact on my ability to get stuff done. I used to setup all manner of outside lighting in order to continue working, but I've grown too old for that these days ... just don't tolerate the flying insect headaches as well as I used to ... :lol:
av8or1

Now for the secondary "mystery" use that I alluded to in the first post. Well, part of the reason that I chose the height of this rack is because the majority of the types of stuff that I need to store underneath the rack would fit underneath a 5' rack. The other reason is that I want to be able to easily reach the stuff that I store on the top of the rack, so much higher than that and you're pressing your luck if whatever you're removing (or adding for that matter) has any heft to it.

That said, another reason for the height is that it just-so-happens to clear the top of the Crown Victoria's roof by a couple of inches or so, maybe less. And so the very first task that this rack will accomplish is to support my old, heavy tail end while I cut the hole in the roof of the wife-eee's dream car build. I figure the more stable that I am when doing the cutting with the plasma the better. And since I needed a rack in the workshop for storage anyway, why not build one that could be used in the vehicular endeavor? :D

Ok. Thank you for reading.
BugHunter
  • Posts:
  • Joined:
    Sun Apr 19, 2020 12:54 pm

av8or1 wrote: Unfortunately the summer nights are disappearing and darkness is befalling us earlier and earlier. Since I have so little room in the workshop, that means that most of the fab work I do is conducted outside. Thus the seasons have a direct impact on my ability to get stuff done. I used to setup all manner of outside lighting in order to continue working, but I've grown too old for that these days ... just don't tolerate the flying insect headaches as well as I used to ... :lol:
I probably would be building it using 2x4s and framing lumber, but steel is nice too I suppose. Might be cheaper than framing lumber and ply wood these days. :D

Yes, you'd better get crack'n! At my location I"m losing about 15 minutes of daylight each week.
https://www.sunrisesunset.com/USA/
av8or1

BugHunter wrote:I probably would be building it using 2x4s and framing lumber, but steel is nice too I suppose. Might be cheaper than framing lumber and ply wood these days. :D

Yes, you'd better get crack'n! At my location I"m losing about 15 minutes of daylight each week.
https://www.sunrisesunset.com/USA/
Yeah dunno why, but I just never was into the whole wood working thing. Didn't even consider it for this storage rack. I enjoy welding too much; for that reason I am generally on-the-hunt for "welding projects". Which translates to "anything that might possibly need welding". :D

You're correct, the days are growing noticeably shorter. Uuuuuggghhhh. Back to that "need a bigger workshop" notion ...
Last edited by av8or1 on Fri Sep 25, 2020 1:21 pm, edited 1 time in total.
av8or1

Well the casters arrived today:
casters 1.jpg
casters 1.jpg (219.68 KiB) Viewed 4224 times
Funny that, as there was no tracking information. Caster City did get them here in three days though. Thus it is difficult to be too disappointed in that result.

I find these casters quite favorable for this application! Rated at 900 lbs each (which is rather low to my brain somehow after the gantry work - hah!) they are likely overkill. However as always, I am a fan of overkill. Thus they will work quite well for me it seems.
casters 2.jpg
casters 2.jpg (213.33 KiB) Viewed 4224 times
In case you were curious:
https://shop.castercity.com/ProductDeta ... e=9DS5x2-S
BugHunter
  • Posts:
  • Joined:
    Sun Apr 19, 2020 12:54 pm

Wow, they're proud of them ain't they! :lol:

Gonna stick with HF for ole Buggy... :D
av8or1

BugHunter wrote:Wow, they're proud of them ain't they! :lol:

Gonna stick with HF for ole Buggy... :D
Ole Buggy?
av8or1

Ok so time was limited today, as I had watch-the-lil-un duty after work while the wife-eee did our almost-weekly shopping. I keep telling her that I'll do that but she wants out of the house for brief respites and thus insists on going. So I dragged the-son outdoors and attempted to have him help, though I wouldn't let him anywhere near the chop saw and in fact kept it unplugged anytime he was in the immediate area. :D He did assist with keeping track of how many gussets we cut though. He correctly counted down from 14, as that was the number we needed to cut tonight:
cutting 3.jpg
cutting 3.jpg (63.91 KiB) Viewed 4180 times
However progress beyond that was slow-going, as the gantry has taken on a second life/purpose as his pirate ship, and daddy had to be the first mate. I know ... "wha-???" Yeah, a gantry = pirate ship. :lol:

Anyway I did get them into primer as well as the supports for the diamond plate, so I suppose that at the end of it all that is progress, which is better than nothing:
cutting 4.jpg
cutting 4.jpg (27.26 KiB) Viewed 4180 times
I would like to finish this off tomorrow ASAP. However there I go again, imposing a deadline instead of enjoying a project - hah! The mini-me 3" grinder FINALLY showed up from HF today, so I must make a run to the local store tomorrow to return it. And the almost-customary weekend grill duties. Apart from that I should have time so with luck I can complete the build then.

Thank you for reading.
av8or1

There were family duties to be had today and so time wouldn't be as plentiful as I had hoped. Still, I managed to make some progress, however meager and slow-going it was. I found that although the tubing itself wasn't heavy, the length made it rather unwieldy. I had planned on at least installing all of the legs today, but for various reasons that didn't happen. I began with a simple join, utilizing the plasma table to hold the tubing in rough position:
storage rack 1.jpg
storage rack 1.jpg (233.91 KiB) Viewed 4135 times
And the second one I found easiest to mount/join while the tubing was simply placed on the ground:
storage rack 2.jpg
storage rack 2.jpg (226.83 KiB) Viewed 4135 times
av8or1

I also found that I needed to muck around with the settings a bit. I took a SWAG that 85A would be an ok starting point on 1/8" tubing with a 3/32" rod. Somehow that seemed a tad hot really, but it was a beginning. Indeed, that was on the tad-high side, as I blew through in a couple of places. I then dropped it all the way down to 65A in order to fill those two holes. In the end I dialed things in at 70A. Which even now seems a tad cold, but boy, it sure caused that tubing to turn bright/cherry red after running just a 2" bead. And so I left it at that.

This was all of the progress that I was able to muster today:
storage rack 3.jpg
storage rack 3.jpg (70.63 KiB) Viewed 4139 times
I spent a fair amount of time on material prep too. The sheer length resulted in another time sink to complete that task, as one might expect.

Anyway. We'll see what tomorrow brings.

Hope all is well!
Last edited by av8or1 on Sun Sep 27, 2020 8:57 am, edited 1 time in total.
DavidR8
  • Posts:
  • Joined:
    Fri Apr 17, 2020 12:50 am
  • Location:
    Vancouver, Canada

Looking good!


Sent from my iPhone using Tapatalk
David
Millermatic 130
Primeweld 225
BillE.Dee
  • Posts:
  • Joined:
    Mon Nov 27, 2017 8:53 pm
  • Location:
    Pennsylvania (Northeast corner)

I really like the plasma table build. Did you intentionally build it that height to work off the back of your truck? And are you able to weld thru the primer?
BugHunter
  • Posts:
  • Joined:
    Sun Apr 19, 2020 12:54 pm

The other day I burned a few 3/32 6013 rods that have been laying around the shop for 25 years. The results weren't ideal since they had been in a box that was open on the end and were fairly dirty, but I did find the heat range which I liked to be around 50 to 55 amps. Even 60 and 65 seemed way too hot for them.
av8or1

BillE.Dee wrote:I really like the plasma table build. Did you intentionally build it that height to work off the back of your truck? And are you able to weld thru the primer?
Well, I wish I could claim such clairvoyance. However that simply is not the case. The plasma table being the approximate height of the flatbed on Da Beast is a fortunate happenstance. Actually the table is an inch or so higher, but it works out well just the same. Having that table was a great help with this project, and in several ways. Therefore I am glad that I finished that build...

Stick will burn through paint, whatever. The best welds are done against bare metal as we all know, and so I strive to do that. However "in a pinch" as Jody might say, I have stick welded against this rusty metal primer. And yeah, it burned through it like it wasn't there. Same goes for weld-thru primer of course, though clearly that is a different animal.
av8or1

BugHunter wrote:The other day I burned a few 3/32 6013 rods that have been laying around the shop for 25 years. The results weren't ideal since they had been in a box that was open on the end and were fairly dirty, but I did find the heat range which I liked to be around 50 to 55 amps. Even 60 and 65 seemed way too hot for them.
Interesting. I've watched Jody's videos regarding 6013 and based on what I've seen there it seems unlikely that I'll ever use one of those rods. I stick weld for penetration and strength; otherwise I'd use a different process, if able given the work area. Since I'm outdoors mostly, I stick weld for that reason primarily actually, unless I do FCAW. Anyway it might be interesting to run a few 6013 beads to see the difference I think, but in actual application, eh ... 'prolly not.

Dialing in the settings that are the most favorable for a given context is kinda fun actually. When I have the right mindset though. :lol: If I am in get-it-done mode, then not so much. However that is one of those indicators that I should slow down and remember to enjoy the build journey. Sometimes that isn't always easy to do given my type-A personality, but that's another issue altogether. :D

Thank you for those numbers!
av8or1

I did manage to make some progress today, though not quite as much as I would have liked. Eh, there I am again, falling into get-it-done mode... :D

Funny how you finally come up with a process for doing a particular task only at the end of your need to complete that task, isn't it? Well the last two verticals (that I will mount for now) saw just that: at last I had a setup that was to my liking:
storage rack 4.jpg
storage rack 4.jpg (253.48 KiB) Viewed 4036 times
One day I am so-gonna build a welding table like many of you have and that DavidR8 is building at present so that I have an easier go of doing this type of thing:
storage rack 5.jpg
storage rack 5.jpg (245.03 KiB) Viewed 4036 times
The problem with that plan at this point of course is that I have absolutely no place to put it. Heck the plasma must reside outdoors as it is, and I wouldn't want to store a welding table outside for obvious reasons. A workbench type of table sure, but not a welding table with all of those so-convenient holes and their fixtures and ... ok I'm gonna stop. 'Havin' a moment of table envy...:lol:
av8or1

With those two in position, I turned my attention to the bottom end of things. I wanted to get this thing on its feet ASAP and knew that the fabrication of those would be a time sink in and of itself. Especially since I would need to do some prep of the material prior to even being able to work with it. Furthermore, I didn't have enough coarse thread 5/8" nuts on-hand to use with the 5/8" all-thread. So a trip to the box store was in order. However that wasn't a bad thing really; we turned it into a mini-family-outing of sorts, stopping for ice cream and such (drive-thru these days). Anyway after an outing I had what I needed to fab-up the feet:
storage rack 6.jpg
storage rack 6.jpg (76.79 KiB) Viewed 4033 times
If you read the gantry thread, you might recognize these bits of plate. They were the original elements of the gantry-on-wheels sub-build. However I scrapped that first approach due to strength concerns. I kept the plate around in the scrap pile however with the notion that I'd be able to use it in a future project. And indeed that was the case; I would utilize it in this particular project in fact. Those plates already had an 11/16" hole drilled in them, which means that I could easily slide the 5/8" all-thread through them. And on the inside of course would be a captive for the all-thread to find a home:
storage rack 7.jpg
storage rack 7.jpg (43.59 KiB) Viewed 4033 times
These plates would then be welded to the bottom of the verticals to form the foundation of the rack's feet.
av8or1

However the bend in the plates on the left needed removal:
storage rack 8.jpg
storage rack 8.jpg (203.34 KiB) Viewed 4032 times
If they were to lay flat and without an awkward "lip" of sorts. I still had the chop saw on the cart, so I set it up and went to work:
storage rack 9.jpg
storage rack 9.jpg (77.65 KiB) Viewed 4032 times
av8or1

So after some repetition those plates were prepared for their new role:
storage rack 10.jpg
storage rack 10.jpg (61.99 KiB) Viewed 4032 times
Note that these plates are over-sized in regard to their new function in life. For that reason, I wasn't concerned with the straightness nor size of cut nor orientation to the center hole. These will need to be cut further down to size later on. I plan on using the plasma to do that, but TBD.

Then it was time to decide how long to make each bit of all-thread, since the saw was already out. I won't be able to weld on a nut to the ends of these, since the all-thread will live between two pieces of plate. However I wanted a decent amount of adjustment ability. So I settled on 10":
storage rack 11.jpg
storage rack 11.jpg (59.24 KiB) Viewed 4032 times
Last edited by av8or1 on Mon Sep 28, 2020 12:11 am, edited 1 time in total.
av8or1

So after all of that (and other unlisted) prep, the bits were ready to be "assembled":
storage rack 12.jpg
storage rack 12.jpg (63.47 KiB) Viewed 4039 times
Here is a good example of how well the plasma table is serving this project. I needed to weld the captives to one side of the 1/4" plate that will then in turn be welded to the verticals. To keep it aligned, I've found through trial-n-error that it's best to thread the all-thread into the nut and hold it in position (somehow). To accomplish the latter, I decided to simply employ gravity by letting the all-thread hang down through the slats in the table. Thus:
storage rack 13.jpg
storage rack 13.jpg (57.2 KiB) Viewed 4039 times
av8or1

That sure worked well:
storage rack 14.jpg
storage rack 14.jpg (49.77 KiB) Viewed 4038 times
It kept the nut in position while I tacked it on each of the 6 sides, no problem. What was a bit of an issue for me is using a 7018 rod to tack with ... boy is that ever not the strong suit of a 7018. I recall a video in which Jody mentioned that a 6010 is a good rod for tacking, and based on my experience with it I can readily agree. However I couldn't be bothered to return to the workshop and come back with a handful of them, then change the settings on the machine, then use them, then switch back ... oh no, I was in that get-it-done mode dontchaknow. So I muddled through, developing a system that employed a sanding pad for a 7" grinder. That worked most of the time but not always... Anyway. I proceeded by first configuring all 6 of them in order to approach the work in "factory mode":
storage rack 15.jpg
storage rack 15.jpg (210.55 KiB) Viewed 4038 times
av8or1

Tacking issues aside, I made it through:
storage rack 16.jpg
storage rack 16.jpg (64.84 KiB) Viewed 4037 times
And put both sides into primer:
storage rack 17.jpg
storage rack 17.jpg (61.37 KiB) Viewed 4037 times
To give them time to dry prior to installing them on the verticals.
av8or1

While that was happening I applied my go-to rusty metal primer to the verticals that I had installed earlier in the day:
storage rack 18.jpg
storage rack 18.jpg (225.98 KiB) Viewed 4038 times
storage rack 19.jpg
storage rack 19.jpg (69.65 KiB) Viewed 4038 times
av8or1

I then mocked up one of the casters onto the 3/16" plate that they will be affixed to via routine hardware:
casters 3.jpg
casters 3.jpg (56.17 KiB) Viewed 4038 times
casters 4.jpg
casters 4.jpg (70.98 KiB) Viewed 4038 times
At that point it was time to rummage through the spare hardware that I keep on-hand to see what could be had. Boy, talk about a time sink. I don't have this organized into those lil' drawers or any other type of organization for that matter. Need to do that, but space ... just don't have much of it ... not to repeat myself too much on that front, but ... Anyway almost an hour later with various bits strewn around the workbench I came to the conclusion that I just didn't have what I needed in all of that mess. Sigh. So that means a return to a big box store prior to being able to do anything further with the feet. Oh joy! :D: Perhaps I can do that tomorrow after work, TBD.
Post Reply