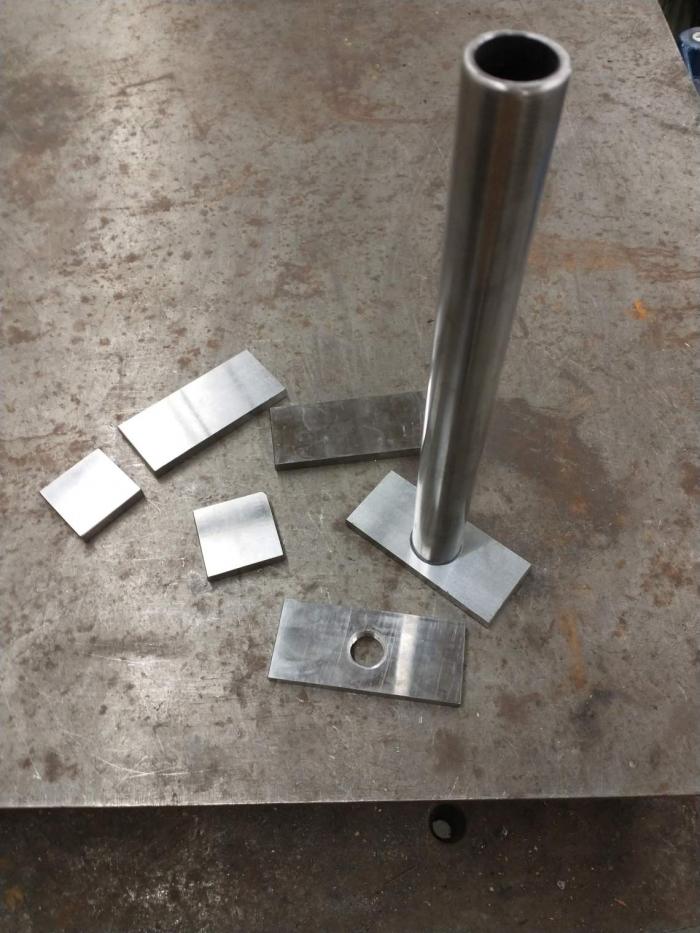
Jody did a video a while back about a hammer he made. I modified the materials and dimensions some and made one for myself after work tonight. Figured it'd be a fun project, and it was.
Used 3/8 x 4 hot rolled stock and cut it into 1-3/4" pieces for the 4 sides, then one more piece cut in half for the two faces. Grabbed a hunk of DOM tubing I had laying around to make the handle.
In his video, I believe he said his was 1/4" steel 2x4 pieces and 2x2 faces. Also he had cold rolled so he didn't need the surface grinder.

Began with the dry-cut saw which did a beautiful job of cutting the parts. All of em, tubing, plug, and 3/8" flat stock. Didn't take any pics of that.

I don't think it took 15 seconds to cut 3/8" x 4 pieces. The saw cut so nice the 1-3/4" piece which was cut off didn't even move when the blade passed by and no part had any burr. Impressive.
Off to the grinder to make the parts look pretty.

- IMG_20210126_144213783_MP.jpg (65.29 KiB) Viewed 3232 times

- IMG_20210126_144924905.jpg (46.71 KiB) Viewed 3232 times
Then went to the milling machine to get the parts equal width. There's no stop on my saw for part width.

- IMG_20210126_151601671_HDR.jpg (86.71 KiB) Viewed 3232 times
Parts are ground and polished, drilled, tapped for the plug, and ready to start assembly.
- IMG_20210126_161440820.jpg (84.74 KiB) Viewed 3232 times
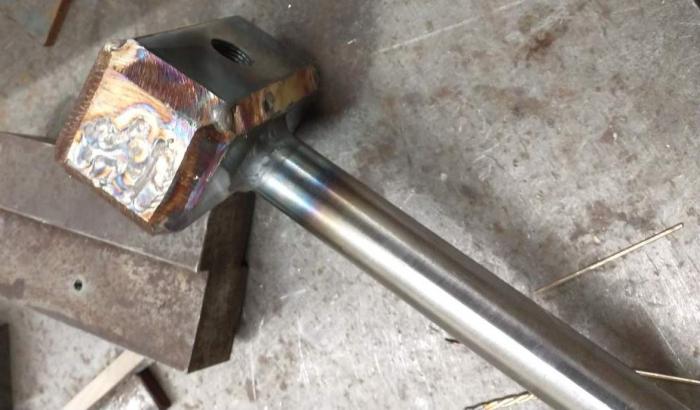
Tacking up the parts

- IMG_20210126_164721838.jpg (39.47 KiB) Viewed 3232 times

- IMG_20210126_170213375.jpg (46.16 KiB) Viewed 3232 times
Welding up the thing. Yea, I didn't care that it got toasty!

- IMG_20210126_174203300.jpg (40.53 KiB) Viewed 3232 times
Stuck the silicon bronze in the fillets and padded beads on the faces.

- IMG_20210126_184252725.jpg (42.79 KiB) Viewed 3232 times
Ground the stuff off and had lots of areas that I felt were better off patching up rather than just grinding deeper to get all the low spots, so I did some touch-up with the SB.
- IMG_20210126_190144788.jpg (42.12 KiB) Viewed 3232 times
Final product ready for me to figure out what handle to stick on it, and how to finish it up. Might paint the handle with clear, and I"m not sure what to do with the head of the thing. Who knows, maybe clear it all and just let the SB faces exposed after taping them off.

- IMG_20210126_191303761.jpg (48.07 KiB) Viewed 3232 times
I haven't decided what to do with the handle. For balance I might stick a chunk of solid material inside the last 3 or 4 inches. Perhaps a press fit, jam it in with the arbor press then weld the thing fast at the bottom. Never can tell with me.
I should also mention, if you use 3/8" stock, probably ought to do a second fill pass with the ER70S2. Without, you're using a LOT of silicon bronze!