
Yeah, sick, isnt it...?MinnesotaDave wrote:- the hours spent on it
What welding projects are you working on? Are you proud of something you built?
How about posting some pics so other welders can get some ideas?
How about posting some pics so other welders can get some ideas?
Thanks guys

Pictures from my scrap collection:
http://forum.weldingtipsandtricks.com/v ... f=9&t=5677
http://forum.weldingtipsandtricks.com/v ... f=9&t=5677

- MinnesotaDave
-
Weldmonger

-
Posts:
-
Joined:Sun Oct 27, 2013 10:57 pm
-
Location:Big Lake/Monticello MN, U.S.A.
Yep - A very nice piece of work indeed - and a crazy amount of hoursAndersK wrote:Thanks guysYeah, sick, isnt it...?MinnesotaDave wrote:- the hours spent on it
Did you use flow forming or just hammer it out?
Looks like a good candidate for flow forming.
Dave J.
Beware of false knowledge; it is more dangerous than ignorance. ~George Bernard Shaw~
Syncro 350
Invertec v250-s
Thermal Arc 161 and 300
MM210
Dialarc
Tried being normal once, didn't take....I think it was a Tuesday.
Beware of false knowledge; it is more dangerous than ignorance. ~George Bernard Shaw~
Syncro 350
Invertec v250-s
Thermal Arc 161 and 300
MM210
Dialarc
Tried being normal once, didn't take....I think it was a Tuesday.
I used a mdf form with routed edges to hammer the lids on.
The torch and the flame was pressed using a steel die and rubber.
Have about 30 hours in it
The torch and the flame was pressed using a steel die and rubber.
Have about 30 hours in it
Pictures from my scrap collection:
http://forum.weldingtipsandtricks.com/v ... f=9&t=5677
http://forum.weldingtipsandtricks.com/v ... f=9&t=5677
this is not a welding question but i am interested how you were able
to make such nice curved corners on the bottom and lid of the aluminum
torch case?
craig
to make such nice curved corners on the bottom and lid of the aluminum
torch case?
craig
htp invertig 221
syncrowave 250
miller 140 mig
hypertherm plasma
morse 14 metal devil
syncrowave 250
miller 140 mig
hypertherm plasma
morse 14 metal devil
- MinnesotaDave
-
Weldmonger
-
Posts:
-
Joined:Sun Oct 27, 2013 10:57 pm
-
Location:Big Lake/Monticello MN, U.S.A.
Even with a form, that's some pretty fancy hammeringAndersK wrote:I used a mdf form with routed edges to hammer the lids on.
The torch and the flame was pressed using a steel die and rubber.
Have about 30 hours in it
30 hours is a lot faster than I would have done it
Dave J.
Beware of false knowledge; it is more dangerous than ignorance. ~George Bernard Shaw~
Syncro 350
Invertec v250-s
Thermal Arc 161 and 300
MM210
Dialarc
Tried being normal once, didn't take....I think it was a Tuesday.
Beware of false knowledge; it is more dangerous than ignorance. ~George Bernard Shaw~
Syncro 350
Invertec v250-s
Thermal Arc 161 and 300
MM210
Dialarc
Tried being normal once, didn't take....I think it was a Tuesday.
About the same method as in the later posts in this thread:motox wrote:this is not a welding question but i am interested how you were able
to make such nice curved corners on the bottom and lid of the aluminum
torch case?
craig
http://forum.weldingtipsandtricks.com/v ... 505#p35702
but working on the outside of the wood with hammers and mallets
You can google hammerforming for more info about this method
Pictures from my scrap collection:
http://forum.weldingtipsandtricks.com/v ... f=9&t=5677
http://forum.weldingtipsandtricks.com/v ... f=9&t=5677
Repaired three deck chairs yesterday that had got a kinked tube. Have no idea what happened to them (not mine) but I think they got damaged in delivery.
Cut it out and made a new tube, 22x2mm 6063
Here's it rigged. Had to pull in the "arms" since they spread when I cut the tube.
Got a good fit, makes welding much easier.
One of the welds, welded upside-down. Nothing to brag about but I'm pleased with the result.
Getting more comfortable with aluminum as I get more practice. Just have to practice more to avoid putting the filler on the tungsten and not let the bead grow to touch the tip, and wait for the heat to build up before dipping.
Settings 80 Amps, manual pulsing (no pedal) 50% cleaning and 200 Hz. Up-slope 1s, down-slope 3s
Arctime 2,4mm tungsten. Filler is 2,4 mm 5356.
- IMG208.jpg (69.02 KiB) Viewed 6869 times
Here's it rigged. Had to pull in the "arms" since they spread when I cut the tube.
- IMG313.jpg (84.3 KiB) Viewed 6869 times
- IMG323.jpg (61.93 KiB) Viewed 6869 times
- IMG322.jpg (64.8 KiB) Viewed 6869 times
Settings 80 Amps, manual pulsing (no pedal) 50% cleaning and 200 Hz. Up-slope 1s, down-slope 3s
Arctime 2,4mm tungsten. Filler is 2,4 mm 5356.
Pictures from my scrap collection:
http://forum.weldingtipsandtricks.com/v ... f=9&t=5677
http://forum.weldingtipsandtricks.com/v ... f=9&t=5677
jwright650
- jwright650
-
Ace

-
Posts:
-
Joined:Wed Dec 03, 2014 3:27 pm
I agree with Dave...awesome torch box!MinnesotaDave wrote:That gas torch box is stunning - the hours spent on it show - nicely done!
John Wright
AWS Certified Welding Inspector
NDT Level II UT, VT, MT and PT
NACE CIP Level I Coating Inspector
AWS Certified Welding Inspector
NDT Level II UT, VT, MT and PT
NACE CIP Level I Coating Inspector
I noticed some of you like metal art so here's a piece I made some years ago.
Its made of 1 mm mild steel with the wings wire-edged for stability. All parts made by hand except the wing pattern
Its made of 1 mm mild steel with the wings wire-edged for stability. All parts made by hand except the wing pattern
- DSC_0149.jpg (31.29 KiB) Viewed 6791 times
Pictures from my scrap collection:
http://forum.weldingtipsandtricks.com/v ... f=9&t=5677
http://forum.weldingtipsandtricks.com/v ... f=9&t=5677

- AKweldshop
-
Weldmonger
-
Posts:
-
Joined:Wed Oct 23, 2013 3:30 pm
-
Location:Palmer AK
That stool looks pretty hard.
You should get a bottle of stool softener.
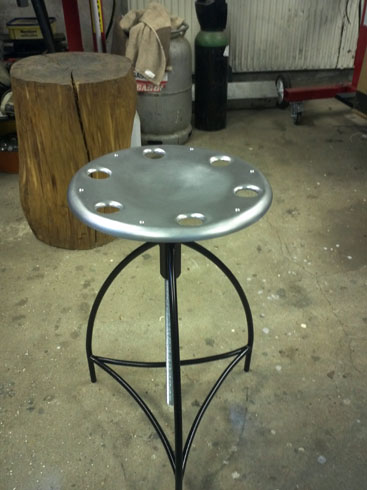

You should get a bottle of stool softener.
Just a couple welders and a couple of big hammers and torches.
Men in dirty jeans built this country, while men in clean suits have destroyed it.
Trump/Carson 2016-2024
Men in dirty jeans built this country, while men in clean suits have destroyed it.
Trump/Carson 2016-2024
If that is what I think it is then there will be sitting on another chair , a long time
Pictures from my scrap collection:
http://forum.weldingtipsandtricks.com/v ... f=9&t=5677
http://forum.weldingtipsandtricks.com/v ... f=9&t=5677
Was welding some 1,5 mm to 4 mm diamond plate tonight. I dont have much time with ali but this went easier than I first thought. Beveled the edges down to half thickness of the plate and pushed the sheet up to top level. 100 Amps, melted down the excess sheet and used little more than a half rod of 1,6 5356 filler for a half meter weld.
Looking alright?
Should I do a fillet weld on the outside or just put some sealer after the cap is welded in? It will sit under a car.
Looking alright?
Should I do a fillet weld on the outside or just put some sealer after the cap is welded in? It will sit under a car.
- IMG_2015031911638.jpg (48.2 KiB) Viewed 7186 times
- IMG_2015031959358.jpg (45.51 KiB) Viewed 7186 times
- IMG_2015031916793.jpg (46.58 KiB) Viewed 7186 times
- IMG_201503191471.jpg (39.74 KiB) Viewed 7186 times
Pictures from my scrap collection:
http://forum.weldingtipsandtricks.com/v ... f=9&t=5677
http://forum.weldingtipsandtricks.com/v ... f=9&t=5677

- TRACKRANGER
-
Weldmonger
-
Posts:
-
Joined:Wed Aug 06, 2014 12:48 am
-
Location:Melbourne, Australia
I'm intrigued.AndersK wrote:Was welding some 1,5 mm to 4 mm diamond plate tonight. I dont have much time with ali but this went easier than I first thought. Beveled the edges down to half thickness of the plate and pushed the sheet up to top level. 100 Amps, melted down the excess sheet and used little more than a half rod of 1,6 5356 filler for a half meter weld.
Looking alright?
Should I do a fillet weld on the outside or just put some sealer after the cap is welded in? It will sit under a car.
What's it actually used for?
EWM Phonenix 355 Pulse MIG set mainly for Aluminum, CIGWeld 300Amp AC/DC TIG, TRANSMIG S3C 300 Amp MIG, etc, etc
There will be a fuel tank on the diamond plate. A catch tank will be hiding behind the alu shell. Will put a fitting thru a grommet on the domed part and connect fuel line there.
The alu shell is only there to keep dirt out.
This is the joint I did
The alu shell is only there to keep dirt out.
This is the joint I did
- IMG_20150322_133408.JPG (63.43 KiB) Viewed 7152 times
Pictures from my scrap collection:
http://forum.weldingtipsandtricks.com/v ... f=9&t=5677
http://forum.weldingtipsandtricks.com/v ... f=9&t=5677

Editing my post. Sorry was not trying to hijack this thread. I should have read it clearly before I posted pictures of a couple of "my" projects. Pics = deleted.
Lets start over.... I love that stool. Nice work! I wish I could do that.
Lets start over.... I love that stool. Nice work! I wish I could do that.
No worries mate, I just kept mine in a single project thread to find it easier. Dont mind at all if anybody posts anything else.
Thanks for the stool comnent. As I use to say, if I can do it so can you.
Just some planning, patience and simple tools needed. Even made this with a broken toe, steel toed shoes was the most comfortable to wear at that time so why not doing something fun to forget the pain
Thanks for the stool comnent. As I use to say, if I can do it so can you.
Just some planning, patience and simple tools needed. Even made this with a broken toe, steel toed shoes was the most comfortable to wear at that time so why not doing something fun to forget the pain
Last edited by AndersK on Thu Dec 29, 2016 11:09 pm, edited 1 time in total.
Pictures from my scrap collection:
http://forum.weldingtipsandtricks.com/v ... f=9&t=5677
http://forum.weldingtipsandtricks.com/v ... f=9&t=5677
More tank work tonight. Welded a 316 1/4" BSP fitting.
- IMG_201504084469.jpg (42.02 KiB) Viewed 3725 times
- IMG_2015040838202.jpg (33.05 KiB) Viewed 3725 times
Pictures from my scrap collection:
http://forum.weldingtipsandtricks.com/v ... f=9&t=5677
http://forum.weldingtipsandtricks.com/v ... f=9&t=5677
exnailpounder
- exnailpounder
-
Weldmonger
-
Posts:
-
Joined:Thu Dec 25, 2014 9:25 am
-
Location:near Chicago
Hey Anders! I'm curious about your settings. I do a good bit of welding on beer kegs for homebrewers lately so I weld alot of thick fittings to 18ga.SS. What were you running?
Ifyoucantellmewhatthissaysiwillbuyyouabeer.
Sheet is 1,5 mm
Using a pedal, max 45 amps
1,6 mm 2% thoriated
Gaslens with #4 cup
1 mm 316 filler.
I start with the arc focused on the fitting. When it gets wet, angle down and start adding filler when sheet and fitting start to fuse together.
Using a pedal, max 45 amps
1,6 mm 2% thoriated
Gaslens with #4 cup
1 mm 316 filler.
I start with the arc focused on the fitting. When it gets wet, angle down and start adding filler when sheet and fitting start to fuse together.
Pictures from my scrap collection:
http://forum.weldingtipsandtricks.com/v ... f=9&t=5677
http://forum.weldingtipsandtricks.com/v ... f=9&t=5677
Jeff, do you back purge those kegs when welding the fittings?
Pictures from my scrap collection:
http://forum.weldingtipsandtricks.com/v ... f=9&t=5677
http://forum.weldingtipsandtricks.com/v ... f=9&t=5677
exnailpounder
- exnailpounder
-
Weldmonger
-
Posts:
-
Joined:Thu Dec 25, 2014 9:25 am
-
Location:near Chicago
I do. I bought an argon bottle just for that purpose. I have made various purge boxes for sparge tanks and HLTs ( kegs with the top cut out) and have a nice setup for intact kegs. Been working out great. Welding thick to thin can be tricky...need to move fast but stainless welds so nice is has gotten easy. I love welding stainless. Your work looks nice.AndersK wrote:Jeff, do you back purge those kegs when welding the fittings?
Ifyoucantellmewhatthissaysiwillbuyyouabeer.
Had an idea for a work light I had to get out of my head.
Made it from aluminum and steel. It has a 5,5W LED light in it and is fully adjustable in all directions
Some welding content 
The steel parts are 0,9 mm thick, thinner at the rear dome after all hammering.
Welded with minimum of filler and then planished.
Made it from aluminum and steel. It has a 5,5W LED light in it and is fully adjustable in all directions
- IMG_20160127_51490.jpg (51.5 KiB) Viewed 3731 times
- IMG_20160127_27168.jpg (28.24 KiB) Viewed 3731 times
- IMG_20160130_1258.jpg (33.35 KiB) Viewed 3731 times
- IMG_20160130_13116.jpg (34.18 KiB) Viewed 3731 times
Welded with minimum of filler and then planished.
Pictures from my scrap collection:
http://forum.weldingtipsandtricks.com/v ... f=9&t=5677
http://forum.weldingtipsandtricks.com/v ... f=9&t=5677
Another Metalshaping project.
- IMG_20170927_10826.jpg (68.12 KiB) Viewed 3560 times
- IMG_20170927_1162.jpg (61.89 KiB) Viewed 3560 times
- IMG_20170927_42741.jpg (36.99 KiB) Viewed 3560 times
- IMG_20170927_3675.jpg (34.77 KiB) Viewed 3560 times
- IMG_20170927_47992.jpg (30.26 KiB) Viewed 3560 times
- IMG_20170927_4602.jpg (24.51 KiB) Viewed 3560 times
- IMG_20170927_40805.jpg (29.55 KiB) Viewed 3560 times
- IMG_20170927_7266.jpg (37.93 KiB) Viewed 3560 times
- IMG_20170927_52102.jpg (35.64 KiB) Viewed 3560 times
Pictures from my scrap collection:
http://forum.weldingtipsandtricks.com/v ... f=9&t=5677
http://forum.weldingtipsandtricks.com/v ... f=9&t=5677
- Wood Welder
-
Active Member

-
Posts:
-
Joined:Mon Jun 20, 2016 4:53 pm
-
Location:Southern California
This box is awesome. I tried metal spinning on my lathe to make an 18" Venturi and it was a disaster.AndersK wrote:Not any welding here, just wanted to show a box I made for my gas torches.
Made in 1,5mm aluminum with stainless handle and hatch.
Once again, I could by a cheap box but what do one learn from that?
I could have welded the lids so the rivets is just for the cool factor.DSC_0333.jpgDSC_0331.jpgDSC_0332.jpgDSC_0336.jpg
Can you guide me to a video of the process to form metal like these boxes? The details are incredible.
Lincoln 100 amp transformer MIG w/flux core wire
HF TIG w/no pedal for steel & stainless, Stick w/3/32 6011,7018
Formerly: Victor O/A and Lincoln 225 AC buzz box
Looking to upgrade
Bikes-XR250, CRF230
HF TIG w/no pedal for steel & stainless, Stick w/3/32 6011,7018
Formerly: Victor O/A and Lincoln 225 AC buzz box
Looking to upgrade
Bikes-XR250, CRF230
Return to “Welding Projects - Welding project Ideas - Welding project plans”
Jump to
- Introductions & How to Use the Forum
- ↳ Welcome!
- ↳ Member Introductions
- ↳ How to Use the Forum
- ↳ Moderator Applications
- Welding Discussion
- ↳ Metal Cutting
- ↳ Tig Welding - Tig Welding Aluminum - Tig Welding Techniques - Aluminum Tig Welding
- ↳ Mig and Flux Core - gas metal arc welding & flux cored arc welding
- ↳ Stick Welding/Arc Welding - Shielded Metal Arc Welding
- ↳ Welding Forum General Shop Talk
- ↳ Welding Certification - Stick/Arc Welding, Tig Welding, Mig Welding Certification tests - Welding Tests of all kinds
- ↳ Welding Projects - Welding project Ideas - Welding project plans
- ↳ Product Reviews
- ↳ Fuel Gas Heating
- Welding Tips & Tricks
- ↳ Video Discussion
- ↳ Wish List
- Announcements & Feedback
- ↳ Forum News
- ↳ Suggestions, Feedback and Support
- Welding Marketplace
- ↳ Welding Jobs - Industrial Welding Jobs - Pipe Welding Jobs - Tig Welding Jobs
- ↳ Classifieds - Buy, Sell, Trade Used Welding Equipment
- Welding Resources
- ↳ Tradeshows, Seminars and Events
- ↳ The Welding Library
- ↳ Education Opportunities