Tig welding tips, questions, equipment, applications, instructions, techniques, tig welding machines, troubleshooting tig welding process
musccoo
  • Posts:
  • Joined:
    Mon Feb 12, 2018 4:54 am
  • Location:
    New Zealand

Hi guys,

I am self taught, just like doing my own and friends projects in the garage. Have got reasonably ok at mild and stainless steel tig, so thought I'd try give alloy a go.

Firstly, machine settings, Boc Smoothcraft 185 hf:
3/32 tungsten, White band (Zirconiated)
1/16 filler 5356
AC balance pretty neutral about 50%
Pure argon gas
Gas lens #8

Aluminium, not sure what type, about 2mm thick, I clean it with acetone before welding.

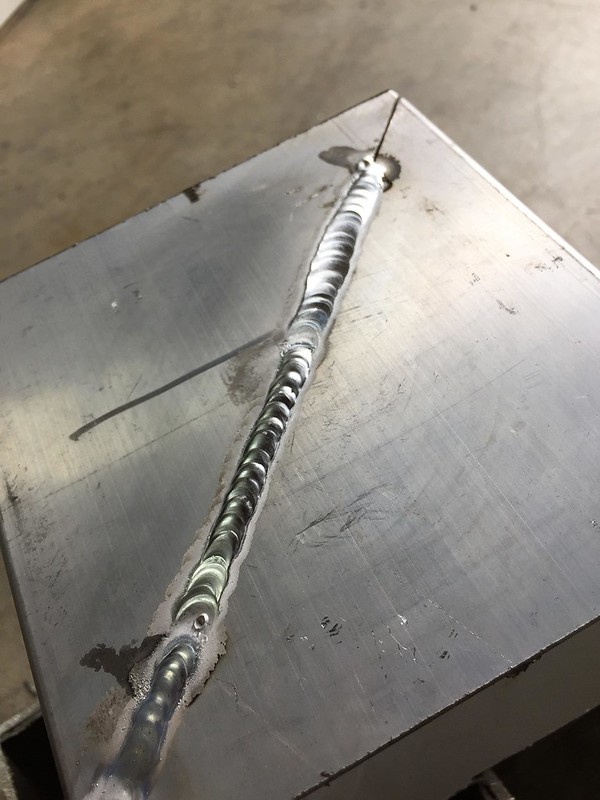
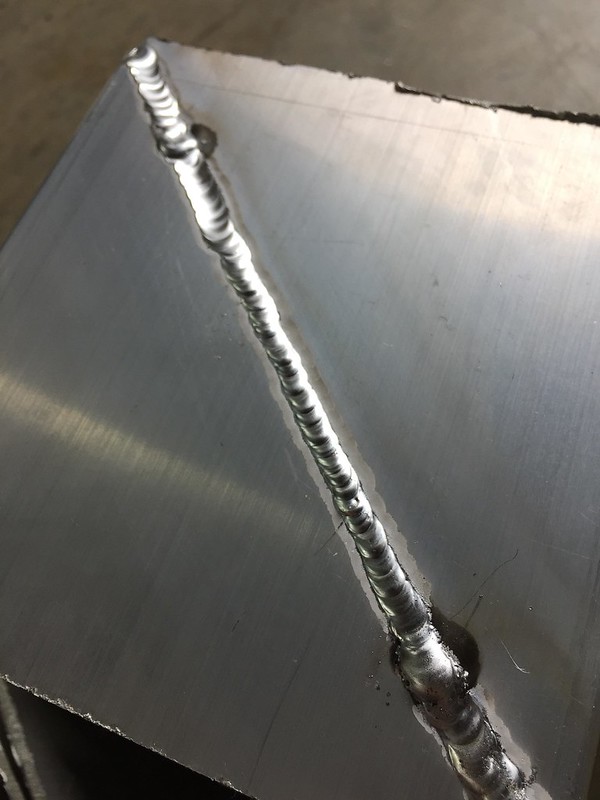
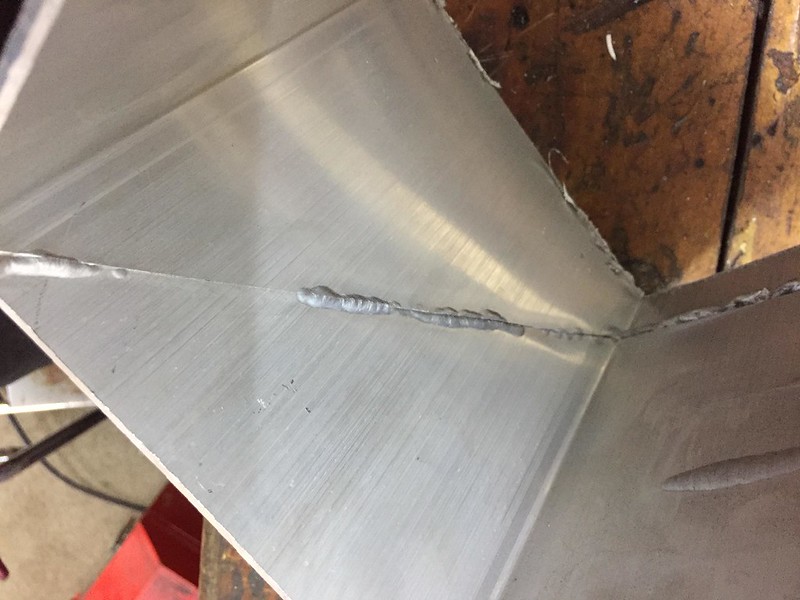
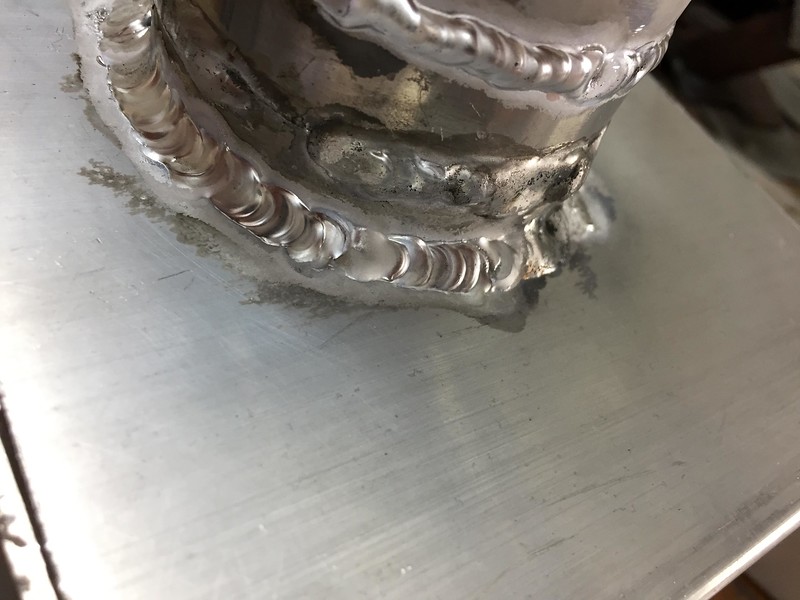
So practiced on some flat plate, varying with amperages, think I got it going ok and ended up on about 58amps (top middle ones)

Image

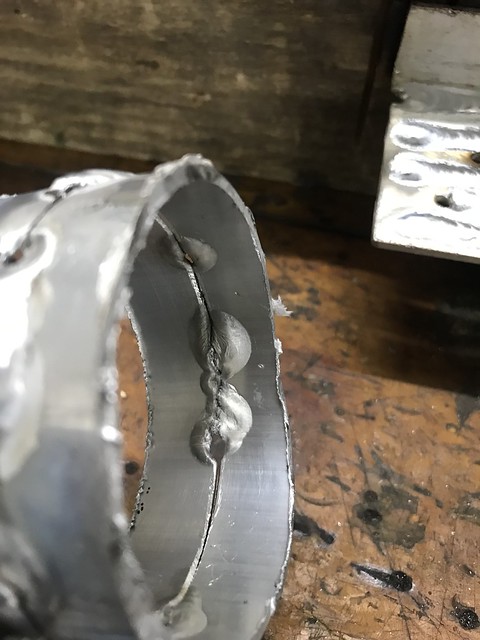
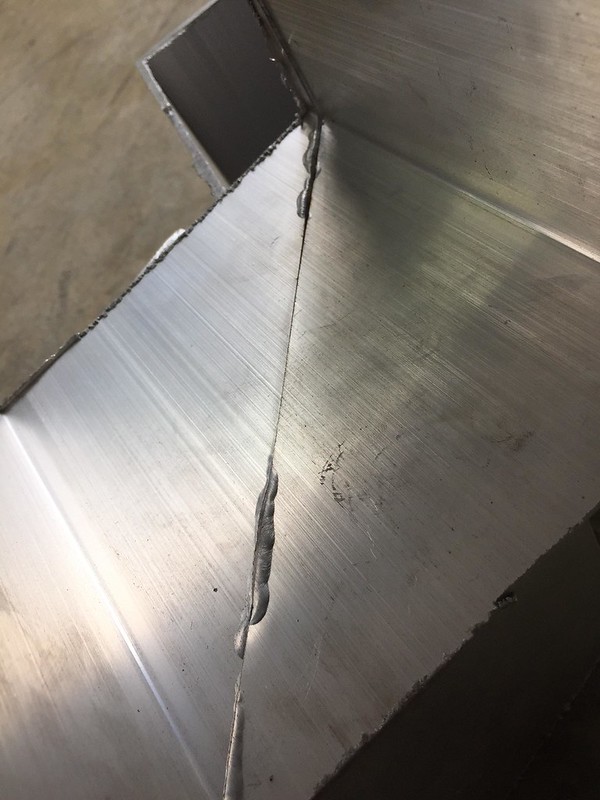
Then trying on some intercooler pipe I had lying around was an absolute disaster. Same settings and as soon as I get the puddle going it caves in.

So I keep trying turning the amps down about 5 at a time, I end up on 30amps and its still doing it. I can stuff the filler in and just try save it but its not right. Then the penetration looks messed from the other side, I doesn't even look like its penetrated, I'm really confused.

I can't even get a nice bead going.

Any help MUCH appreciated!

ImageImageImage
Image
cj737
  • Posts:
  • Joined:
    Thu Sep 29, 2016 8:59 am

Change the balance up to 70%, 50% is actually creating too much penetration.

In your two pictures of the interior of the tubing, the large “warts” is the penetration soaking through due to excessive heat and balance. Aluminum once hot, holds it heat. So get your puddle, then add filler and taper off your amperage with your pedal.your material is pretty thin, so it will be difficult to weld if you keep practicing on the same piece without allowing a significant cooling time. Or quench it with a water bucket as you practice.
User avatar
  • Posts:
  • Joined:
    Mon Nov 04, 2013 7:51 am
  • Location:
    The Netherlands

cj737 wrote:In your two pictures of the interior of the tubing, the large “warts” is the penetration soaking through due to excessive heat and balance.
Yup.. Also keep in mind that the oxide 'skin' on alu remains intact on the back side so unlike steel(s) the back won't really want to 'fuse' into a single weld but tends to stay 2 pieces. That's what usually happens.

Jody has this video where he shows the back of an alu pipe as he's welding on the front and you can see the way the back remains 'covered' by the oxide layer (around 1:38):

https://www.youtube.com/watch?v=XzsfBV6_vNY

I guess to get a smooth fused weld on the inside too you'd need to progress to a gapped style setup where the filler basically bridges the gap between the material ends and that way creates the new inner surface.

Bye, Arno.
musccoo
  • Posts:
  • Joined:
    Mon Feb 12, 2018 4:54 am
  • Location:
    New Zealand

Change the balance up to 70%, 50% is actually creating too much penetration.
Ohh right, ok that makes sense. I don't have a pedal at the moment was thinking I might get away without while I learn a bit.
So that would be why its caving in too fast...too hot and too much penetration..

Ill try change the balance, but do my amps sound about right?
Jody has this video where he shows the back of an alu pipe as he's welding on the front and you can see the way the back remains 'covered' by the oxide layer (around 1:38):

https://www.youtube.com/watch?v=XzsfBV6_vNY
Thanks his vids are great, I was looking for one like this but couldn't find it cheers!
tweake
  • Posts:
  • Joined:
    Mon Dec 18, 2017 4:53 am
  • Location:
    New Zealand

musccoo wrote: Firstly, machine settings, Boc Smootharc 185 hf:
hows the welder?
i see they are on special at the mo, looking at getting one myself. btw pedals are on special to.
tweak it until it breaks
Bill Beauregard
  • Posts:
  • Joined:
    Thu Jan 24, 2013 9:32 pm
  • Location:
    Green Mountains of Vermont

You are using far too low a current. Aluminum conducts heat FAST. The bubbling on the backside is because you had to wait around too long to get a puddle to flow. Turning up the heat, then moving faster will improve that.

Willie
cj737
  • Posts:
  • Joined:
    Thu Sep 29, 2016 8:59 am

To expand on Bill's point...

Since you are not using a pedal, and you are welding thin aluminum with thin filler, ONLY filler rod can control your heat while you weld. That means, once you get a puddle, you need to rapidly jam filler in to prevent melting the base material and getting blow-outs or burn-throughs. This is pretty challenging for a new welder.

Each time you add filler, the filler material cools the puddle to a small degree. With aluminum, the base gets hotter very quickly which is why a pedal or switch to control your amperage while you weld is very common. So you have that challenge. Then, you are relying on small filler wire which will barely cool your weld, another challenge. Until you get a pedal or switch, upsize your filler on tubing. You can still "dab" only a smaller amount (or more) and then you travel a bit quicker to control your heat-soak and prevent burn-through. Make any sense?

And welding tubing is very hard in steel, really hard with ally, and near impossible with thin ally, no pedal, and a new-to-welding welder. So you got all that going for you! :) Grab some slightly thicker material, up your amps, work in flat positions for more time to get your technique right, then work on vertical UP, edge welding, and then when you get a pedal, attack some larger tubing. Your results will be vastly different. ;)
Bill Beauregard
  • Posts:
  • Joined:
    Thu Jan 24, 2013 9:32 pm
  • Location:
    Green Mountains of Vermont

Lets use the analogy of an ice cube. Ice is liquid or solid at the same temperature; 32F. Yet the transition from solid to liquid in either direction involves 746 BTU per pound. Latent Heat Of Fusion. Dropping in Ice, even at 32 degrees will chill your drink. It won't freeze it because heat transfer slows as ice, and drink equalize in temp.

A puddle of aluminum will immediately transfer heat to filler rod. As aluminum is super efficient at conducting heat throughout the piece, the back of the weld solidifies as fast as new filler liquifies. The stack of dimes appearance comes from the rapid freezing of each puddled bit of filler. Usually stepping up a size in filler, is very beneficial. I use 3/32 filler even on very thin aluminum sheet.

When we make a fillerless weld, no chilling ice cube effect happens. Aluminum is very fragile in this not quite solid, not quite liquid state. Dipping filler, melting it, draws the heat away from the very near part where we no longer want it wet. It is no longer as weak.

Willie
noddybrian
  • Posts:
  • Joined:
    Thu Jan 24, 2013 12:13 pm

In pictures that model though basic appears to have slope down so it's still possible to get away without a pedal hitting the initial amps hard then using the downslope as a kinda pulse.
musccoo
  • Posts:
  • Joined:
    Mon Feb 12, 2018 4:54 am
  • Location:
    New Zealand

Wow thanks for all the suggestions, this forum is really helpful.
hows the welder?
i see they are on special at the mo, looking at getting one myself. btw pedals are on special to.
Yeah seems pretty good for a 'cheapy', I have an issue with the pulse not working but warranty will cover that when I can be bothered, everything else seems pretty good for the money. I might just go get the pedal lots of people recommending it
You are using far too low a current. Aluminum conducts heat FAST. The bubbling on the backside is because you had to wait around too long to get a puddle to flow. Turning up the heat, then moving faster will improve that.

Willie
Right that makes sense, I realise Alloy needs a lot more current than the equivalent thickness steel, what would be about the right current on this size? 100?
Each time you add filler, the filler material cools the puddle to a small degree. With aluminum, the base gets hotter very quickly which is why a pedal or switch to control your amperage while you weld is very common. So you have that challenge. Then, you are relying on small filler wire which will barely cool your weld, another challenge. Until you get a pedal or switch, upsize your filler on tubing. You can still "dab" only a smaller amount (or more) and then you travel a bit quicker to control your heat-soak and prevent burn-through. Make any sense?
Yeah that does make a lot of sense thanks!
In pictures that model though basic appears to have slope down so it's still possible to get away without a pedal hitting the initial amps hard then using the downslope as a kinda pulse.
It's only got down slope for end of the weld not the start. I might just go get the pedal haha
Bill Beauregard
  • Posts:
  • Joined:
    Thu Jan 24, 2013 9:32 pm
  • Location:
    Green Mountains of Vermont

noddybrian wrote:In pictures that model though basic appears to have slope down so it's still possible to get away without a pedal hitting the initial amps hard then using the downslope as a kinda pulse.
If you ski, you will understand. I've never mastered slalom skiing. I can't plan turns to match the gates.
A pulse requires you to sync your actions to the pulse in the welder. You can adjust the rate of pulse. I've never managed to synchronize dipping with the machine. Pulsing with my foot is a great deal easier for me.

Choosing a higher rate of pulse, I feel is a great way to limit the heat input while heating the weld to an adequate energy level.
noddybrian
  • Posts:
  • Joined:
    Thu Jan 24, 2013 12:13 pm

Well I don't ski either & have general coordination problems plus my damaged left hand has a mind of it's own - the more I concentrate the worse it gets - for me using a pedal just complicates the issue so I only use one as a last resort - ( mostly on thin aluminum ) & I hate them - am considering one of the pressure sensitive torch switch amptrols instead but the price is crazy high still -I do know what you mean with the pulse timing thing - though I find that easier than using a pedal - my point to the OP was that you can weld without a pedal on aluminum just not continuously - with slope down set the main amps high enough to get a puddle fast - add filler quickly before it gets too big / out of control & start to wash forward while tapering off with the slope down - once the amps get low enough the puddle solidifies hit the switch blast it again & move forward - pretty much as you would bump weld on anodized - some of the nicest welds you will see on here were done that way on boat railings - not even sure if the guy has a pedal available & the shape / size of his projects would make using one very difficult - others love the pedal & struggle to weld without it - that's why we are all different but still get the job done.
cj737
  • Posts:
  • Joined:
    Thu Sep 29, 2016 8:59 am

noddybrian wrote:...once the amps get low enough the puddle solidifies hit the switch blast it again & move forward - pretty much as you would bump weld on anodized - some of the nicest welds you will see on here were done that way on boat railings - not even sure if the guy has a pedal available & the shape / size of his projects would make using one very difficult...
This is the exact technique I use often with ally when the shape, material or position requires real control. I don't have a torch switch, but whack the pedal, use pulse (often 1.2pps, 50% on time, 20% peak) to get fast chill. Its almost like making a bunch of single hot tacks with no start or re-start.
Last edited by cj737 on Wed Feb 14, 2018 9:43 am, edited 1 time in total.
Bill Beauregard
  • Posts:
  • Joined:
    Thu Jan 24, 2013 9:32 pm
  • Location:
    Green Mountains of Vermont

There are some new torch mounted amperage controls out now. I don't have one, but some welds would benefit. I manage usually to rig a foot pedal to serve the purpose.
musccoo
  • Posts:
  • Joined:
    Mon Feb 12, 2018 4:54 am
  • Location:
    New Zealand

noddybrian wrote:my point to the OP was that you can weld without a pedal on aluminum just not continuously - with slope down set the main amps high enough to get a puddle fast - add filler quickly before it gets too big / out of control & start to wash forward while tapering off with the slope down - once the amps get low enough the puddle solidifies hit the switch blast it again & move forward - pretty much as you would bump weld on anodized
Ahhhh I get ya makes sense I'll give it a go!
musccoo
  • Posts:
  • Joined:
    Mon Feb 12, 2018 4:54 am
  • Location:
    New Zealand

So finally got a chance to have another go.. I bought a foot pedal and wow what a difference.

I found that tungsten size seems to make a huge difference with alloy. Some 3/4mm alloy I was using a 2.3mm tungsten but intercooler piping I couldn't even get a puddle going properly so had to use the 1.6mm tungsten. Maybe this is beginner error I'm not sure. Also cup size, I had just been rocking my 8 gas lens that I use for stainless. I put the standard collet body back in with a 4 and seemed to be much better.

Nonetheless my results were much better than first attempt.

Image

Image

Image

Image

Image

Image

I tried welding some intercooler pipe to the thicker stuff at the end, I found that it was just making a mess with the 2.3mm tungsten so I had to use the smaller 1.6mm. Its a bit messy, but its a start.. (it looks dirty cause of my first weld practice lol but it was clean I gave it a good go over with acetone first)

Image
musccoo
  • Posts:
  • Joined:
    Mon Feb 12, 2018 4:54 am
  • Location:
    New Zealand

Been doing some more practice, stuff for a friend. Gave the old cast a go, not the cleanest on the sump, but doesn't leak so I guess it worked? haha

Using 2% lanthanated 2.3mm for everything

Image
Image
Image
Image
Image
Image
Image
cj737
  • Posts:
  • Joined:
    Thu Sep 29, 2016 8:59 am

Looks much better. With respect, that extension on the turbo, you may find it will crack during operation due to the heat shrink/expansion. One method to avoid that is to bevel both pieces to a fine point so you can get 100% penetration without intruding on the ID.

Also, flow argon over the weld after you weld to aide in cooling the ally and preventing contamination from entering the weld while its hot. You may need to make 2 passes depending upon the thickness of the tubing, and if so, stagger your start/stop to avoid aligning the weld ends.
musccoo
  • Posts:
  • Joined:
    Mon Feb 12, 2018 4:54 am
  • Location:
    New Zealand

cj737 wrote:you may find it will crack during operation due to the heat shrink/expansion
Ah yeah, I was hoping cause it doesn't have any stress (weight - only a filter) on it, it might be ok so I didn't bother bevelling it out ( I def thought it about it), but what you say about heat is a good point.

It it breaks I'll do it again with a bevel :)

Thanks for the tips appreciate it
Darrin
  • Posts:
  • Joined:
    Sat Mar 31, 2018 1:10 am
  • Location:
    Australia

musccoo wrote:
cj737 wrote:you may find it will crack during operation due to the heat shrink/expansion
Ah yeah, I was hoping cause it doesn't have any stress (weight - only a filter) on it, it might be ok so I didn't bother bevelling it out ( I def thought it about it), but what you say about heat is a good point.

It it breaks I'll do it again with a bevel :)

Thanks for the tips appreciate it
That,or heat treat it depending on the base material, small enough to fit in an oven. Easy enough to find the temps required and times for different alloys.......just do it when the missus is away....!!!!
Esseti AC/DC 200
Uni mig mini mig 180
Rossi ct 416 plasma
Post Reply