Tig welding tips, questions, equipment, applications, instructions, techniques, tig welding machines, troubleshooting tig welding process

Ive been working on running beads on plate and getting better but still have a ways to go. For a change of pace tonight I tried a filet, well let's just say that when I got done Fido got a talking to. Any advice.
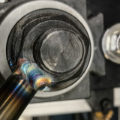
- Attachments
-
- image1.jpeg (55.2 KiB) Viewed 622 times


Hold a tight arc.
Disclaimer: I am still a beginner. It's easier said than done when starting out. You will get the hang of it. Don't worry about dipping when you start out. Practice without filler as well. Also practice on 16ga if you can get some. It really helps practice minimal heat input into a weld.
For a fillet type joint (Tee, Lap, Inside corner, etc), you really need to learn to focus the heat input into the piece of material that can conduct heat away from the electrode more evenly. For example, the edge of a piece of material wants to blow away right? It's because the heat has nowhere to go on one side. In the middle of a piece of material it welds much cleaner right? The heat can move away in both directions.
Once you figure out how to get your electrode in the joint the way that is comfortable for you, hold a tight arc, and use the heat distribution to your advantage. You will have a light bulb moment don't worry.
LAst thing: In the picture, it looks like you're focusing on the top piece. I can't really tell if that is a tee joint or an inside corner fillet, but try getting in in closer to the root and aiming for the bottom piece a little more. You can fill the crater with filler and it will prevent undercut on the piece coming down vertically.
Also, it would help if you post your settings, material type, filler diameter etc.
- tungstendipper
-
Weldmonger

-
Posts:
-
Joined:Sun Nov 19, 2017 10:09 am
Is that steel?
Lincoln MP 210, Lincoln Square Wave 200,
Everlast 210 EXT
Thermal Dynamics 25 Plasma cutter
" Anything that carries your livelihood wants to be welded so that Thor can’t break it."
CJ737
Everlast 210 EXT
Thermal Dynamics 25 Plasma cutter
" Anything that carries your livelihood wants to be welded so that Thor can’t break it."
CJ737
It would be helpful to know what your torch setup is, filler size, and material dimensions.
The beads look like you are welding hot enough. The inconsistency of the weld in the fillet looks to be mostly down to technique, and possibly using too large a filler wire with too small a cup.
Your arc length needs to be tight enough to control the puddle, but the heat needs to hit both sides of the T joint. Or you will need to move the torch top-to-bottom to get full fusion. Adding filler on the vertical piece helps insure you have ample puddle and no undercut, since the heat below will drag the filler down and into the joint.
Probably easier to start with a "lay wire" technique on this joint. Establish the puddle, and keep the filler in the puddle at the leading edge. You just keep pressure on the wire to keep it melting, move the torch forward over the filler. Eliminates dabbing into the puddle and getting inconsistent beads. Your ripples will be much tighter with this technique.
You can then focus on torch angle and movement. Get those skills down first, then move along farther to extend the puddle. Then go to the dab method. These beads certainly aren't bad for a new welder! Better results come with more practice
I was in a hurry last night when I posted and forgot my setup. Here it is 3/32 2% lanthinated, 15CFH, 3/32 ER70-2 filler, #6 alumina cup, Running max 135 amps with pedal, floor boarded most of the time but backed off a little when it looked like getting away from me, then back to full on. Machine is Everlast 255EXT. Material is 3/16 hot roll cleaned with flap disc and wiped with acetone. Right to left was first bead, started out strait holding electrode in the bottom of the V, then started weave ing a little. I noticed I didn't get filler high enough on vertical piece and got some undercut scalloped places where I was weaving. I'll try a bigger cup and the lay wire tip tonight and post up later. Thanks for the help.
Return to “Tig Welding - Tig Welding Aluminum - Tig Welding Techniques - Aluminum Tig Welding”
Jump to
- Introductions & How to Use the Forum
- ↳ Welcome!
- ↳ Member Introductions
- ↳ How to Use the Forum
- ↳ Moderator Applications
- Welding Discussion
- ↳ Metal Cutting
- ↳ Tig Welding - Tig Welding Aluminum - Tig Welding Techniques - Aluminum Tig Welding
- ↳ Mig and Flux Core - gas metal arc welding & flux cored arc welding
- ↳ Stick Welding/Arc Welding - Shielded Metal Arc Welding
- ↳ Welding Forum General Shop Talk
- ↳ Welding Certification - Stick/Arc Welding, Tig Welding, Mig Welding Certification tests - Welding Tests of all kinds
- ↳ Welding Projects - Welding project Ideas - Welding project plans
- ↳ Product Reviews
- ↳ Fuel Gas Heating
- Welding Tips & Tricks
- ↳ Video Discussion
- ↳ Wish List
- Announcements & Feedback
- ↳ Forum News
- ↳ Suggestions, Feedback and Support
- Welding Marketplace
- ↳ Welding Jobs - Industrial Welding Jobs - Pipe Welding Jobs - Tig Welding Jobs
- ↳ Classifieds - Buy, Sell, Trade Used Welding Equipment
- Welding Resources
- ↳ Tradeshows, Seminars and Events
- ↳ The Welding Library
- ↳ Education Opportunities